Smoked Almond Crackers

I’ve been on a bit of a binge lately, and have probably eaten my weight in hickory smoked almonds in the last month or two. My obsession shows no sign of stopping. This is actually good news for you, because it inspired me to use part of my stash to create very tasty crackers that pair beautifully with salmon dip. And Chardonnay.

I hate to appear wishy-washy by giving you a lot of options and alternatives, but some people will click out of a recipe if it says something scary like “roll the dough”. I get it – rolling dough can be messy and time consuming. I’m going to give you an alternative to that. Personally, I love rolling out dough. It may be the only exercise I have in a day!

First, the basic method:

To make flat crackers, the dough is rolled out and then cut into any shapes that float your boat. But you can also flip a mini-muffin pan over and drape circles of dough over the . . . bottom of the pan to create crunchy little cups.These are genius, because they hold more dip.

Whether you make flat crackers or cups, you’ll need to get the dough very thin – no more than 1/8-inch thick. Thinner is even better. Don’t worry, it’s easy dough to work with. The simplest way to make the flat crackers is by rolling the dough directly onto a baking sheet. You don’t need to separate the crackers – just cut them with a pastry (or pizza) cutter and bake.Or you can use cookie cutters for cute shapes, cutting them directly on the pan or by rolling your dough on a floured surface (removing the scraps for re-rolling).

From left to right – thick to thin. The thick cups were 1/8-inch, the ones on the right were probably 1/16-inch.

Once the crackers or cups are baked and the oven’s turned off, any crackers that aren’t completely hard (which would be those on the thicker side of the scale) get returned to the warm oven to dry out for 30-40 minutes. This ensures a crispy, crunchy, sturdy cracker that will store well.

For you rollingpinphobes, I had an idea that worked very well. Do you have a tortilla press? Love mine, and it wasn’t very expensive at all. Just plop a ball of dough between pieces of parchment and press down gently. Don’t press all the way or you’ll end up with a VERY thin piece of dough that will tear easily. I can cut three 2 1/2-inch circles  at a time this way, and the thickness is consistent. 

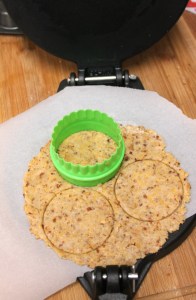
When I first tried making these, I assumed that the salt content of the almonds and the cheese would be enough, so I didn’t add any salt. But crackers need to be salty in my opinion, and they just didn’t quite cut it, so I added a small amount of salt to the second batch and found them to be perfect. If you’re a real salt lover, sprinkle a little on the top of the crackers before baking.

No, I don’t get a kickback for this. I just love this stuff and want to share!

I used this Sweet Onion Sugar on one batch because I crave the whole sweet/salty/savory experience, and it was a big hit. My bottle was a gift from a friend, purchased from an amazing store in Montana called The Copper Moose . . . one of those places that could make a foodie run rampant, scooping up things they never even knew existed. Danger, danger, danger.

This recipe will yield approximately 4 dozen dip cups or 2-inch square crackers.

Smoked Almond Crackers
Print
Author:
Makes 48
Ingredients
  • 1 cup hickory smoked almonds
  • 1 cup grated extra-sharp cheddar cheese
  • 1 cup all-purpose flour
  • 1 teaspoon baking powder
  • ½ teaspoon baking soda
  • ⅛ teaspoon salt
  • ¼ teaspoon garlic powder
  • 1 tablespoon brown sugar
  • ¼ cup oil
  • ⅓ cup buttermilk
  • 1 teaspoon Worcestershire sauce
Instructions
  1. Heat oven to 425 F.
  2. For flat crackers you will need a large, flat baking sheet. For cracker cups, you will need a mini-muffin pan. If your muffin pan isn't non-stick, you will also need small paper liners.
  3. Chop the almonds very fine. To save time, you can us a blender or food processor, using short pulses to avoid turning it into paste.
  4. In a large bowl, combine almonds, cheese, flour, baking powder, baking soda, salt, garlic powder, and brown sugar. Mix well.
  5. Add oil, buttermilk, and Worcestershire sauce. Use a heavy spoon or your hand to thoroughly combine. You should be able to form the mixture into a ball with your hands.
  6. FOR FLAT CRACKERS: Roll directly onto ungreased baking sheet. Lightly flour rolling pin and the top of the dough and roll very thin, no more than ⅛-inch. Use a pastry (or pizza) cutter to cut into squares or diamonds. You don't need to separate them. Alternatively, you can use cookie cutters. Lift the scraps between the shapes and save for re-rolling. Sprinkle with salt if desired and bake 7 minutes, or until crackers are rich golden brown. Remove from oven and place baking sheet on rack to cool. Repeat with remaining dough. Once all crackers are baked, check to see if crackers are dry and crunchy. If not, turn oven off and open the door for 30 seconds. Return crackers to warm oven for 30-40 minutes to dry out.
  7. FOR CRACKER CUPS: Turn mini-muffin pan upside down. Lightly grease non-stick pans, or cover each metal cup with a paper liner if your pan isn't non-stick. Roll out dough on floured surface, or press balls of dough between pieces of parchment in a tortilla press. Dough should be no thicker than ⅛-inch. Thinner is better! Cut circles that are 2½ inches and drape the dough circles over each cup, shaping gently. If any holes or tears appear, patch them with a pinch of dough. Bake 7 minutes, or until rich golden brown. Move pan to cooling rack and allow cups to cool for at least 5 minutes before lifting each one carefully from the pan. Remove paper liners if you're using them. Once all the cups are baked check to see if cups are dry and crunchy. If not, turn off oven and open door for 30 seconds. Place cups on a baking sheet and return to warm oven for 30-40 minutes to dry out.

Chop the almonds (no big pieces!) or use a blender or food processor.

For flat crackers, roll the dough right on the baking sheet. Cut with pastry or pizza cutter or cookie cutters.

For dip cups, loosely shape dough on the upside-down mini-muffin pan and bake.

There – I posted something that wasn’t sweet for a change. Now on to Mother’s day creations, and I’m pretty sure I’ll be pulling out all the stops.

Lorinda


Deviled Cookies

If you’ve been following my blog, you might remember the Deviled Cakes I made a few years ago. They’re still one of my very favorite creations, but unfortunately the egg shaped baking pan is impossible to find now. So I decided to try the same idea with easy shortbread cookie dough.

Finding plastic eggs that open horizontally wasn’t that easy either, but they’re out there!

It wasn’t quite as I envisioned. I had hoped the shortbread dough would be strong enough to hold its shape in the oven with a hole in the middle for jam or ganache.

It wasn’t.

However, I filled that hole with a solid chocolate egg and baked it flat-side down, and—voilà! The chocolate egg supported the cookie dough and added a fun surprise center. Sweet!

A little white chocolate was spread smoothly on the cookie and topped with yolk-colored buttercream and red sugar sprinkles.

I’m getting this post in just under the wire, with two days until Easter. It was sort of an impromptu decision, which translates into: “I didn’t feel like cleaning house today”. This was much more important, right? If you don’t have time to make them this Easter, they’d be cute for a spring tea or luncheon, too.

Deviled Cookies
Print
Author:
Makes 24
Ingredients
  • COOKIES:
  • 1 cup (2 sticks) butter, softened
  • 1 cup powdered sugar
  • 1 egg yolk
  • 1 teaspoon milk
  • 2 cups flour
  • ¼ teaspoon salt (if using unsalted butter, increase to ½ teaspoon)
  • ½ cup cornstarch
  • 24 small solid chocolate eggs
  • BUTTERCREAM ICING:
  • ½ cup butter, softened
  • 3½ cups powdered sugar
  • ¼ cup heavy cream
  • ½ teaspoon vanilla
  • food coloring
  • *****
  • You will also need:
  • Plastic eggs that open horizontally
  • White chocolate candy melts - about 1 cup
  • Red sugar
Instructions
  1. COOKIES:
  2. In a large bowl, combine butter and powdered sugar. Beat until light and fluffy.
  3. Add egg yolk and milk, and blend well. (If using a stand mixer, you may want to switch to the dough hook at this point.)
  4. Add the flour, salt, and cornstarch and mix until it turns into a smooth, stiff dough. At first it will seem very crumbly, but it should come together. If it doesn't, add a little milk, a few drops at a time.
  5. Chill dough for 1 hour.
  6. Heat oven to 350 F. Cover baking sheet with silpat or parchment.
  7. Lightly grease or spray the inside of one egg half and dip in flour. (The grease will help the flour stick.)
  8. Press chilled dough firmly into egg, level with the top.
  9. Press one unwrapped chocolate egg into widest half of the egg as deep as possible. Using your hand or a knife, level the dough in the egg. It's okay if a little chocolate is showing.
  10. Squeeze the sides and ends gently to release the egg flat side down onto prepared baking sheet. Repeat, placing eggs at least 1 inch apart.
  11. Bake 14-15 minutes, or until the flat side is beginning to turn light golden brown. Allow to cool on the baking sheet on a rack. (If you need to use the pan for the remaining eggs, slide silpat or parchment onto the rack.)
  12. Once eggs are cool, melt white chocolate in the microwave at 15 second increments, stirring often, or in a small pan on lowest heat. Use a knife or offset spatula to spread melted chocolate smoothly on each egg. Run your finger around the top edge for a clean look.
  13. Make buttercream: Beat soft butter until creamy. Slowly add powdered sugar (and a little of the cream if it's too thick to mix), beating well. Add vanilla and remaining cream and beat well until fluffy. Add food coloring. I used mostly yellow, with just a tiny amount of green and orange to achieve an egg yolk color.
  14. Pipe buttercream onto each cookie and sprinkle with red sugar.

Solid chocolate egg ready to be pressed firmly into the dough.

Lay flat to bake. (I used a Silpat, but parchment works too.)

Baked. I flipped them over so you can see their underbellies.

Spread melted white chocolate on the flat side.

Sigh. I didn’t get a photo of piping the buttercream. You’ve got this, right?


Happy Easter, everyone.

Lorinda

Honey Bee Spice Cake

This pretty spring confection is a five layer honey spice cake filled with whipped buttercream icing and topped with a layer of marshmallow honey fondant. A cute little beehive is made from leftover cake pieces (removed because I just had to make the cake a hexagon to go with the honeycomb theme) and placed on the top amid icing flowers and leaves and a jellybean honey bee or two.

You’re looking at a lot of time, labor, and ingredients. The butter! Omygosh, the powdered sugar! If this has you shaking your head, don’t stop reading. I’ll give you time-saving options.

The picture doesn’t do it justice; this is a huge cake. I used 10-inch square pans, which hold roughly twice what a standard 9-inch round pan holds. Even after cutting my cake into a hexagon shape, it weighed a ton. Trust me, it’s a thing of beauty, but be prepared to make a lot of icing! (And by this I mean . . . buy extra butter and powdered sugar. Depending on how generous you are, or how many flowers you want to make, you may need another batch.)

Right off the bat I’m going to go into my usual disclaimer: I’m a little bit nutty when it comes to playing with my food. I’m also retired and have a whole lot of free time. If you don’t want to go all the way with this project, here are some ideas for cutting corners:

  • In the first place, don’t cut corners! I made a hexagon to resemble honeycomb. You can stick to a round or square cake.
  • Cut the recipe in half and use three 9-inch round pans. (If you only have two pans, use approximately 2 1/2 cups of batter in each of your available pans and bake the cakes. (They won’t take as long to bake, so start checking at 30 minutes.) When they’re done, re-use one of the cake pans with the remaining batter. It will be fine waiting there on the counter for its turn. Don’t try to divide them – just level the tops and go with three thicker layers.
  • If you choose not to go with a hexagon shape, you won’t have leftover cake for the beehive. Use a big round pastry tip and pipe a buttercream beehive in the middle. Or just decorate with flowers and bees.
  • Easier yet? Make cupcakes. The fondant can still be rolled out and pressed with bubble wrap for the design, then cut into squares and draped over the cupcakes. An icing beehive on each would look really cute.
  • Speaking of fondant, you could save time by buying it (in the cake decorating aisle of large stores), but it sure won’t taste as good. Lots of people just peel it off anyhow, so it’s up to you.
  • Flowers are a lot of fun to create, but they can also be very time consuming. You can buy pre-made decorator flowers, use edible fresh flowers, or even buy wafer paper edible flowers online. (Just type “edible wafer flowers” into your search engine.) See what wafer paper pansies look like here on my Brownies for a Crowd post.
  • Don’t forget that you can spread this out a bit, too. Make the cakes ahead. Wrap them well and freeze them, or let them chill in the fridge for a day or two. If you’re making flowers, do that ahead of time, piping them onto pieces of waxed paper and freezing them. The bees can be made way ahead. They don’t need any special treatment – just put them up high where they aren’t a temptation to little ones, so they don’t “fly away”.


TO MAKE BEES,  use jelly beans – a yellow one for the body and thin slices of either yellow or white for the wings. I used a Wilton edible ink marker for the eyes and stripes, but found that some jellybeans really resisted the color. A little dark chocolate and a very small piping tip might be easier for you. I stuck a pin in the poor bee’s bum for easy handling, and then when he was finished, pulled out the pin and put a tiny strip of black licorice in the hole for a stinger. I melted a little white chocolate in a small dish to use as glue and attached two thin slices to the sides for wings. You will need to hold them in place for a few seconds to let the white chocolate dry.

My little bee factory

The following recipe is for the LARGE spice cake. It’s easy to cut in half if you prefer to go that route. Yes, yes, I know – the recipe goes on and on and on. That’s because it is for the fondant, the cake, and the icing!

Honey Bee Spice Cake
Print
Author:
This will make a huge cake, using three 10-inch square cake pans. You can also divide the recipe in half and use three 9-inch round pans instead. Make the fondant the day before and leave (covered) on the counter until ready to use.
Ingredients
  • FONDANT (for best results, make the day before):
  • 14 ounces marshmallow creme (also called "fluff")
  • 2 tablespoons honey
  • 1 teaspoon vanilla extract
  • yellow and orange food coloring, and a small amount of cocoa powder to achieve honey color
  • 2 pounds powdered sugar
  • CAKE:
  • 1 cup cooking oil (peanut, canola, anything light colored)
  • 1 cup butter, room temperature
  • 2 cups sugar
  • 1 cup honey
  • 1 tablespoon vanilla
  • Juice and zest of one large lemon (about 3 tablespoons juice)
  • 12 eggs, separated
  • 3 cups cake flour
  • 2 cups all purpose flour
  • 2 teaspoons baking soda
  • 2 teaspoons baking powder
  • 1 teaspoon salt
  • 2 tablespoons cinnamon
  • 1 teaspoon nutmeg
  • ½ teaspoon allspice
  • ½ teaspoon ginger
  • ½ teaspoon ground cloves
  • ½ teaspoon cardamom (optional)
  • 1½ cup buttermilk
  • 1 cup milk
  • WHIPPED BUTTERCREAM ICING:
  • 1 pound (4 sticks) butter, room temperature
  • 1 cup shortening
  • 3 pounds powdered sugar
  • 1 teaspoon vanilla (clear vanilla for a lighter color)
  • 1 teaspoon banana flavoring (optional - substitute lemon or extra vanilla if preferred)
  • ⅔ cup heavy cream
  • assorted food coloring
  • Small bubble wrap
  • Decorations: flowers, bees (you can find these pre-made in some cake decorating departments, or make them from jelly beans), leaves, sprinkles
Instructions
  1. FONDANT: In a large bowl, combine the marshmallow cream, honey, and vanilla extract. Add food coloring one drop at a time, and a little cocoa powder, until it is the color of honey. Stir in as much of the powdered sugar as you can.
  2. Lightly coat your work surface with shortening and sprinkle generously with powdered sugar. Using greased hands, knead the remaining powdered sugar into the fondant. This may take 10-15 minutes. When finished, the fondant should be fairly stiff and should not stick to your hands. (If it's still sticky, use a little more powdered sugar.) Cover with a bowl on the counter or place in a plastic storage bag. Leave out on the counter until ready to use.
  3. CAKE: Heat oven to 350 F. Grease and flour (or use an oil/flour spray like Baker's Joy) 3 10-inch square cake pans. (If you don't have 3 pans, bake the cakes in shifts.) Place parchment in the bottom of each pan.
  4. In a large bowl combine oil, butter, sugar, and honey. Beat for 2 minutes.
  5. Add vanilla, lemon juice, and lemon zest and beat until combined.
  6. Add egg yolks, one at a time, beating well between each addition. Scrape the sides of the bowl frequently.
  7. In a large bowl or pan, sift together the flours, baking soda, baking powder, salt, and spices.
  8. In a small bowl or measuring cup, combine the buttermilk and milk.
  9. Beginning with the dry ingredients and ending with the liquid, add ⅓ of each at a time, mixing each time just until incorporated. So . . . ⅓ of the flour mixture, mix. ⅓ of the liquid, mix, repeat until all is combined.
  10. In a large bowl, beat egg whites until stiff peaks begin to form. Fold gently into the cake batter.
  11. I filled two of the pans a little over half full - about 7 cups of batter in each - (these will each be divided into two layers once cooled) and filled the third pan less than half full - about 4 cups of batter. The third cake will be thinner, and won't be divided - just use it as the top layer.
  12. Bake for approximately 40 minutes (a little less for the thinner cake), or until a toothpick comes out clean when inserted in the middle of the cake. Ovens vary - if you see that the cake is browning and pulling slightly away from the sides of the pan, give it the toothpick check!
  13. Allow the cakes to cool in the pan on a rack for 10 minutes, then carefully turn them out.
  14. For easiest handling, I really recommend you chill the cakes thoroughly before cutting layers or trimming.
  15. I made a cardboard template of a hexagon and used it to cut the cake before layering it. Save the trimmings in a covered bowl for later if you plan on making a beehive for the top.
  16. Divide each of the two larger cakes into two equal layers. Leave the thin cake as is. A little dome won't hurt with this cake, because the fondant will be draping over it, but you can level it if you'd like.
  17. ICING: In a large bowl, beat the butter well. Add the shortening and beat until thoroughly combined. Beat in the vanilla and banana flavoring. Add powdered sugar slowly. If mixture gets too thick to beat, drizzle in a little of the cream. Scrape sides often, and beat until completely combined.
  18. Slowly add cream, beating at high speed until icing is thick but spreadable. If it is too thick, add a little more cream. If it is too thin, add a little more powdered sugar.
  19. Spread icing between each layer, being careful to bring the icing all the way out to the edge. (Piping a "dam" around the edge is very helpful.)
  20. Cover the entire cake with a very thin coating of icing. This is a crumb coat, which will trap the crumbs and keep the cake looking nicer when you ice it.
  21. Chill for at least one hour, or pop the cake in the freezer for 20-30 minutes.
  22. Spread icing over entire cake. Don't worry too much about making it perfect. If you're using the fondant top, you'll only see the bottom part of the cake. Save about ¼ cup of icing if you are making a beehive for the top.
  23. DECORATE:
  24. Roll the fondant out on a greased surface generously sprinkled with powdered sugar. Roll just a little less than ¼ inch thick. Cut a rough circle at least 1 inch bigger all around than the top of the cake. Press entire circle with lightly floured bubble wrap to achieve a honeycomb effect. You can do this with a rolling pin, but I find that I have better control when pressing with my hand.
  25. Using both hands, lift the fondant up and quickly drape over cake. Fondant will stretch! Don't press onto sides of cake - let it hang. Use a pair of scissors to trim around the bottom of the fondant in a slightly uneven design or scallop, leaving the bottom inch or two of the cake showing.
  26. To make the beehive, combine cake scraps with just enough icing to make it hold together when you squeeze it. Form a beehive and drape with a thin piece of fondant. Use fingers to press smoothly. Press a little cocoa in the beehive entrance to give it some depth. Set on cake.
  27. Decorate with icing flowers, leaves, honey bees.

Mmmm. Marshmallow creme!

Grease those hands and knead it! Use as much powdered sugar as it will hold.

Fondant. Yes, it’s messy to make, but pretty tasty! Cover and let it rest.

Cool for 10 minutes, then turn out onto rack to cool completely.

Divide the two larger cakes as evenly as possible. Level the third (thinner) cake and use whole.

Layer with icing.

It’s crumb coated. Now chill!

Roll it out, almost 1/4-inch thick so it will show the bubble marks.

Press the bubble wrap firmly on fondant.

Ice the cake. Make it pretty around the bottom, but don’t worry too much about the top. It’ll be covered with fondant.

Lay the fondant over the cake. Use a scissors to trim it up so the bottom of the cake shows. I piped decorations around the bottom first. Don’t do this! It made it harder to shape the fondant.

Roughly shape the beehive out of cake scraps mixed with a little icing.

Lay fondant over hive and press gently to shape. Use thumb and a little cocoa powder in the bee entrance to give it some depth.

Decorate with icing leaves and flowers, or anything else that suits your fancy.

That’s it. Piece of cake, right? Hahaha, I know. I’m ducking right now.

Lorinda