I’m working my way through some caramel recipe ideas that have been keeping me awake at night, and it hasn’t been a hardship for me at all; I love caramel! I don’t think I’ve ever met a bowl of caramel corn that I didn’t like, and this is no exception. Of course, I also love candy corn. If you’re not a fan (and I know there are some of you out there) you can substitute something else that screams “Fall” to you. Maybe Reeses Pieces? M&Ms? Black licorice? (Haha, got you there. Black licorice would be gross. I think. Hmm.)
I like lots of nuts in my caramel corn, so I used a generous amount of peanuts. Any nuts would be good, though. They have a tendency to stay at the bottom of the pan, so do try to encourage them to mingle with the popcorn. Of course, if you remember what Cracker Jack was like, the peanuts (all two of them) were always at the bottom of the box. Rebels!
A drizzle of melted white, yellow, and orange candy melts added to the festive autumn theme. Go lightly with melted white chocolate; it can overwhelm the flavor of the caramel, and you wouldn’t want to do that!
I use little pastry bags and melt the white chocolate in a glass of hot water. No mess!
The recipe calls for 4 quarts of popcorn, which may sound like a lot, but believe me—it really isn’t. This stuff has a tendency to disappear before your very eyes, and it stores well in an airtight container. I used mushroom popcorn because I wanted the big, round, fluffy kernels.
Speaking of recipes, do you see how short this one is? That’s because this is EASY. And oh, so satisfying. Do it! Seriously, just do it!
10 each: white, yellow, and orange candy melts (optional)
Instructions
Grease a really large pot or bowl. (I use coconut oil.) Put popcorn and nuts in the pot and stir to combine. Set aside.
Lightly grease a 12x18x2" cake pan - or two 9x12" pans. Set aside.
Heat oven to 225 F.
In a large saucepan combine brown sugar, butter, honey, water, and salt over medium heat. Stir constantly until mixture comes to a boil. Drop heat to medium-low. Adjust as necessary to keep mixture gently boiling for 5 minutes without stirring. Remove from heat.
Stir in the vanilla and baking soda and pour over the popcorn and nuts. Stir well.
Scoop into the prepared baking pan(s) and place in the oven. Bake for 1 hour, stirring every 15 minutes.
Remove from oven and stir in the candy corn. Dump out onto a piece of parchment or foil and allow caramel corn to cool completely.
Melt each color of candy melt separately - either in small dishes in the microwave or by putting candy in small pastry bags or zip-type bags in a glass of hot water. (Don't let water touch the candy or it will seize up.) Drizzle over caramel corn. Let the drizzle harden before storing or serving.
The baking soda will foam up. Just give it a few good stirs and pour it over the popcorn and nuts.
Stir hot caramel into popcorn
Spread into greased pan and bake.
I got this in just under the wire because tomorrow is October and I’m moving on . . . to maple. No pumpkin spice here, folks. We’re going for Maple Madness!
Celebrate fall with these luscious cupcakes filled with caramel, pecan, and cream cheese. Adding a drizzle of caramel and an elegant caramel rose will create a perfect dessert for the upcoming holidays.
The cupcakes are delicious, but let’s not pretend that they’re the focus here. It’s the rose. It’s all about the rose!
Believe it or not, the roses are very simple to make. All you’ll need is a bag of caramels, a sturdy rolling pin, a small round cutter, and parchment paper. I was blown away by how easy it was to work with caramels. They aren’t sticky, they don’t dry out when you’re playing with them, and they stretch and curl obligingly when you want them to. They stay pliable and . . . well . . . edible, unlike gum paste or candy clay.
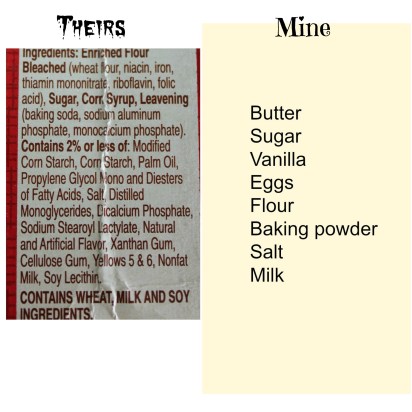
And the cake itself is very basic. If your inclination is to reach for a boxed mix, I understand. But if you’d like to try your hand at making a cake from scratch, this would be the recipe to use. You’d have to add eggs, butter, and water to the mix; why not add just a few more ingredients, make the cake from scratch, and avoid the additives that are in packaged mixes?
Compare!
I think the hardest thing about this recipe is unwrapping the caramels, but if I can do it YOU can do it! Speaking of caramels, do you remember when Kraft had chocolate caramels, too? They’re back. Hard to find, but I just ordered some online. I’ll bet they’d make lovely roses too.
An 11-ounce bag will give you about 40 caramels. You’ll use 22 for the roses, and the remaining 18 for the filling. (Good grief, don’t sweat it if you’re short a caramel or two. You have to check to make sure they’re fresh, right?)
So, you’ll start out with the filling, then make the cake batter. You can create the roses while the cupcakes are baking, and make the frosting once they have cooled. And you know the drill: boxed cake, canned frosting, leave out the filling . . . anything goes. Simple chocolate cupcakes with fudge icing would look great with the roses too. Just make sure you make the roses!
½ cup chopped pecans (toasted for the best flavor)
CAKE:
6 tablespoons butter, softened
1 cup white sugar
1 teaspoon vanilla
2 eggs, room temperature
1½ cups cake flour (all-purpose flour may be substituted)
1½ teaspoons baking powder
¼ teaspoon salt
1 cup milk
Buttercream icing (or icing of your choice)
Instructions
In a small saucepan on low heat, melt the caramels and cream, stirring often. Set aside to cool.
In a small bowl, beat the cream cheese and brown sugar thoroughly. Add egg yolk and beat well.
Once the caramel is lukewarm but still fluid, add to cream cheese mixture. Beat well. Stir in chopped pecans. Set aside.
Heat oven to 350 F. Place 18 paper liners in cupcake pans.
In a large bowl, beat the butter and sugar until light and fluffy - at least 2 minutes.
Mix in vanilla. Add eggs one at a time, mixing thoroughly and scraping the sides of the bowl between each egg.
Sift together the flour, baking powder, and salt.
Add half of the flour mixture the butter mixture. Beat well and scrape down the sides of the bowl. Add half of the milk. Beat well and scrape down the sides of the bowl. Repeat.
Fill cupcake liners halfway. Don't add too much; you need to leave room for filling. If you have extra batter, make another cupcake or two.
Using a tablespoon, place a scant spoonful of filling in each cup, using the spoon to make a small depression in the batter before scooping the filling into the center. The filling will still show on top, but this will help some of it to sink into the cupcake.
Bake for approximately 24 minutes, until golden brown around the edges. Test with a toothpick, making sure to insert on the side of the cupcake, away from the gooey center.
I’m going to cut right to the caramel rose directions.
Use a large piping tip, or a cap from a bottle of water or a milk carton—whatever you can find that’s round and approximately 1 inch across—to cut out the caramel circles.
I found that working with one caramel at a time is easiest. Place it between sheets of parchment and roll out thin. You should be able to cut 4 circles out of it with a reasonable amount of leftover scraps. (Pile them up and roll them out later.)
In the picture below, the pieces of caramel in the background are round. That’s because I put each one in a tortilla press. It made it a little easier to roll out that way but isn’t necessary at all. And I’m still scratching my head about the fact that I put a square caramel in the press (between sheets of parchment) and it flattened the caramel into a perfect circle. WTH?
Cut one circle at a time and pop it out of the cutter. If you let them stack up in there, they’re a real bear to separate. I know this for a fact! This would be a fun activity for kids to do and allow you to go right to the fun part of forming roses. It takes 9 rounds to make a rose.
Set your finished roses on the counter (uncovered) or in a mini-tart pan for a little more support. If the rose flattens, just fluff it back out.
Cut out 1-inch circles. (The rounds in the background still need to be rolled out.)
Roll one circle to make the center. Overlap 3 petals around the center. Overlap 5 petals for the outside layer, pulling edges thin and curling down if desired. Petals can be shaped and enlarged before wrapping or after, whichever is easiest. (If you want to have enough caramel for a few leaves, you can cut some of that stem off and add it to the scraps.)
They’re your roses; make them 7 petals instead of 9 if you want. Play with the shapes of the petals. Make some big ones, some small. Play with your food! If you have any leftover caramel, a few leaves make the cupcake even prettier.
Use your favorite icing. I made a basic buttercream for this batch.
I had so much fun making these, and I’ll bet you will too. The roses would be perfect on individual brownies. Or chocolate cookies. Or . . . well, I’ll leave something to your imagination.
If you grow zucchini or know anyone who does, chances are you have a few hanging around in your fridge, or you stashed bags of grated zucchini in your freezer. Or maybe you’ll want to put your coat on and run to the store right now because this is now my official, absolute, no-holds-barred favorite zucchini recipe!
Granted, the flaky pastry might have something to do with my passion for these little puffs (you could probably fill them with cat food and I’d still love them), but the cheesy zucchini filling was so savory and delectable that I was hooked with one bite.
I considered adding ham, onions, olives, or chopped chicken breast—all of which I think would be delicious, but in this case, I wanted to appreciate the pastries in their simplest form. And I appreciated them a lot. A whole lot.
Rough puff pastry is so easy. It really is! It takes a little time because you chill it several times between the rolling/folding action, but making the dough is simple. You dump flour and salt on a work surface, chop cold butter into it, fold in cold water, and then roll and fold . . . many times. See? Easy and fun!
I make mine the day before because I think it has more flavor that way. Take it out of the fridge to soften 30 minutes before you plan to make the puffs.
Yes, yes, I’m using that potsticker press again. I’m getting a lot of mileage out of that little gadget. If you don’t have one, you can do it the old-fashioned way, with a fork.
And I do want to mention that a few of these will—in spite of your valiant efforts with egg white and potsticker press—ooze. What a horrid word. I tried to find a more appealing description but failed. It’s cheese; it oozes! But you know what? That crispy blob of cheese on the baking sheet is the best part as far as I’m concerned.
Makes 20-24 For best results, make the dough several hours before you plan to serve. The day before is even better!
Ingredients
PASTRY:
2 cups all-purpose flour
½ teaspoon salt (add ¼ t additional salt if using unsalted butter)
1 cup (2 sticks) COLD butter
⅔ cup very cold water
FILLING:
1 cup shredded zucchini, firmly packed (about 1 small zucchini)
1 tablespoon olive oil
½ cup shredded sharp cheddar cheese
¼ cup shredded fresh parmesan cheese
2 ounces cream cheese
2 ounces mozzarella (the soft, fresh kind if possible)
¼ teaspoon ground black pepper
¼ teaspoon garlic salt
¼ teaspoon herbs de Provence (or herbs of choice)
Pinch of onion powder
2 tablespoons breadcrumbs (I used Panko, but any kind will do.)
ASSEMBLY:
1 egg white beaten with 1 teaspoon water
Instructions
PASTRY:
Place flour on work surface. Mix in the salt.
Cut cold butter into small cubes - about ½ inch square. Chop into flour mixture using a long spatula, knife, or bench scraper. Don't overwork the mixture - you should see chunks of butter larger than a pea.
Drizzle cold water over flour and butter with one hand while tossing with a spatula in the other hand. Use the spatula to scrape the messy dough into a rectangle about 5" x 8", with the short edge facing you. Lightly flour the work surface as needed.
Using a rolling pin, press and gently roll until dough is approximately 7" x 10". It will be very crumbly. Don't panic, it will come together! Use a spatula or bench scraper to lift the bottom of the dough so that the bottom edge is two-thirds of the way up. Lift and fold the top down until the top edge is at the bottom. The dough has just been folded into three equal layers. Give it a turn to the left. Repeat three more times. By the last roll and fold, it should look like dough.
Wrap dough tightly in plastic wrap and refrigerate for 30 minutes.
Remove dough from refrigerator and repeat the roll/fold/fold/turn procedure three times. Return to refrigerator for 30 minutes.
Again, remove dough from refrigerator and repeat the roll/fold/fold/turn procedure three times. Return to refrigerator for at least 30 minutes, or up to 3 days. (If dough has been chilled for more than 1 hour, let it sit at room temperature for 30 minutes before making puffs.)
NOTE: While the dough is chilling you can make the filling and refrigerate it until needed.
FILLING:
Heat olive oil in a pan on medium-high heat. Add grated zucchini and cook, stirring frequently for 1 minute, or until softened. Remove from heat.
Add the cheeses. Stir well. If cheese isn't melted, you can heat it on low or simply knead the mixture together. Stir in the seasonings and breadcrumbs. Cover and refrigerate until needed.
ASSEMBLY:
Heat oven to 400 F. Cover two baking sheets with parchment
With the short end of the dough facing you, and the open edge of dough on the right (like a book), cut across the middle, creating two squares. Working with one at a time on a lightly floured surface, roll out dough to a long rectangle, 9" x 21".
Using a 4-inch cutter, cut 10 circles. Stack scraps flat in a pile and set aside. Place one circle at a time in potsticker press (or leave flat on work surface if using a fork to seal the puffs) and brush a little egg white around the edge. Put 2 level teaspoons of filling in the center and press firmly to close, or use a fork to seal.
Place at least 1 inch apart on baking sheet. Brush lightly with egg white (a paper towel dipped in the egg white works well) and poke the top of the puff once with a fork.
Repeat with remaining dough. Roll all of the scraps at once. Cut as many circles as possible and discard the remaining dough. (Or just pile loosely on the baking sheet and sprinkle with sugar before baking!)
Bake for about 12 minutes, or until puffs are a light golden brown. Move to a cooling rack. Best eaten warm.
Chop the butter into the flour. (That’s Irish butter – so yellow!!)
Drizzle with one hand and toss with the other.
Corral it into a rectangle and roll it out. I know it’s a mess; just keep rolling!
The first “fold”. Make an attempt to lift the bottom edge up two-thirds of the way.
And then fold the top down over the bottom to create three equal layers. Ugly shaggy layers. It’ll get better, I promise.
Repeat three times and you’ll end up with dough! See the small butter pockets? That’s okay. They’ll blend in eventually. Chill for 30 minutes, then repeat and repeat. The rolling and folding just take a few quick minutes.
Grate the zucchini
Saute briefly in olive oil
Add the cheese.
Add breadcrumbs and seasoning. Stir.
Work with half at a time.
Roll out thin and cut 4-inch circles
Brush edge of rounds with egg white and put filling in the center. Press firmly, using a potsticker press. (Or you can fold it and use a fork.)
Brush with egg white and poke a fork in the top, then bake
Scraps should be stacked flat and rolled all at once. (One time only.)
I used lots of pictures and probably too many words; making these melt-in-your-mouth treasures is a lot easier than it appears. Remember that if you’re making these for a party or guests, the dough can be made several days ahead of time, making the assembly go very quickly.
I may be adding a couple more zucchini plants to my garden next year. You might want to grow a few too!