Lemon and Violet Tea Cakes

For Mothers Day, May Day, or a spring tea, these sweet little tea cakes will steal the show! So easy to make (and to eat), you may find yourself trying out all the different variations you can think of. Try adding: lime zest, chopped nuts, colored sprinkles, or culinary lavender. Skip the coconut if it isn’t to your liking, and just add a cup or so of nuts.

You almost certainly have eaten similar cookies during the holidays; they’re a classic, known as Russian Tea Cakes, Mexican Wedding Cakes, and a variety of other names. Buttery, melt-in-your-mouth tender, and minimally sweet (if you don’t count the powdered sugar they are usually rolled in), they are one of my favorite cookies on the Christmas platter. I just traded coconut for the nuts. Oh, and added lemon. And violets.

Coconut was something that just seemed to go with the lemon and violet theme. I’m not a huge fan, but I chopped it up into tiny pieces (no long stringy stuff for me) and found it delightful.

IMPORTANT: Violets (violas) are edible. Pansies, too. Both are perfect for this application. But beware; African Violets are NOT edible. Nope. Steer clear! When in doubt, do your research. I bought seeds for edible violets last year and had more flowers than I could use. They made it through our cold winter (zone 5) and are blooming like crazy again this year. Try that. Or you can order fresh violas online (if you’re Daddy Warbucks). I understand that some grocery stores offer them in season. Not where I live! One more option is candied violets. They aren’t as pretty as fresh, but still nice.

Lemon and Violet Tea Cakes
Print
Author:
Makes 24
Ingredients
  • 1 cup butter, room temperature
  • ¾ cup powdered sugar
  • 1 tablespoon fresh lemon juice
  • 1 tablespoon grated lemon zest (I needed 3 large lemons for this)
  • ¼ teaspoon lemon extract (or ½ teaspoon vanilla)
  • ½ cup coconut, chopped fine
  • 2 cups all-purpose flour
  • GLAZE
  • 1 cup powdered sugar
  • 2 tablespoons water or lemon juice
  • 1 teaspoon meringue powder (optional)
  • 24 fresh violets, stems trimmed off as close to flowers as possible.
Instructions
  1. Heat oven to 300 F. Cover two baking sheets with parchment.
  2. COOKIES: In a large bowl, beat the butter and powdered sugar until creamy.
  3. Add lemon juice, zest, extract, and coconut. Beat well.
  4. Add flour and beat just until combined. (Mixture will look crumbly.)
  5. Use a rounded tablespoon of dough for each cookie (a cookie scoop works well) and roll into balls, taking care to make them smooth and round. Space at least 1 inch apart on prepared baking sheet.
  6. Bake for about 20 minutes, or until the bottoms are golden brown.
  7. GLAZE: In a small bowl, whisk together the powdered sugar, water (or lemon juice) and meringue powder. Mixture should be fairly thin, easily pouring off a spoon.
  8. Dip the top of each cookie in the glaze and allow it to drip before turning it right side up on a piece of parchment. Immediately place a violet on top, pressing down lightly to flatten. Allow cookies to dry for at least 15 minutes, then add a little more water to the small amount of glaze left in the bowl and paint it gently over each flower. Let cookies dry thoroughly before storing.

Add lemon, zest, extract, and coconut to creamed butter and sugar mixture

Don’t over mix. It’s okay if it looks crumbly. It will come together when you scoop.

Make round balls and place cookies at least 1 inch apart

I use meringue powder for a firmer glaze, but you can skip it if you don’t have any.

Dip into glaze and place flower on icing immediately

Thin the glaze a bit and paint a layer over flowers, then let dry.

Wishing you the joy of sunshine, flowers, and sweet things!

Lorinda

Patriotic Meringue Puffs

Well, these are addictive little devils! Sweet little sugar puffs that melt in your mouth, all dressed up for the Fourth of July. Trust me, you won’t be able to stop at one.

I did something out of character and took the easy route with these treats. I’ve made meringues many times using egg whites, but I tried using Wilton’s meringue powder and it worked beautifully.

If you’re fresh out of meringue powder, I’d advise a trip to the store – pronto. And get some superfine sugar while you’re there. You don’t HAVE to use it, but it dissolves into the liquid a lot faster and I highly recommend it. Here’s what you’ll need:

  • Meringue Powder
  • Superfine sugar (aka: Baker’s sugar)
  • large pastry bag
  • large star tip
  • red and blue paste food coloring (or gel, if it’s thick)
  • Two paintbrushes
  • Parchment

I tried using my gel coloring but it didn’t stick to the bag at all. Maybe because it’s “squeezable” gel, so it’s thinner. Paste coloring worked fine.

This is seriously so easy. The hardest thing you’ll have to do is get the stripes of color inside the pastry bag. I’ll give you some pointers, but the important thing to remember is that even if your stripes are wonky, the meringues will still look great.

Patriotic Meringue Puffs
Print
Author:
Makes about 30 meringues (1½ inch) or hundreds of little bitty ones.
Ingredients
  • ¼ cup water
  • 1 tablespoon meringue powder (I use Wiltons)
  • ½ cup superfine sugar
  • a few drops of flavoring if desired (use clear colors: lemon, peppermint, cinnamon are all good.)
  • red and blue paste food coloring
Instructions
  1. PREPARATION: Drop large star tip into the pastry bag. Fold down the top third of the bag (making a cuff) and paint alternating stripes of red and blue up the inside of the bag, starting at the base of the star tip and working up. Don't make them too thick or too close together, or you'll end up with purple! (I used 3 stripes of each color.) Set bag aside.
  2. Cover a large baking sheet with parchment.
  3. MERINGUES: For best results, use a stand mixer (or a sturdy hand mixer and medium-sized bowl.) Heat oven to 250 F.
  4. Beat together the water and meringue powder until foamy.
  5. Add sugar very gradually, sprinkling it in a little at a time, scraping bowl occasionally.
  6. Beat until thick and shiny, about 5-7 minutes. Add flavoring if using and beat until incorporated.
  7. Place the prepared pastry bag inside a tall water glass. Carefully drop meringue into bag. Don't try to spread it, just drop it in there. Unfold the cuff of the bag and twist to close.
  8. Pipe meringues on prepared pan. Squeeze near the pan and pull up slowly, releasing pressure as you go. Aim for about 1½ inches at the base. The first few won't be very colorful, but they're still pretty. They won't spread and can be fairly close together. Small stars can be piped for decorations, but pipe them on a separate sheet; they'll take less time to bake.
  9. Bake large puffs for 25 minutes, (10 minutes for the tiny stars), then turn off oven (don't open the door!) and leave them for a couple of hours. If you have an oven that vents heat out when it's turned off, at the end of the bake time turn the heat down as low as it will go and let them bake for another 10 minutes before turning oven off.
  10. Store the meringues in an airtight container.

Slooooowly add sugar to water and meringue powder. Beat until very thick and shiny.

I place the cuff over my hand and very (very) carefully paint the lines. I was pretty generous here and had some vibrant colors. I used less on the second batch and they were still bright and pretty.

Here’s what it looks like before the meringue is added.

Place bag in glass for support. Carefully drop the meringue into the bag.

Piping the puffs

Tips:

  • Take your time when adding the sugar. Give it time to dissolve.
  • If you want to make the tiny stars (great for decorating cupcakes) hold the tip a little bit above the parchment and start squeezing as you push down and touch the sheet. Stop squeezing and pull up. You’ll get the hang of it!
  • To make both sizes, put the large puffs in the oven first. Let them bake for 15 minutes, then put the other sheet in too. Continue to bake for the remaining 10 minutes then turn off the oven without opening the door. Don’t peek – leave them to dry out for a couple of hours (or overnight). If you have an oven that vents the heat once it’s turned off, see the recipe for instructions.
  • Put a dot of meringue batter on the baking sheet under the parchment to hold it in place while piping.
  • If you want a little more white and a little less color in your meringues, just make 4 stripes instead of 6 inside the pastry bag.
  • Keep them dry, cool, and dark. In theory, they’ll last 2 weeks. I don’t think they’ll have that opportunity!

Here is the mini version:

Piped and ready for the oven.

Jazz up strawberry shortcake, cookies, cupcakes, or a bowl of ice cream. Or just pop them—one after another—in your mouth.

Have a sweet and safe 4th!

Lorinda

Crustless Company Quiche

Layers of hash browns, bacon, sweet onions, cheese, ham, and eggs create a breakfast dish that you’d be proud to serve to company . . . or just scarf down yourself. My goal was to make this delicious dish while producing a minimum amount of pans to wash, and I was pretty pleased with the way it all worked out.

My inspiration was a fantastic recipe by Cydnee of Tampa Cake Girl. Her “Quiche Me Baby One More Time” was so appealing, and also low-carb, which was a win-win situation in my book.

But my husband wanted hash browns. And I didn’t have Swiss cheese. Or heavy cream. Besides, I think I have some kind of genetic disorder that doesn’t let me follow a recipe exactly as it’s written. I.Just.Can’t. I have to fiddle and improvise, no matter how perfect the original version is.

So, my apologies to Cydnee for messing with her recipe, but here’s my version. Now you can choose between low-carb and almost low carb. (Aw, c’mon, it’s just one potato.)

Crustless Company Quiche
Print
Author:
Serves 8 polite people, 6 hungry people.
Ingredients
  • 2 cups shredded potato (or packaged hash browns)
  • 3 pieces bacon, uncooked, cut into bite-sized pieces
  • ¼ cup chopped sweet onion
  • 1½ cups grated cheese (I used cheddar and parmesan, but Swiss or jack are good, too)
  • 1 cup chopped ham
  • ½ cup whipped cream cheese
  • 6 eggs
  • 1 cup milk
  • garlic salt (or regular salt) and pepper to taste. A pinch of nutmeg is good, too.
Instructions
  1. Heat oven to 375 F. Lightly spray a deep pie pan with cooking spray.
  2. Spread shredded potato in the bottom of the pan and top with uncooked bacon pieces.
  3. Bake for 30 minutes.
  4. Remove from oven and sprinkle with chopped onions, then cheese. Top with chopped ham.
  5. Combine cream cheese, eggs, and milk. Beat well, add seasonings, and pour over the top.
  6. Place dish on baking sheet and bake for 45-50 minutes.
  7. Cool for 5-10 minutes and serve.

Layer the uncooked bacon on the shredded potatoes (the bacon grease will help cook the potatoes) and bake for 30 minutes.

Chop onions and grate cheese.

Add onions to cooked potatoes and bacon

Combine the cream cheese, eggs, and milk. Add seasonings.

Beat well.

Add cheese, then ham, then egg mixture. Bake 45-50 minutes.

Seriously, that’s all there is to it! I peeled, grated, rinsed, and blotted dry one large potato for this recipe. If you want to save steps (and avoid washing a peeler, grater, and bowl) you can use fresh shredded potatoes from the store, or even frozen shredded hash browns.

The quiche comes out of the pan cleanly, making it easy to plate. And oh, boy does it taste good! The Man moaned his way through two huge pieces and drove me nuts coming up with variations to try next.

As a reminder, Father’s Day is coming up and this would be an easy, man-pleasing breakfast to serve him. He’ll love you for it.

Lorinda


Huckleberry Pastry Puffs

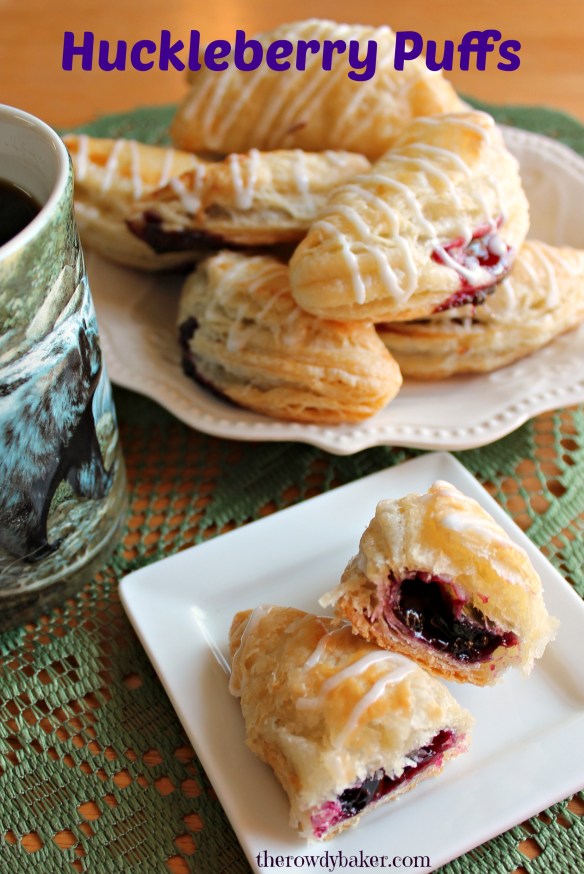
Do you want to create culinary magic? Fill homemade puff pastry rounds with wild huckleberries and prepare to be wowed. These flaky little four-bite pastries will melt in your mouth, and I’m telling you, there is nothing that compares to the flavor of huckleberries.

Of course, if you don’t have access to huckleberries, blueberries are a good option. I found frozen organic wild blueberries that are impossible to tell apart from huckleberries, so use whichever variety you can get your hands on.

Rough puff pastry is really very simple to make. (You could use store bought puff pastry, but it will be more crisp and brittle.) Once you get the hang of it, you’ll probably want to use it for lots of other treats, like danish, croissants, or strudel. Here are two of my favorite strudel recipes: Sour Cream Apple Strudel and Sausage Breakfast Strudel. The dough can hang out in the fridge for days (let it sit out on the counter for 30 minutes before using or it’ll be really hard to roll out) or can be frozen. It’s not much harder to make a double batch, and it’s wonderful to have some tucked away for later.

I made the dough and filling the night before and rolled, cut, filled, and baked the little puffs the next morning – in about an hour. You know what makes it go really, really fast? A potsticker press! You can find one for less than $5.00 on Amazon (search for “dumpling press”) or at an Asian market, and I know you’ll find many uses for it. It won’t languish in your kitchen drawer, I promise.

I’d go for the cheap plastic model. This one has lasted years.

Go easy on the filling!

Huckleberry Puffs
Print
Author:
Makes approximately 8 flaky pastries, each about the size of a puffy potsticker. I use a potsticker press in this recipe, but if you don't have one, fold the dough round over the filling and press together firmly with a fork.
Ingredients
  • HUCKLEBERRY FILLING:
  • 1 cup fresh or frozen berries
  • pinch salt
  • ½ cup sugar
  • 2½ teaspoons cornstarch if using fresh berries, OR...
  • 1 tablespoon cornstarch if using frozen berries
  • 2 teaspoons fresh lemon juice
  • ROUGH PUFF DOUGH:
  • 2 cups all-purpose flour
  • ½ teaspoon salt
  • 1 cup (2 sticks) butter, cut into 1-inch cubes
  • ⅔ cups ice water
  • ASSEMBLY:
  • 1 egg white
  • Powdered sugar for dusting, or drizzle with a simple powdered sugar/water glaze
Instructions
  1. FILLING: In small pan, combine berries, sugar, and salt over medium heat, stirring continuously until mixture comes to a boil. Reduce heat to low and simmer for 5 minutes, stirring often.
  2. Pour or spoon approximately 1 tablespoon of the hot berry juice into a small cup or bowl and add the lemon juice. Stir. Slowly add cornstarch, stirring until smooth. If necessary, add a bit more berry juice.
  3. Whisk the cornstarch mixture into the berries and turn heat back to medium. Stir until the mixture thickens, 1-2 minutes. Remove from heat and allow filling to cool. (To cool quickly, place pan in shallow bowl of ice water.) Once cool, refrigerate until needed.
  4. PASTRY DOUGH:
  5. Place flour on work surface, stir in the salt, and drop the butter onto the flour.
  6. With a bench scraper or metal spatula, chop the butter and flour together until combined. Don't overwork the mixture - you want to see chunks of butter larger than peas.
  7. Begin drizzling the water over the mixture with one hand, while flipping and tossing it with the other. Again, don't over do it! It should be a crumbly mess at this point.Use your metal utensil to form the dough into a rough rectangle about 5"x 8".
  8. Roll out dough to approximately 6"x10", using the metal scraper to form straight edges. Keeping the short edge facing you, Flip the bottom edge up to the middle (it will be crumbly...just do the best you can) and the the top edge down to the bottom. This will create three equal sized layers. Give the dough a turn to the left, lightly flouring the surface if necessary to keep it from sticking, and repeat. Repeat 3 more times. Wrap snugly in plastic wrap and place in the refrigerator for at least 30 minutes. (It can be refrigerated for several days.)
  9. ASSEMBLY: If your dough has been refrigerated more than an hour, place it - still wrapped in plastic - on the counter to warm up for 20-30 minutes.
  10. Heat oven to 400 F. Cover two baking sheets with parchment.
  11. On lightly floured surface, follow the previous method and roll and fold it two more times. Add flour if necessary to keep the dough from sticking.
  12. Roll dough out into a rectangle that is approximately 14"x24". Using a round cutter that is the size of your potsticker press (about 4"), cut circles as close together as possible. As you work, stack the dough scraps on top of each other to keep the layers intact when you re-roll them.
  13. Whisk together the egg white and 1 teaspoon water.
  14. Lift one round at a time and place on the potsticker press. (Flour the potsticker press as needed.) With finger or pastry brush, spread a little egg white around the perimeter.
  15. Place 1 teaspoon filling in the center and fold the press over. Press firmly along the rounded edge for a good seal. (If you aren't using a press, fold the dough over the filling and press edges with fork.) Place on prepared baking sheet, keeping puffs at least ½" apart.
  16. You can roll the scraps one time. They won't be quite as flaky, but they're still very good! Cut remaining rounds and discard any scraps.
  17. Poke a fork in the center of each puff one time, brush lightly with egg white mixture, and bake for 18-20 minutes, or until golden brown.
  18. Use spatula to move puffs to a cooling rack. Dust with powdered sugar or drizzle with icing once the puffs are lukewarm.


Stir the berries and sugar together and bring to a boil.

Stir cornstarch mixture into the hot berries and cook until thickened.

Chop (don’t blend!) the cold butter into the flour.

Yup, it’s a little messy, but flip the flour with one hand while you drizzle water over it with the other. You can doooo it!

It’s going to look like this the first time you roll it. It’s okay. Really!

It’s a crumbly mess, but fold it into thirds. Just do your best!

See? It looks a lot better when you get to the third roll/fold.

Roll dough out thin and cut into 4-inch circles.

Re-roll your stack of scraps. Stacking them keeps the butter layers going in the right direction.

Add the filling. Not too much – about a teaspoon. Any more and it will really ooze out.

Poke each puff once with a fork and brush with egg white. Bake!

Drizzle or dust – either way is delicious.

Don’t let those bears get the upper hand here. Put on your hiking boots, strap a can of bear spray to your hip, and hit the woods for some wild mountain huckleberries. Those little gems are priceless indeed, and worth every single damn mosquito bite!

Lorinda

Hot Cross Mini Buns


About the size of a large doughnut hole, though not as sweet, these miniature hot cross buns will look great in a basket on your Easter table. The dough is filled with raisins or currants, spices, and saffron (if you choose to add it). The taste can be a surprise, because our eyes see the icing design on top and our brain assumes that the buns themselves will be sugary, like cinnamon rolls . . . or doughnuts. They aren’t. The bread is like a slightly sweet dinner roll, though those little bits of fruit inside do add a sweet surprise with each bite.

With regular hot cross buns there’s a higher bread-to-icing ratio, so I usually slather mine with butter or jam, but these little ones don’t need to be gussied up like that. Just two bites (unless you’re my husband, in which case, they are popped into his mouth whole) and you’re reaching for the next one. See? You’ve just saved all of those pesky butter and jam calories, so you can eat more mini buns!

A few years ago I made hot cross buns for a Yummy Northwest Easter column, using a very old and challenging recipe. It was an experience. If you’d like to see what happens when I have kitchen fail after kitchen fail, by all means go read the archived article: Old Fashioned Easter. Scroll down; the link to the recipe is right under the photo of Hot Cross Buns.

HINTS:

  • I added saffron to this recipe because it’s a traditional spice used to symbolize something or other (sunshine, spring, happy stuff) and because I happened to have a bottle of it languishing in the pantry. If you have some, add a few strands – but don’t overdo it, because the sweet spices like cinnamon and nutmeg should predominate.
  • You don’t have to mark the tops of the raised buns. You can just bake them as they are and use the icing alone to create the crosses. If you want to cut the design in the top before baking, make sure you use a very sharp blade so the puffy little buns don’t get smooshed.
  • If you like lots of fruit in your rolls, add more raisins or throw in a handful of chopped apricots or dried cherries.


Hot Cross Mini Buns
Print
Author:
Makes 60 mini buns Hot cross buns are slightly sweet and lightly spiced. Saffron is a traditional addition, but the buns are delicious without it, too.
Ingredients
  • ⅔ cup milk
  • small pinch saffron - OPTIONAL!
  • ½ cup raisins
  • ½ cup butter, cut into large chunks
  • ¼ cup plus 1 teaspoon sugar, divided
  • 1 cup very warm water
  • 1 package active-dry yeast
  • 1 egg
  • ½ teaspoon cinnamon
  • ⅛ teaspoon ginger
  • ⅛ teaspoon nutmeg
  • ⅛ teaspoon ground cloves
  • ⅛ teaspoon allspice
  • 4½ cups bread flour
  • ¾ teaspoon salt
  • GLAZE:
  • 1½ cups powdered sugar
  • ½ teaspoon vanilla
  • pinch of salt
  • 3 tablespoons water (or use fresh lemon juice for some "zing")
Instructions
  1. In small saucepan, heat milk and saffron (if using it) until bubbles form around the edge of the pan. Remove from heat and, using a strainer if you added saffron, pour into a large bowl. A stand mixer is best. Add raisins, butter, and ¼ cup sugar, stirring briefly. Butter will soften, but don't worry if it isn't completely melted.
  2. In a small bowl, combine warm water with remaining 1 teaspoon sugar. Add yeast and allow mixture to sit until foamy - about 5 minutes.
  3. Add yeast mixture, egg, and spices to the milk mixture and beat until combined.
  4. Add flour and salt. Switch to dough hook if using a stand mixer, and knead by machine for 5 minutes. If kneading by hand, drop dough onto lightly floured surface and knead 7-8 minutes. Dough should be soft but not sticky.
  5. Place dough in greased bowl, cover, and let rise until double, about 1 hour.
  6. On lightly floured surface, punch down dough. Divide into 60 equal pieces and roll into balls. The easiest way to do this is to work on an unfloured surface. Form a ball by bringing the sides to the top, like an Asian dumpling, and then turning the ball over and pulling it towards you, scooching it along the surface.
  7. Place balls at least ½-inch apart on ungreased baking sheets, cover, and allow to rise until almost double, about 1 hour.
  8. Heat oven to 375 F
  9. Combine powdered sugar, vanilla, pinch of salt, and water (or lemon juice) in a small bowl. Mix well. (Hint: for a firmer icing, add ½ teaspoon meringue powder.) Remove 2 tablespoons of icing and place in a small cup. Add water to the small cup a few drops at a time until it is a very thin consistency. This will be brushed over hot rolls to add a thin, shiny coating. Place remaining icing in a heavy plastic bag with one tip cut off, or in a pastry bag with small writing tip.
  10. With a very sharp knife or razor blade, cut a cross shape on top of each bun, if desired. Bake mini buns for 12-14 minutes, or until the tops are rich golden brown. Remove from oven and immediately brush with a light layer of the thinned glaze. Allow to cool on a rack.
  11. Pipe a cross on each bun with icing (fill in the design if you cut the buns before baking) and allow to dry thoroughly before storing.

Add a small pinch of saffron to milk if desired. (I may have gone a little crazy here. Don’t use quite that much unless you love the taste of saffron!)

Heat milk until bubbles appear all around the edge of the pan. (Don’t forget to strain out the saffron.)

Isn’t this beautiful, soft dough?

Cut dough into 60 equal pieces. (Mrs. OCD here can tell you that I had 60 20-gram balls of dough. Yes, I weighed them. No, you don’t have to.)

Roll into balls and place on ungreased cookie sheet to rise.

After balls rise, cut an X in them with a very sharp knife or razor blade if desired. (Or you can skip this step and just make the X with the icing after they’re baked.)

Brush with thin glaze while hot, and then pipe on the cross after they cool.

They don’t have to be for Easter, of course. Skip the icing and split these little sweethearts in half. Spread with lemon curd, honey butter, or flavored cream cheese for a luncheon or party. And . . . hide a few for yourself!

Lorinda

Corned Beef Hand Pies

Flaky little pie crusts stuffed with corned beef, cabbage, carrots, and onions will be the hit of your St. Patrick’s Day party. These savory treats are also a great way to use leftover corned beef, and are easy to pack in a lunch.

Did I say leftover corned beef? The only way that ever happens around here is if I cook two roasts! And now that The Man has had a taste of these hand pies, I may have to cook three.

I originally made these with green pie crust. You know . . . going with the whole green theme. I don’t have a problem eating green baked goods; green doughnuts taste just as good as normal doughnuts, right? But to be honest with you, the green crust didn’t photograph very well.

If you want to do it for fun, just add a few drops of green food color to the buttermilk before you add it to the flour. (I may have gone a little overboard with the coloring.) Hand pies with shiny golden brown crusts are lovely, and can be used for any occasion, so I’ll just let you choose.

I also played with the crust and made shamrock shaped pies. The half circles are easier to make – definitely less time consuming, but the shamrocks are pretty cute. They just have those little corners that you have to pay attention to and get sealed properly. If you’re up for a challenge and you have a large shamrock cookie cutter, give them a whirl!


Corned Beef Hand Pies
Print
Author:
Makes approximately 24 hand pies if using 4-5 inch circles.
Ingredients
  • Filling:
  • 2 cups cooked corned beef, finely chopped
  • 1 cup grated cabbage and carrot mixture, finely chopped
  • ¼ cup thinly sliced green onions
  • 2 teaspoons mustard, yellow or Dijon
  • 1 tablespoon apple cider vinegar
  • 1 tablespoon flour
  • ¼ teaspoon sugar
  • ¼ teaspoon garlic powder
  • 2 eggs (1 egg is used for egg wash)
  • Pastry:
  • 4 cups flour
  • 2 teaspoons salt
  • 1 cup cold butter
  • 1 cup cold shortening
  • ½ cup buttermilk (you may use regular milk)
  • 2 tablespoons vodka (or vinegar, if you prefer)
Instructions
  1. In medium bowl, combine corned beef, cabbage and carrot mixture, and green onions.
  2. In a small bowl, whisk together the mustard, vinegar, flour, sugar, garlic powder, and 1 egg. Pour into the meat and vegetable mixture and stir well. Cover and refrigerate until needed.
  3. In a large bowl, combine the flour and salt. Add butter and shortening and, using a pastry blender, blend together until small lumps no larger than peas remain.
  4. In a cup or small bowl, combine the buttermilk and vodka (or vinegar). Pour all at once into the dry ingredients and toss with a fork (or your fingers) until combined. Mixture should form a ball when you press it together with your hands. Divide into 3 disks. Cover with plastic wrap and refrigerate 15 minutes.
  5. Heat oven to 375 F.
  6. Whisk together the remaining egg and 1 tablespoon water in a cup to make an egg wash. Set aside.
  7. On a floured surface, or between two pieces of lightly floured parchment, roll once piece of dough out at a time to about ⅛-inch thickness. If using parchment, you may need to lift the paper and sprinkle dough with flour to keep it from sticking and to keep parchment from wrinkling.
  8. Using a 4-inch round cutter or large shamrock cookie cutter, cut as many pieces as possible. Cover scraps and put aside to re-roll all at once at the end. If you have a small roller, the shapes can be rolled gently to make them a little larger and thinner. 5 inches is perfect.
  9. Brush one piece lightly with egg wash. Add approximately 1 heaping tablespoon of filling. For half circles, fold the circle over. For shamrocks, cover with another shamrock shape. Press firmly around the edge of the hand pie, then use a small fork and go around it again to seal.
  10. Poke a few small holes in the top of each pie and brush lightly with egg wash. Place on parchment covered baking sheets.
  11. Bake for about 20 minutes, or until the bottoms turn golden brown. Serve warm.


Finely chop the cooked corned beef.

Stir all of this goodness together! I hate to say this, but you could roll out biscuits from and can, fill them with this, and they would STILL taste amazing!

Add sauce to meat mixture.

For crust, blend the fats and flour together, then toss with liquids.

Flatten the dough into 3 disks.

Cut out large circles (about 4-5 inches) and brush with egg wash

Add a rounded tablespoon of filling

Press edges firmly.

Seal with a fork and bake!

 So…the obligatory green pastry has been posted. Now I need to play around with something sweet. I’ll be back soon,

Lorinda

Banana Pound Cake


Banana pound cake vertical with nameI’m usually pretty fearless in the kitchen. If something doesn’t come out the way I’d hoped, I can almost always salvage it, even if it’s for another purpose. But after failing miserably at making pound cakes in the past, I’ve been hesitant to try again. There are so many other types of cake to enjoy, right?

But…a pound cake is just perfect for making petits fours, and Valentine’s Day is just around the corner (now you know what my next post will be), so I girded my loins pulled up my big girl panties and tried again, learning a few things in the process. My goal was to make a banana pound cake. I came up with two versions, slightly different, both of which met the approval of my tasting crew.two cakes A pound cake shouldn’t be heavy, but it is supposed to be dense, with a velvety crumb. If you want something lighter, keep looking; this is NOT an angel food cake! Pound cake is good on the first day, but better on the second – and fantastic on the third. Covered well and left at room temperature, this cake just gets more flavorful as it ages.

I love making traditional recipes, so tried to stick with the basic measurements our great grandmothers probably used: one pound of flour, one pound of butter one pound of sugar, one pound of eggs. I did use some leavening for insurance, though theoretically the cake should rise because of all the air that is beaten into the batter.

Should be 8 eggs there, but you get the idea :)

Should be 8 eggs there, but you get the idea 🙂

My first cake seemed a little too dense – more like banana bread. While I pondered the situation, I peeked at other recipes on the internet and found that most people use only half a pound of butter. I stalled long enough to test the cake again on it’s third day on the counter. Amazingly, it seemed even more flavorful, and the texture had improved. I loved this cake!

Still, I wanted to tweak the recipe a little, aiming for a lighter texture and color.

A little richer, a little heavier...yum!

A little richer, a little heavier…yum!

I replaced one cube of butter with an extra half cup of sour cream, and even though I’m usually adamant about using real vanilla extract, this time I used Wiltons clear vanilla flavoring to keep the color from turning light brown. (Bananas and vanilla extract will do that!) I also reduced the leavening a little bit and paid more attention to beating the butter and eggs longer.

The result was a cake with a finer crumb, a beautiful yellow color, and a sweet, mild flavor. (Some of the credit for the yellow color should probably go to my hens, who lay eggs with vibrant yolks! If you use store bought eggs and want the cake to be banana-yellow, add a drop or two of yellow food coloring.)

Banana Pound Cake 2 vertical name

I’ll give you the recipe for the lighter cake, since I’m guessing that’s what most of you will be interested in, but under that recipe I’ll tell you how to make the first cake, in case it sounds better to you. Personally, I think I preferred the heavier cake with the little brown specks. And I think the extra butter made it a bit more flavorful. Your call!

Banana Pound Cake
Print
Author:
A sweet, dense cake with a fine crumb and subtle banana flavor.
Ingredients
  • 1½ cups salted butter, room temperature (if using unsalted, add ¼ teaspoon salt to dry ingredients)
  • 1 pound sugar (about 2⅓ cups)
  • 1 pound eggs, room temperature (Weigh them in the shell! About 8 large eggs.)
  • 2 teaspoons clear vanilla flavoring
  • 2 ripe bananas, mashed (about 1 cup)
  • 1 cup sour cream
  • 1 pound cake flour (about 3 cups) sifted
  • ½ teaspoon baking powder
  • ½ teaspoon baking soda
  • ICING:
  • 1 cup semi-sweet chocolate chips
  • 2 tablespoons creamy peanut butter
  • 4 tablespoons heavy cream
Instructions
  1. Grease and flour (or spray with a flour/oil mixture like Baker's Joy) a large, 12-cup bundt pan.
  2. Heat oven to 325 F.
  3. In a large bowl, beat the butter at medium speed for at least 3 minutes.
  4. Slowly trickle in the sugar, beating continuously and scraping the sides of the bowl often. Beat until light and fluffy.
  5. With mixer on low, add eggs one at a time, beating between each egg for at least 30 seconds. Yes, this will take you 4 minutes, but don't cheat - it's really important!
  6. In a small bowl, mix together the vanilla, mashed bananas, and sour cream. Pour slowly into the mixture in the large bowl, mixing just until combined.
  7. Sift together the flour, baking powder, and baking soda (and ¼ teaspoon salt if using unsalted butter). Gradually add to batter, stirring just until combined.
  8. Spoon into bundt pan and smooth the top.
  9. Bake on middle rack of oven for approximately 1 hour 15 minutes, or until the top is golden brown and a bamboo skewer comes out clean when inserted into the cake. Don't underbake or the texture of your cake will not be as smooth. If in doubt, give it 5 more minutes!
  10. Cool on a rack for 20 minutes, and then turn out to cool completely.
  11. Once the cake is cool, make icing:
  12. Combine chocolate chips, peanut butter, and heavy cream in a small pan.
  13. Heat on low, stirring frequently, until completely melted. Mixture should be thick, but spoonable. If too thick, add a small amount of cream or peanut butter, heating until smooth.
  14. Drizzle (okay...glop) over the cake. Chill briefly to set the icing faster, if desired.
  15. Keep covered at room temperature for up to 1 week.


To make the more traditional cake, follow the instructions above, except:

  • Use 2 cups of butter (1 pound)
  • Use 1 tablespoons vanilla extract
  • Use 1/2 cup sour cream
  • Increase baking powder to 1 teaspoon
Smoothing the batter in the pan.

Smoothing the batter in the pan.

Slowly melt ingredients for icing.

Slowly melt ingredients for icing.

The chocolate icing I used is really more of a ganache. You can use a regular chocolate glaze if you prefer; I wanted thick and fudgy on this cake. I pictured a chocolate covered banana, and almost added chopped peanuts, but figured that might be going too far. Gilding the lily, huh? I think melted white chocolate with the peanut butter would be good too. (Think peanut butter and banana sandwiches.)

A few hints, words of wisdom:

  1. This is one of those times when weighing your ingredients is very helpful. Hey, I’m pretty sloppy about measuring things, but I weighed my flour, eggs, and sugar on a digital scale for accuracy this time.
  2. It’s really, really important to have your eggs and butter at room temperature. Please don’t use a microwave to soften your butter – just let it sit out until it can be beaten. Not too soft, not too hard.
  3. This is pretty obvious, but the top of your cake will become the bottom, so if you want a smooth line at the bottom, take a sharp knife and cut off the top of the cake where it puffed up in the middle!

Now that I’ve found that I actually can produce a decent pound cake, I have a feeling you’ll be seeing a lot more of them. If I have some failures, pffft…they’ll just be made into trifle.

I’m moving into Valentine’s Day mode now though, so first…heart shaped EVERYTHING!

Lorinda

Huckleberry Hurricane

What’s wild and wet and can knock your socks off? A Huckleberry Hurricane, of course.


Huckleberry hurricane

When the group of nutcase bloggers I post recipes with each month decided to skip the baked goods and bring on our best summer drinks, there was no doubt in my mind what I’d make.

I usually make huckleberry margaritas each year during berry picking season, sort of a reward for the hours of backbreaking work that went into foraging for this bounty. But I’ve got to tell you, white rum or vodka are lovely in this drink too! Margaritaa, daiquiria, or even (gasp) a booze-less version…all are wonderful. The important ingredient? Wild mountain huckleberries. You could use blueberries, but huckleberries have a much richer flavor. And I’m NOT talking about those nasty, sour, bright red huckleberries you find in the Pacific Northwest. These are found at high elevations and are dark purple and sweet; as precious as gold.huckleberries

I love to add a big blob (that’s a technical baking term) of huckleberry jam to the mixture in the blender, but it’s not necessary. Simple syrup sweetens the drink very well, and in a pinch – if you’re desperately eager for that drink and don’t want to make the simple syrup – you can get away with just using a couple of tablespoons of superfine sugar.

Huckleberry Hurricane
Print
Author:
Makes 2 drinks.
Ingredients
  • ½ cup sugar
  • ⅓ cup water
  • 1 cup huckleberries (fresh or frozen)
  • 1 cup crushed ice
  • juice from ½ fresh lemon
  • 1 tablespoon frozen limeade concentrate
  • ½ cup alcohol (tequila, white rum, or vodka)
Instructions
  1. In a small sauce pan, combine the sugar and water. Cook and whisk over medium heat until sugar is dissolved. Cool completely. (If you are in a hurry, put ice water in a larger pan and set the small one in it to cool quickly.) You won't use all of the simple syrup, but my guess is you'll be making a second batch of drinks! If not, it will store in the refrigerator for several days.
  2. In a blender, combine ¼ cup of the cooled sugar mixture and the remaining ingredients. Blend until smooth. Taste. Add additional sugar if desired.
  3. Serve immediately.


Adapt this recipe to your own tastes, and beware of brain freeze!summer drink roundup

Here are links to the other fantastic summer drinks – I hope you’ll go check them all out!
Lorinda

Pineapple Kalejitos from Moore or Less Cooking Blog.
Cherry Chocolate Shake from Cooking From a Stay at Home Mom.
Melon Pucker Martini from Tampa Cake Girl.
Mommy’s Cherry Chocolate Milkshakes from Hun, What’s For Dinner?
Spiked Shortcake Italian Soda from Crumbs in my Mustachio.

Mint Bombe


mint bombe with watermark horizontalDo you remember my Brownie Bombe from last December? I thought I’d try a mint version for St. Patrick’s Day, and it turned out yuuuuuuuuumy!

An ice cream bombe is always an impressive dessert, and yet it’s really very simple to make. The trick is to start early – at least a day before you plan to serve it. The bombe must be frozen between layers, then frozen overnight for best results. To make it even simpler you could use boxed brownie mix, jarred hot fudge sauce, and a large tub of non-dairy topping, but making these things from scratch is really easy, I promise.


mint bombe inside close with watermark
This mint bombe was made with two ice creams: Mint Brownie and Vanilla. I only used two ice creams this time because I added a core of mint fudge. Feel free to use any ice cream flavor you like; you can’t go wrong with this dessert!

Mint Bombe
Print
Author:
Serves: 12
A core of mint fudge sauce, surrounded by ice cream, surrounded by brownies, surrounded by whipping cream. Mmmm.
Ingredients
  • One batch of brownies (recipe below)
  • Two cartons (1.5 quarts each) ice cream
  • Mint Fudge Sauce (recipe below)
  • 1 cup heavy whipping cream
  • 1 tablespoon powdered sugar
  • 2-3 teaspoons creme de menthe (or 2 drops of green food coloring)
Instructions
  1. Prepare a 2-quart bowl by lining with foil. Lightly oil the foil.
  2. Press pieces of brownie against the foil, making a thin brownie shell. Make sure all of the foil is covered, but leave approximately ½ –inch of foil showing at the top of the bowl. Reserve the remaining brownies; these will be used at the end.
  3. Remove your first flavor of ice cream from the freezer to let it soften for 10-15 minutes. Put the brownie-lined bowl in the freezer while the ice cream is softening.
  4. With a spoon or rubber spatula, press a layer of ice cream over the brownie layer. You will use the entire carton of ice cream. Bring it all the way to the top of the brownie, keeping the layer as uniformly thick as possible.
  5. Return to the freezer for at least 2 hours, or until firm.
  6. Remove the second container of ice cream from the freezer and let it soften for 10-15 minutes.
  7. Fill the center with softened ice cream, almost to the top. With a wooden spoon handle, make a hole in the center for the fudge sauce. This should make the layers of ice cream the same height. If not, add a little more of the second flavor to make the top even.
  8. Fill the hole with mint fudge sauce.
  9. Return to the freezer for at least 2 hours, or until firm.
  10. Remove from freezer and crumble the remaining brownies over the top, pressing firmly.
  11. Cover the bombe with foil or plastic wrap and freeze overnight.
  12. Lift the bombe out of the bowl using the foil. Turn flat side down on serving platter and remove the foil.
  13. Whip the cream until soft peaks form. Add the powdered sugar and whip until stiff peaks form. Add in the crème de menthe or food coloring if you are using it, and “frost” the bombe.
  14. Decorate with sprinkles or candy shamrocks. For best results, freeze again until the whipping cream is firm (but it can be cut right away if you’re ready to serve.)


Brownies:
1 cup powdered cocoa
3 cups sugar
1 3/4 cups flour
1/2 teaspoon salt
2 teaspoons baking powder
4 eggs
1/2 cup melted butter
1/2 cup oil
1 tablespoon vanilla

1. Heat oven to 350 F.
2. Grease and flour a 10×10” (or 8×12 or 9×12) pan.
3. In a large bowl, combine the cocoa, sugar, flour, salt, and baking powder.
4. In a small bowl, beat the eggs lightly. Add the melted butter, oil, and vanilla.
5. Pour the wet ingredients into the dry ingredients and stir just until combined.
6. Spoon into prepared pan and level with a spatula.
7. Bake for approximately 35 minutes. Don’t overbake.

Mint Fudge Sauce:
1/2 cup sugar
1/2 cup cocoa
4 tablespoons butter
1/2 cup mint chocolate chips (or use semi-sweet chocolate and add a few drops of peppermint extract)
1/2 cup cream

Combine all ingredients in a small pan over medium-low heat. Cook, stirring frequently until chips are melted and the sauce is completely smooth. Pour into a small bowl to cool and thicken.

Press brownies into the foil-lined bowl.

Press brownies into the foil-lined bowl.

Add a layer of mint ice cream. Freeze until firm.

Add a layer of mint ice cream. Freeze until firm.

Add vanilla ice cream, make a hole, and pour in mint fudge sauce!

Add vanilla ice cream, make a hole, and pour in mint fudge sauce!

Add a brownie top (which will actually be the bottom...)

Add a brownie top (which will actually be the bottom…)

"Frost" it with whipped cream.

“Frost” it with whipped cream.

Freeze, slice, and serve!

Freeze, slice, and serve!

St. Patrick’s Day is Monday, so start one of these this weekend! Seriously, if the bombe in-progress sits in the freezer for 4 or 5 hours between steps, that’s perfectly fine. Work it around your schedule! Even if you don’t serve it for a few days, as long as it’s covered up in the freezer, it will come out perfect.

A sweet little Irish wish for you:

Sláinte chuig na fir, agus go mairfidh na mná go deo!
(Health to the men and may the women live forever)

Okay, maybe a little nicer:
May your home always be too small to hold all of your friends.

Triple Trouble Caramel Corn!

MiscNov 046I try to stay away from Google when I’m creating a recipe, because I don’t want to be influenced by other bakers’ methods or ingredients. When I’m happy with my recipe I take a peek, and am usually surprised (and yes, maybe a little discouraged) to find out how many other people have already made my “original” idea.

And RATS…it happened again.  I thought this was going to be at least a fairly new idea. My son, my husband and I were sitting around brainstorming ideas for caramel corn. (I love my caramel corn recipe, but it’s pretty basic, and I wanted something unusual.) I knew we were on a roll when the discussion turned to bacon. What goes with bacon? Maple, of course! And if you’re have maple, you must have pecans, right?

Caramel Corn with Maple, Bacon, and Pecans. Yeah, baby…come to Mama!
MiscNov 043

After we’d sampled it over and over and over, I checked the search engine, and pfffft – it’s been done. Sigh. I guess most things have already been done in one form or another – so I’ll just give you MY take on this tasty treat.

Triple Trouble Caramel Corn!
Print
Author:
Ingredients
  • 6 quarts popped popcorn
  • 8 oz bacon (or more) chopped and cooked
  • 2 cups coarsely chopped pecans
  • 1 cup (2 sticks) butter
  • 2 cups dark brown sugar (golden brown is fine, too!)
  • ½ cup honey
  • 1 teaspoon salt
  • 1 tablespoon maple flavoring (Watkins is good, but I prefer Mapleine)
  • ½ teaspoon baking soda
Instructions
  1. Heat oven to 250 F.
  2. Prepare two large, shallow pans by coating with cooking spray. (I used coconut oil instead, and it worked pretty well.)
  3. In a very large bowl or roasting pan, combine popcorn, cooked bacon, and pecans. Set aside.
  4. In a large saucepan over medium heat, melt butter. Add the brown sugar, honey, and salt. Stirring constantly, bring to a boil.
  5. Without stirring, allow the mixture to continue cooking at a low boil for 5 minutes.
  6. Remove from heat. Stir in the maple flavoring and baking soda. (It will foam up a little.)
  7. Pour over the popcorn and stir to combine. Divide between the two pans, spreading the popcorn mixture as evenly as possible.
  8. Bake for 1 hour, stirring every 15 minutes. The mixture will seem soft when you're stirring it, but don't worry - it will crisp up nicely when it cools.
  9. Remove from oven and cool completely in the pans. Break apart.
  10. Store in airtight container.


Boil the sugar mixture for 5 minutes.

Boil the sugar mixture for 5 minutes.

Stir it into the popcorn, nuts and bacon.

Stir it into the popcorn, nuts and bacon. (If you’re making the bacon/maple/pecan version, this will look darker.)

Spread onto two greased baking pans.

Spread onto two greased baking pans.

Once you start eating it, you won't stop!

Once you start eating it, you won’t stop!

I implore you to cook up the popcorn in a big pan or an air popper. The stuff in the microwave bags is SO bad for you. I know, I know, butter and sugar aren’t exactly health foods, but at least they are real. The microwave bags have a coating inside that is really gross. It’s honestly not hard to make popcorn “from scratch”!

If you want the plain Jane version (just like Cracker Jack), substitute unsalted or lightly salted peanuts for the pecans, and skip the bacon. Use 1 teaspoon vanilla instead of the 1 tablespoon maple flavoring. Or…gussy it up with a variety of nuts. Almonds, cashews, walnuts…all are yummy.

I wish you could see my kitchen right now. I made a peanut batch first. Then I tried the maple/bacon/pecan batch, but wasn’t happy with it (maple syrup in the sugar solution didn’t work out well, and I chopped the bacon and pecans too small) so I tried again. Each of these batches makes about 5 quarts, so just picture 13 quarts (hey, we had to try some of it!) of caramel corn. Yikes! I’m going to have to find someone to give some of this to or else dig out my “fat pants.”

Think crisp cellophane bags with pretty ribbons and a little silk poinsettia. What a welcome hostess gift this would make!