Barmbrack is a fruit-filled, slightly sweet bread that is traditionally served In Ireland on Halloween, but is also enjoyed on St. Patrick’s Day. Originally, it was leavened with the frothy foam produced by fermenting beer, but since I don’t make my own beer, I used good old active-dry yeast instead. In keeping with the “spirit” of the thing, though, I did soak the dried fruit in beer.
Guinness is lovely…dark and rich, with a hint of coffee and chocolate. You can, of course, use any beer. Or milk. Or brewed tea. It’s all up to you.
This isn’t a difficult recipe, but it is time consuming. The fruit needs to be soaked for at least 2 hours, then it needs to rise twice, and since the dough is rich, this can take anywhere from 1 to 2 hours each time. The good news is, the bread tastes even better the next day, so you can make it ahead of time.
And if you’re really rushed, I have an easier recipe for Tipsy Tea Brack that uses baking powder instead of yeast. It’s much faster, and aside from being just a little sweeter, the two breads are very similar. Both were a hit in my household, but I have a weakness for yeast breads, especially when toasted, and didn’t mind spending a day babysitting the dough. Mmmm.
1½ cups dried fruit (raisins, sultanas, fruitcake mix)
zest from 1 lemon
½ cup very warm water with a pinch of sugar added
1 packet (1/4 oz) active-dry yeast
¼ cup sugar
1 egg
1 teaspoon vanilla
1½ teaspoons pumpkin pie spice (or ½ teaspoon. cinnamon and ¼ teaspoon each: clove, ginger, allspice, nutmeg)
4 cups bread flour
1 teaspoon salt
2 tablespoons melted butter (if using unsalted butter, add an additional pinch of salt)
Instructions
In a small pan, heat liquid until steaming, but not boiling. Remove from heat.
Add dried fruit and lemon zest. Cover tightly and let fruit sit for at least 2 hours. Strain into a bowl,. Press firmly on fruit to remove excess liquid. Reserve 1 cup of liquid, discarding any remaining. If necessary, add water to bring the amount to a full cup.
In a small bowl or cup, combine the warm water and yeast. Let it sit until foamy - about 5 minutes.
In a large bowl (a sturdy stand mixer is recommended), combine the cup of reserved liquid, ¼ cup sugar, egg, vanilla, spices, yeast mixture, and 2 cups of the bread flour. Beat until well combined.
Switch to a dough hook and add remaining flour and salt. Knead by machine for 3 minutes, then drizzle in the butter and knead for an addition minute. Add fruit and mix until combined. (If kneading by hand, add the butter along with the last 2 cups of flour, then move dough to a floured surface and knead 6 minutes, working the fruit in at the end.)
Transfer dough into a large greased bowl, cover with plastic wrap, and allow dough to rise until doubled. This may take 1½ hours or more, depending on the warmth of your kitchen.
Grease a 9-inch round cake pan and line the bottom with a piece of parchment.
Turn dough out onto a lightly floured surface and knead a few times to distribute the fruit evenly. Form into a ball and place in prepared pan. Cover and let rise until almost doubled.
Heat oven to 375 F. Bake bread for approximately 50 minutes. The top should be dark brown. Turn the bread out onto a cooling rack. The bottom should sound hollow when tapped. (If in doubt, give it a few more minutes in the oven.) Allow the bread to cool completely before cutting.
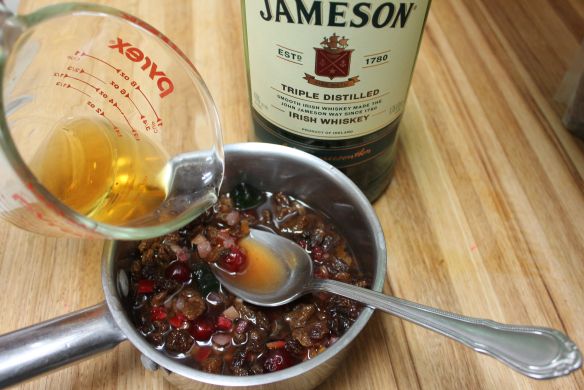
Skip the soda bread on St. Patrick’s Day and try your hand at this delightful Irish treat! If you aren’t a fan of fruitcake (which I totally understand) you could skip the candied fruit and just use the sultanas and raisins for a milder taste. If you don’t care for dried fruit (even soaked in Jameson’s), it’s back to soda bread for you!
Tea Brack, which uses baking powder to rise, is a simpler version of Barmbrack, a yeast-leavened loaf. Both are very popular in Ireland. Though little charms are often baked in, I hate the thought of putting inedible things in my bread, so I was a party pooper and didn’t toss in the coin, the ring, the little piece of material.
There are a lot of recipes out there for both breads, each claiming to be “traditional”. I gave up trying to sort through them and did my own thing—as usual. If you’d like to try the yeast version, check out my recipe for Irish Barmbrack
My recipe has Irish whiskey in it, and a crusty top made with Irish Cream and brown sugar. If you prefer to leave out the alcohol, just use tea instead. Note: I used Earl Grey, but any black tea would be fine.
In a medium pan, warm tea until steaming but not boiling. Remove from heat.
Add fruit, lemon zest, and whiskey. Cover and let sit for 2-3 hours.
Line the bottom of a generously greased loaf pan with parchment. Heat oven to 350 F.
Sift the flour, baking powder, brown sugar, and spices into a medium bowl.
Stir the egg and vanilla into the fruit mixture and pour into the bowl with the dry ingredients. Gently stir just until the flour is incorporated, and spoon into prepared pan. Bake for 55 minutes, or until a toothpick inserted into the middle of the loaf comes out clean. If you are not adding the topping, let the loaf cool on a rack for 10 minutes, then turn it out to cool completely.
TOPPING: If you are adding the topping, mix the brown sugar and Irish Cream together well, then brush over the top of the hot loaf. Return to the oven for 5-10 minutes. Let the loaf sit in the pan on a cooling rack for at least 15 minutes, until topping feels firm to the touch. Turn out onto the rack to cool.
Add whiskey to hot tea and fruit. Let it sit until those raisins are plump (2-3 hours).
Sift the dry ingredients into a medium bowl.
Stir egg and vanilla into cool fruit mixture.
Gently stir, just until the flour is incorporated. (a few white wisps are fine)
Spoon batter into prepared pan and bake.
Whisk together the Irish Cream and brown sugar until smooth.
Brush the top of baked bread with the Irish Cream mixture. (For moister bread, poke holes with a toothpick first.) Pop it back in the oven for 5-10 minutes, or until topping is firm.
Just a few minutes in the oven turns the topping light and crunchy.
A three generational road trip from California to Connecticut (to drop my granddaughter off at college) was full of adventures and lots of laughter. You’re invited to travel along as I share recipes inspired by my favorite memories.
The first day of our road trip was a long one, from Sacramento to Salt Lake City, where we had a wonderful dinner with my daughter’s old high school friend (hi, Angie!) and then fell into our hotel beds, exhausted. In the morning we were pressed for time, but had heard wonderful things about Pig & a Jelly Jar and just had to have breakfast there. It was a fun little place, and breakfast in the courtyard was lovely, but . . . we’d really been lusting after their warm beignets, and were sad to find out that there weren’t any prepared yet. We’d have had to wait 40 minutes, which would put us behind schedule.
We had a wonderful breakfast anyhow, and then got on the road, sans beignets. I was disappointed because I’d never tried one—had just heard about them from people who’d visited New Orleans. You know what’s coming, right?
Yeah. when I got home I made some. And then I made some more. There’s really nothing hard about it, if you don’t mind a mess. Between the hot oil and the powdered sugar, I had more cleaning than I was counting on, but still . . . it was worth it.
Jelly glazed sausage and a fried egg take this over the top!
As a nod to Pig & a Jelly Jar, and inspired by a glazed doughnut breakfast sandwich I had in New Haven, Connecticut (I know, I’m state hopping here), I split a few of the beignets and added pork sausage lightly glazed with jelly. It should have been blueberry lavender jelly (which is what the restaurant serves with their beignets) but a quick check in the fridge assured me I was all out of blueberry lavender jelly, so I used raspberry. And I added a fried egg. Oh, yum!
Then, because I couldn’t resist, I made a maple beignet version with sausage, scrambled egg, and maple-glazed bacon. This was, of course, my favorite.
I’m going to be honest here: since I’ve never eaten a beignet outside my own kitchen, I don’t really know how mine compare. What I do know is, they are pillowy and sugary, and delicious. And since I was worried because my beignets had big air pockets in them, I Googled the “problem” and found out that air pockets are desirable. Sweet!
I also discovered that I prefer little bite-size beignets. They fry a bit faster and seemed lighter. And you can fool yourself into thinking you’ll just have a few. (Don’t count on it!) So if you aren’t planning on making breakfast sandwiches, I would definitely recommend keeping the squares two inches or smaller.
Note: Beignets aren’t supposed to be a sweet dough (like a doughnut), which is why you drench them in powdered sugar. For my maple version I used dark (bold grade) pure maple syrup as the sweetener, and it worked great. However, even with the flavorful bold syrup, the maple flavor will be very subtle. I am not a fan of subtle maple flavor, so I added a teaspoon of my beloved Mapleine flavoring, which gave the dough a little boost. Next time, I’ll double the amount.
Makes about 16 3-inch beignets. or about 64-70 small beignets (1½ inch)
Ingredients
BEIGNETS:
½ cup pure maple syrup
6 tablespoons butter
5 ounces evaporated milk (small can)
1 cup warm water (110 - 115 degrees)
1 package active-dry yeast
2 eggs
1-2 teaspoons maple flavoring
1¼ teaspoons salt
5½ cups bread flour
Light flavored oil, enough to have at least 2 inches in a heavy pot
SANDWICH FILLINGS:
Per sandwich: 2 slices bacon, 1 sausage patty, 1 egg, fried or scrambled
Maple syrup for glazing meat, OR
JELLY GLAZE:
2 tablespoons jelly
2 teaspoons water
1 teaspoon butter
Instructions
BEIGNETS:
In a medium saucepan on med-high heat, bring maple syrup to a full boil and cook for 1 minute, stirring constantly. Remove from heat and add butter and evaporated milk. Stir occasionally until butter is melted and mixture is lukewarm.
In a large bowl (a stand mixer with dough hook is recommended) combine warm water and yeast. Allow mixture to sit 5-10 minutes, to soften the yeast.
Add warm syrup mixture and eggs to the yeast mixture, mix until combined.
Add salt. Gradually add flour until dough comes cleanly away from the side of the bowl. Continue to knead by machine for 4 minutes, or by hand on floured surface for 6 minutes.
Place dough in a greased bowl, cover with plastic wrap, and allow it to rise. This is a rich dough, and may take up to 1½ hours..
On a generously floured surface, roll dough out into a square, approximately 14x14 inches. Try to keep it an even thickness. Use a pizza cutter or sharp knife to trim off uneven edges. Use a ruler to mark off squares (between 3 and 3½ inches). If making beignet bites, these can be cut in quarters. Let them sit and rest while you prepare the oil.
Pour oil into a deep, heavy pot over medium heat until oil reaches 360 F. You'll need to keep a close eye on the heat as you cook; it will fluctuate. A good thermometer is really important.
While oil is heating, cover a large cooling rack with paper towels.
Use a thin spatula to drop several squares of dough into the hot oil, being careful to leave enough room for the dough to move around freely. If you make large beignets, you may only be able to fry two at a time, depending on the size of your pot. Allow the dough to reach a warm brown color (about 1 minute) before flipping over. Once both sides are cooked, use a slotted spoon or kitchen spider to move the beignets to the prepared cooling rack.
Once all of the beignets are done, sift powdered sugar over both sides. You can give them a second coating in a paper bag with more powdered sugar, if you'd like.
Eat warm!! These can be frozen and reheated, but they're really best if eaten right away.
SANDWICH FILLINGS:
To glaze bacon or sausage with maple, simply pour a few tablespoons of syrup in a non-stick fry pan over medium heat. Once bubbly, add the meat, flipping several times until syrup turns thick and sticks well.
For the jelly glaze, mix the jelly, water, and butter in a non-stick frypan over medium heat. Stir until hot and bubbly. Add meat, flipping several times, until glaze turns thick and sticks to the meat.
Love is baked right into this bread, with a heart-shaped swirl of cherries and walnuts. The dough is surprisingly simple to make, and creating the heart just takes an extra step or two; I’ll walk you through it.
Make sure your bread pan isn’t too small. A 9-inch by 5-inch pan (or even a little bigger) works well. This is a large loaf . . . more to love!
I used dried, sweetened dark cherries. (Not freeze-dried!) On my first attempt I used frozen dark cherries (heated and drained) and it was a sloppy mess. Still, it almost worked . . . if you don’t count the dramatic way it blew up in the pan. Luckily, I half expected this, and used a sheet pan under the bread pan. Whew.
Of course, if you don’t want to fuss with the heart shape, you can just roll it up with the filling like a spiral bread. It’s still delicious! But I really recommend my method of brushing egg wash on the dough as you roll. It helps the whole thing hold together. No one wants to pick up a piece of bread and have it unroll!
Makes 1 large loaf of bread. (Use at least a 9x5 pan.)
Ingredients
BREAD:
1 cup whole milk
1 tablespoon butter
¼ cup warm water with a pinch of sugar added
1 package active-dry yeast
1 egg
1 tablespoon sugar
3¾ cups flour (adjust if needed)
1½ teaspoons salt
1 tablespoon oil (light flavored, like canola or peanut oil)
FILLING:
5 ounces finely chopped dried (not freeze dried!) dark cherries - about a cup
½ cup sugar
2 tablespoons flour
1 egg white (reserve the yolk for assembly)
1 teaspoon vanilla
½ cup ground (or very finely chopped) walnuts
Instructions
BREAD: Heat milk and butter until butter is melted. Pour into a large mixing bowl (a sturdy stand mixer with a dough hook is recommended). In a small cup or bowl, combine warm water with a pinch of sugar and the yeast. Let it sit until foamy, about 5 minutes.
To the milk mixture in bowl, add yeast mixture, egg, sugar, and 2 cups of the bread flour. Beat well.
Add salt and remaining flour, (enough to make dough come cleanly away from sides of bowl) and mix until completely combined. With mixer running, drizzle oil over the dough and knead by machine for 6 minutes (or by hand on lightly floured surface for 8 minutes).
Cover the bowl with plastic wrap and let it rise until double, approximately 45-60 minutes. Make the filling while the dough rises.
FILLING: Mix together finely chopped cherries, sugar, flour, egg white, vanilla, and walnuts. Set aside. Combine the egg yolk with 1 teaspoon water and whisk well.
ASSEMBLY: Move raised dough to a very lightly floured surface. Press into a rectangle or log. Cut off ⅓ and set aside.
Press the larger piece of dough firmly into greased bread pan. (I spray my pan with a flour/oil blend like Baker's Joy). Try to make the dough level. Set aside.
Roll the small piece of dough into a long rectangle, approximately 8 inches by 15 inches. Distribute the filling over the dough. Don't worry if it doesn't completely cover the dough, just keep it as even as possible.
You will be rolling both ends toward the middle, so mark the middle of one of the long sides for reference. Beginning at one short end, roll dough snugly, pulling toward yourself slightly as you go. Use a pastry brush or paper towel to brush the floury bottom side lightly with egg wash as you roll. (This will help the swirls stick together.) Roll to your middle mark. Repeat, rolling from the other end. Both sides should be equal - if not, adjust by unrolling the larger side a little and rolling the other until they touch. Pinch the ends closed.
With a sharp knife, cut the dough in the pan lengthwise, right down the middle, almost to the bottom of the pan. Use your hands or a dough scraper to make a V-shaped channel.
With floured hands, quickly pick up the rolled dough. The round tops will be the top of the heart, so press the sides to make the bottom a little pointed, and tuck the roll into the V-shaped channel in the pan, getting it as deep as possible.
Cover lightly with plastic wrap and let the dough rise until the bottom section of dough is just above the sides of the pan. (The heart part will be higher.) Brush with any remaining egg wash.
Heat oven to 375F. Place bread pan on a baking sheet and bake for about 40 minutes, or until it's a rich dark brown. Bottom should sound hollow when tapped.
Cool for 10 minutes, then turn out onto rack to cool completely before cutting. (Don't cut while hot, or the filling might not set properly.)
The dough is easy, so I’m not going to overwhelm you with prep photos. Here it is, ready to rise.
This is nice dough – not sticky, rises quickly. I cut corners and didn’t move it to a greased bowl. It was fine rising in the mixing bowl. (One less thing to wash!)
Cut 1/3 of the dough off and set it aside.
Press the large piece of dough firmly into bread pan. Make it as level as possible.
Roll out the small piece of dough and cover with filling. (I forgot the walnuts, so sprinkled them on. It worked!)
Brush the dough as you go!
Meetin’ in the middle! And yeah, yeah, it got a little messy. I was on a roll and forgot to stop in the center. Had to put it in reverse. Adds some rustic charm to the finished bread.
Slash the dough in pan down the middle and press open into a V-shaped channel.
Pick up rolled dough, pressing together at the bottom (which will be the pointy part of the heart) and fit into the channel in the pan.
Let it rise until the bottom bread is just above the edge of the pan. The rounded heart dough will be standing tall. Brush with remaining egg wash.
Baked.
I know it’s hard to wait, but do let this bread cool down before cutting. The texture will be so much better. Warm is okay; you have to be able to melt that butter, right? Or put a couple of slices under the broiler and enjoy it toasted. (I don’t recommend using a toaster. If that filling fell out, it would make a real mess.)
I never turn down a doughnut. Or two. Maple bars are my guilty pleasure, and I go back and forth between preferring cake doughnuts and raised, but one thing is clear to me: they must be fried to be irresistible. Baked doughnuts are fine, but . . . they just aren’t the same.
I love apple cider cake doughnuts, and was pondering the possibility of adding apple to a raised doughnut. (No, no, not chunks like apple fritters.) Would the addition of applesauce interfere with the rise of the yeast? The Man thought it was a bad idea, but rapidly changed his mind when he taste-tested a half dozen or so.
Here are some glazed and some sugared. See that dark doughnut kind of in the middle? I may have left that one in the oil too long. Still tasted good though!
This recipe creates a very soft dough. Soft and supple, and . . . well . . . I want to write poetry about the way it feels! It demands a little delicacy in handling, but the payoff is an incredibly light, fluffy doughnut. Actually, a whole lot of them; you’ll get about 24 doughnuts and a pile of doughnut holes. They’re best the day they’re made, but can be frozen for a few weeks, so don’t feel like you have to sit down and eat two dozen of them (though I did my best).
Oh, and there’s a reason store bought doughnuts come in a cardboard box! If you put these in an airtight plastic bag, they will get gooey. I find that they do well loosely covered with foil.
cooking oil - lots of it! At least 2 inches deep in pot. (I use peanut oil.)
GLAZE (OPTIONAL):
2 cups powdered sugar
¼ cup apple cider (a little more if needed to create a thin glaze)
1 teaspoon meringue powder (optional for a firmer glaze)
SUGAR TOPPING (OPTIONAL)
mix 1 cup sugar and 1 tablespoon cinnamon and roll warm doughnuts in mixture.
Instructions
In a medium saucepan on medium high heat, scald milk by bringing it almost to a boil. Remove when you see bubbles all around the edge of the pan.
Add ⅓ cup sugar, apple sauce, apple cider, cinnamon, nutmeg, and salt. Set aside.
In a large bowl (a sturdy stand mixer is recommended) combine the warm water, yeast, and remaining ½ teaspoon sugar. Let it sit until foamy - about 5 minutes.
Add the milk mixture to the bowl and stir to combine. Add eggs, one at a time, beating well with between eggs.
Add 5 cups of the flour, one cup at a time (switch to a dough hook if using a stand mixer) and beat for 2 minutes.
Add butter, one slice at a time, beating after each addition.
Slowly add remaining flour and knead by machine for 5 minutes. (If kneading by hand, spoon dough onto generously floured surface and knead for 7-8 minutes.) Dough will be very soft and will not form a ball. Scrape into a large greased bowl and cover. Let rise until double, about 1 hour.
Turn dough out onto a generously floured surface. Flip over to cover both sides lightly with flour, and pat into a rectangle. Roll gently out approximately ⅓-inch thick. Using a doughnut cutter or a large and small round cutter, cut out the doughnuts. Try to keep them close together. Use a spoon to remove the holes as you go, placing them on lightly floured surface.
Once all of the doughnuts are cut out, remove the scraps. They can be re-rolled once, but I don't recommend cutting out doughnuts. They will be a little tough, and not very attractive. But you can cut more holes out of the scraps.
Cover the doughnuts with a dishtowel and let them rise until puffy. (About 45-60 minutes.)
Heat oil to 365 F. Use a thermometer often, adjusting heat as necessary to keep the temperature consistent. Use a thin metal spatula to slide a few doughnuts at a time into the hot oil, always leaving them room to float and move in the oil. Cook until golden brown (about 1 minute) and flip the doughnut over to cook the other side. Remove with a slotted spoon or spider, and place on cooling racks covered with paper towels.
While still warm, whisk together the glaze ingredients (if using) and dip the top of each doughnut, placing on a rack to dry.
Alternatively, you can simply combine sugar and cinnamon and roll the warm doughnuts in the mixture.
I didn’t have apple cider, so used apple juice. It is a little sweeter, but still worked well.
Add applesauce, spices, and apple cider to scalded milk.
Combine warm water, yeast, and sugar and let it bubble. Stir in the milk mixture.
Mix in eggs one at a time.
Add 5 cups of the flour, but not like this! I’m sure you won’t be so busy taking photos that you forget to put the guard on the mixer, right? (You should have seen ME. And the FLOOR!)
NOW add the butter, bit by bit. I know, seems strange, huh? But adding the butter after the majority of the flour makes a huge difference in texture. Trust me. Then you’ll add the remaining flour to make a very soft dough.
See how soft the dough is? It won’t come cleanly from the bowl, but if you use your fingers to coax it out into the greased bowl it shouldn’t stick to your hands. Soft but cooperative!
Once the dough has risen, dump it onto a floured surface. Turn it over to coat both sides with flour and roll it gently – about 1/3-inch thick.
Cut ’em out! Rather than re-rolling (which makes for less-than-desirable results) cut more doughnut holes with the scraps. Or any little shapes. I used a small flower cutter on some.
Cover and let rise until puffy – about 45-60 minutes.
Use a metal spatula to slide into deep oil – at least 2 inches – about 365 F. Cook a few doughnuts at a time, just until golden brown. Remove with slotted spoon or spider.
The doughnut holes are the best part!
Place on cooling racks covered in paper towels.
Whisk up some glaze and dip the warm doughnuts. (The meringue powder is totally optional. I just like a firmer glaze.) Or roll the doughnuts in cinnamon sugar.
Drip drying.
Don’t quote me on this, but I’m pretty sure doughnut holes have no calories.
Here’s to a warm, cozy, indulgent holiday season. Wishing you joy,
I’m on a bit of a sourdough kick right now, and couldn’t resist creating a sourdough version of my Pumpkin Rye Bread. This is a little denser, chewier . . . just the way I like it. It also takes longer that the yeast version (though it is not a bit harder to make), so I recommend you start this bread in the evening and let the dough rise overnight in a cool spot.
I use a cast iron Dutch oven with a domed lid for baking sourdough bread. The pan helps the bread keep its shape and the lid holds the steam in and gives the loaf a wonderful crust. If you don’t have one, you can simply put a pan of water in the bottom rack of your oven when you start preheating. The bread can go on a baking sheet on the rack above the water and the steam will give your bread that magical sourdough crust.
This loaf has been dropped into a preheated (OH so hot) Dutch oven. Lid goes on for baking. (You’ll notice for this loaf I put the orange strip down first with the dark dough on top of it, then rolled, for a lighter colored loaf.)
This is ideal for Thanksgiving or Christmas, but you know I can’t just leave a recipe alone, right? So . . . with Halloween as an inspiration, I made a batch with food coloring for more contrast, and cut designs on an outer layer of rye dough. I love the way it turned out!
With the exception of food coloring, the ingredients are the same; it’s just formed differently. The loaf at the top of the post was rolled up like a cinnamon roll, and the Halloween version was made of a ball of brown dough wrapped in orange dough, wrapped in the remaining brown dough.
Get creative. As long as you handle the dough gently to keep as many of those precious air bubbles in it as possible, you can play to your heart’s content. I think a whole lot of balls of dough pressed together and then formed into a smooth ball or covered with a layer of dough would be fun. Next time!
1 teaspoon unsweetened cocoa powder (2 if you're going for darker dough)
1 teaspoon espresso powder
Food coloring (optional) for richer colors
Instructions
Begin this bread in the evening and bake the next day. The first rise takes 8-10 hours.
In a large bowl, combine sourdough starter, pumpkin, and water. (Add orange food coloring here, if desired.) Stir in 3 cups of bread flour, and salt until completely blended.
Pile 1 cup of bread flour on work surface and drop half of the dough onto it. Using a bench scraper to help if necessary, knead until dough is smooth and doesn't stick to hands - about 5 or 6 minutes. You will use up most of the flour. Form dough into a ball and place in greased bowl.
To make the rye dough, you can either knead by hand or machine. If kneading by hand, add caraway seeds, molasses, cocoa powder, and espresso powder. Mix well, then place 1 cup of rye flour on work surface, drop the dough onto it, and proceed as you did with the orange dough. You may need a little additional flour; if so, don't use more rye flour - use bread flour. If kneading by machine, use a dough hook. Add rye flour and the remaining ingredients and knead for 5 minutes. Add a little more bread flour if dough is overly sticky. Form into ball and place next to the orange dough in the bowl.
Cover with plastic wrap and let the dough sit in a cool place overnight.
The next day, carefully separate the two balls of dough (don't worry if a little of one color sticks to the other.) Handle the dough as gently as possible so you don't lose all the bubbles. Press, stretch, or gently roll each piece into a long wide strips, about 3 inches wide by 14 inches.
Place one on top of the other. If the dark strip is on the bottom, more dark will show on the outside of the loaf, and vice versa. Roll the two pieces up together and pinch the end to seal.
Turn so the swirl is on top and use the sides of your hands to tuck the dough under a little, scooching the bread along the work surface to smooth the bottom.
Place in a bowl lined with floured plastic wrap or a floured dishcloth. Cover and let rise until doubled. Depending on your sourdough starter, this could take anywhere from 1 - 4 hours.
Baking in a Dutch oven: Set the bottom half of Dutch oven on second lowest rack in oven and preheat to 450 for at least 30 minutes. (No grease is necessary if it is well seasoned.) Open oven and pull out rack. Gently lift dough from bowl and CAREFULLY drop it into the VERY hot pan. Use a scissors or sharp knife to make three quick cuts across the bread, cover with the lid, and return it to the oven. Reduce heat to 425 and bake for 20 minutes. Remove lid and bake for an additional 20 minutes, or until the bread is beginning to brown.
BAKING on BAKING SHEET: Put a large pan of water on bottom rack of oven and preheat to 450 F. for 30 minutes. Dust the center of a baking sheet with flour or corn meal. Lift dough from bowl and place on baking sheet. Open oven door carefully (the steam is very hot) and quickly put the bread on a rack above the water. Reduce heat to 425 F and bake about 40 minutes, or until bread is beginning to brown.
Remove from oven and tip out onto cooling rack. The bottom of the bread should be brown and sound hollow when tapped. Allow bread to cool before cutting.
NOTE: Photos are for the original recipe. Halloween bread photos and instructions will be at the bottom of the post
Combine sourdough starter, pumpkin, and water.
Stir in 3 cups bread flour and the salt. It will be kind of . . . gloppy. That’s okay!
On work surface, drop half of the dough onto 1 cup bread flour and (using a dough scraper to begin with, if necessary) knead until smooth (about 5 – 6 minutes).
It should hold its shape and shouldn’t stick to your hands or the work surface. It will use most of the flour to reach this point.
To remaining dough, add molasses, caraway seeds, cocoa, and espresso powder. Mix well.
This is where there should be a photo of me, kneading the rye dough on a bed of rye flour. The photographer (ahem) was negligent. Sigh. Just figure it’s the same as incorporating the flour in the orange dough, only you MAY need a little more flour (because of the molasses). If so, use bread flour, not more rye.
Snuggle them up, cover with a cloth or plastic wrap, and let them rise in a cool place overnight.
Next day, pat each ball of dough into a long strip, about 3 inches wide, and 14 inches long. (Longer makes smaller marbling, shorter makes big, bold streaks.)
Lay one piece on the other (whichever color you want to show most on the outside should be on the bottom) and roll it up. Pinch the end to seal. Turn so the swirl is on the top and use the sides of your hands to tuck the bottom underneath a little, while “scooching” the bread toward you and turning.
Line a bowl with plastic wrap or a dish towel, and sprinkle generously with flour. Place dough in the center. Cover, and let rise until doubled. Depending on your starter this could take anywhere between 1 – 4 hours. Mine took 2.
This loaf has been dropped into a preheated (OH so hot) Dutch oven. Lid goes on for baking.
HALLOWEEN VERSION!
Use the same ingredients but add a generous squirt of orange coloring when you add the pumpkin and water, and then add black food coloring to the remaining dough when you add the molasses. Follow the recipe instructions for adding the remaining flour and tuck them into the bowl to rise.
Waiting to be put to bed for the night.
The next day, instead of forming two strips and rolling them together, divide the dark dough into two pieces. Roll one into a ball, place on slightly flattened orange dough and bring the orange dough up to completely cover the dark dough. Pinch together well and flip it over, smooth side up.
Pull orange dough up and over the ball made with half of the dark dough.
Flatten, gently stretch, or carefully roll out the remaining dark dough, large enough to completely encase the orange ball. Lay it over the orange dough ball and tuck under the bottom. Gently “scootch” the ball toward you, spin a little to the right, pull toward you again. Repeat until the dough is smooth.
Drape the remaining dark dough over the ball. (That’s my hand under there. I may have gotten carried away and made it a little too big. The stuff stretches! The extra dough just got tucked under, creating a thicker dark marbling at the bottom. You can’t go wrong with this!
Line a bowl with a dishtowel or plastic wrap, dusted in flour, and set the dough in the bowl. Cover and let rise until doubled. This can take anywhere from 1-4 hours, depending on the enthusiasm of your sourdough starter.
Ready to rise
Lift out and, using scissors, knife, or razor, cut designs in the dough, snipping deeply enough to see the orange, and even the brown center. Bake as instructed in the recipe.
Snip snip!
Okay, WHEW. I think I’m ready to move on from bread now.
I make these recipes seem WAY more complicated than they are, because I don’t want to leave any questions in your mind when you’re elbow-deep in flour. If I had a little more technological ability I’d just do a video. (Maybe in the future, but don’t hold your breath.)
As Julia Child said: “Learn how to cook- try new recipes, learn from your mistakes, be fearless, and above all have fun!”
Two of my favorite breads have been marbled together to create a crusty, flavorful symbol of autumn harvest. This loaf could be:
The focus of a charcuterie board.
A Thanksgiving centerpiece.
The foundation for the best turkey or grilled cheese sandwich ever.
A Halloween masterpiece. (Add a little orange and black food coloring.)
I actually made two versions—this, and one using sourdough. I loved the chewy texture of the sourdough loaf, but I can only put one recipe in a blog, and this one was quicker to make. (You’re welcome!) I will, however, post the sourdough recipe too in a few days. Check back!
It takes a little more effort to make this than a normal loaf of bread, because you will have to knead the orange half by hand. (The rye half can be kneaded by machine if you wish.) But there is nothing hard about this at all.
Optional: 1 egg white whisked with 1 teaspoon water and flaked rye (or oatmeal)
Food coloring - orange and black to create Halloween colors
Instructions
In a large bowl combine very warm water, sugar, and yeast. Let sit until bubbles begin to form - about 5 minutes.
Add pumpkin, 3 cups of bread flour, and salt. Mix until completely combined. Mixture will be a heavy batter.
Spread the remaining 1 cup of bread flour on work surface and drop half (about 1½ cups or 1 pound) dough on the flour. Sprinkle some of the flour on top of the dough and knead until just slightly sticky - about 5 minutes. It's very soft to begin with; use a dough scraper if necessary. Form kneaded dough into a ball and place in a greased bowl. Leave any leftover flour on work surface.
The remaining dough in the bowl will be your brown rye bread. To knead by hand, stir in caraway seeds, molasses, cocoa, and espresso powder,. Push bread flour aside and place 1 cup rye flour on the work surface, then drop the dough onto the top and knead as you did the orange dough. If more flour is needed, don't add more rye - use bread flour. (If kneading by machine, simply add the remaining ingredients to the dough and switch to a dough hook and knead for 5 minutes.) Form a ball and place it into the bowl next to the orange dough.
Cover and let rise for 1 hour.
On floured surface, press or roll the rye dough into a rectangle approximately 12 inches long, with the width a little shorter than the length of your bread pan. Repeat with the orange dough. Place orange dough on top of brown dough. (It doesn't have to fit perfectly.)
Fold the bottom third up and then the top third down over the bottom third. Pinch edges closed. Using the edges of your hands, gently tuck the dough under all the way around, several times until you achieve a smooth loaf. If the orange dough shows through the top a little, that's fine.
Place in prepared loaf pan, cover with a cloth or plastic wrap, and let rise until double - about 1 hour.
Heat oven to 375 F and lightly grease a large loaf pan. (I like to spray with a flour/oil spray like Baker's Joy.)
If desired, brush the top of the loaf with egg white wash and sprinkle with flaked rye (or oats). Make several slits diagonally or straight across the top using a sharp knife, razor, or scissors.
Bake for approximately 40-45 minutes, or until light brown. When released from the pan the bottom should sound hollow when tapped. .
For best results, let the bread cool before cutting.
Combine water, sugar, yeast, and let it sit until you see a few small bubbles forming (about 5 minutes).
Add flour, pumpkin (sheesh, that looks RED!) and salt. Mix well. It will be more like a heavy batter than a dough.
Place half the dough on top of 1 cup flour on work surface. Knead for about 5 minutes. You probably won’t need all the flour, but that will depend on if you divided the dough evenly. If it isn’t sticking to your hands, it has enough flour!
Form into a ball and place in greased bowl.
To the remaining half add molasses, cocoa, espresso powder, and caraway seeds. If using the machine to knead, add rye flour. If kneading by hand, don’t add the flour yet. Dump the wet dough onto a cup of rye flour. Knead well and form into a ball.
Snuggle them up, cover with a cloth or plastic wrap, and let them rise.
The orange dough is softer and will rise a little more. That’s okay!
Press or roll each ball into a rectangle about 12 inches long and not quite as wide as the length of your pan. Lay orange dough on brown.
Flip bottom third up, then top third down over the bottom third.
Pinch it all the way around the edges.
Use the sides of your hands to gently tuck the bread under ALL the way around until you have a smooth loaf. Place it in the pan to rise until doubled.
Once it has risen, you can brush the top with an egg wash and sprinkle with flaked rye if you’d like.
Snip! Snip! Cut a few slits in the top, straight or diagonal, with a sharp instrument of choice.
Put down that butter! Try to restrain yourself (I know it’s hard) and wait until it’s cooled off to cut it, otherwise you’ll let out all that important steam. Warm is okay.
This is going to be a fall tradition around here from now on. Hope you and yours enjoy it too!
Who needs soda crackers in their soup when it’s so easy to make edible spoons? Yes, you can have your spoon and eat it too! Surprisingly, one spoon will make it through an entire bowl of soup without falling apart, but if you give each person two or three, they can crunch away as they go, which is half the fun.
I used a little yeast in this simple dough to keep the spoons light; we wouldn’t want to break a tooth on them, right? The dough won’t rise much, but it will be easier to work with after an hour of rest. While I worked with half of the dough (I don’t have four dozen spoons) the other half was covered with plastic wrap, rising a bit again as it waited its turn. Once the spoons are covered with dough they go straight into the oven, because you don’t want them to rise at that point.
If you don’t need four dozen spoons, you could turn the remaining dough into breadsticks by cutting the dough into strips, brushing with melted butter and then sprinkling with garlic salt and Italian cheese. Give them a twist and bake until light brown and crunchy.
I can fit 18 spoons on a cookie sheet, which was plenty for me! If you get tired of making spoons, turn the rest of the dough into crunchy breadsticks.
Since the spoons need to be very firm, crunchy is what we’re going for here. VERY CRUNCHY! If you want soft, tender breadsticks, try my Breadsticks…How Cheesy Can You get?
I tried many different methods for shaping the dough to see which was fastest and easiest for me, and settled on rolling the dough out very thin, then cutting rough spoon shapes with a sharp knife. You may prefer to roll small pieces into ropes (skinny on one end, fat on the other), but the important thing is to cover the spoon with a very thin layer of dough. If it’s too thick it won’t be as crisp, and it will puff up, which won’t leave enough room in the bowl of the spoon for soup.
Thin, thicker, thickest! The spoon on the left would be for a light soup. The spoon on the right would work for chili.
In a large bowl, combine the water, salt and sugar.
Add flour and yeast. (If using a stand mixer, switch to a dough hook.) Mix until dough comes cleanly away from the sides of the bowl, adding a little more flour if necessary.
Place dough on a floured surface and knead a few times until dough isn't sticky. Place in greased bowl or a plastic bag. Let dough sit for 1 hour. It will rise a little, but will not double.
Heat oven to 375 F. Cover two baking sheets with parchment. (The spoons slip around easily; use baking sheets with sides, if possible.) Gather STAINLESS teaspoons and tablespoons and place them upside down on the baking sheets. Coat the backs lightly with a thin coating of butter.
Divide dough in half. Return one half to bowl or plastic bag while you work with the other half.
On a floured surface, roll dough out very thin . . .no more than ⅛ inch. With a sharp knife cut out shapes roughly the size and shape of a spoon. Don't worry about being exact; you can stretch and pat the dough to fit.
Start with the bowl of the spoon, pressing the dough to fit all the way to the edges. Press with the palm of your hand to make it even, trimming any excess around the edge with scissors if necessary.
Twist the dough at the bottom of the bowl, where it turns into the handle, and press firmly onto the spoon, then cover the handle with the dough, cutting off the end or twisting it decoratively. You can also twist the whole handle, or braid . . . have fun and experiment!
When all of the spoons are covered with dough, place the baking sheet into the oven. Bake approximately 18-20 minutes, depending on the thickness of your dough and the weight of your silverware. Look for a rich golden brown around the edges.
Remove from oven and leave the dough on the spoons for 5 minutes. Remove and allow stainless spoons to cool before repeating with the remaining dough.
Best if used promptly, but if you are making them ahead, make sure they are completely cool before storing.
You can also freeze them. If you want to serve them warm, just pop them in the oven for a few minutes at 375 F.
Place dough in greased bowl or plastic bag and let it sit for 1 hour. It will rise a little, but won’t double.
This dough was a little thick. Thin is better, but if you want sturdy, be sure to bake it a little longer.
Ready for the oven.
Baked. Let them sit on the spoons for 5 minutes.
We’re moving into my favorite time of year. Pears and apples, nutmeg and cinnamon, maple everything . . . I love Fall! The garden goes to sleep and I have time to play in the kitchen and linger in my happy place. I just bought forty pounds of Honeycrisp apples and some gorgeous pears, so I guess you know what’s coming next.
I love dense, chewy rye bread, but wanted something lighter for sandwiches and rolls. With yeast in short supply in many places right now, I was pleased to find that using sourdough starter and just 1/4 teaspoon of yeast created two wonderful loaves of bread. I tried a batch without any yeast, and it was really good, but it took a little longer to rise and was slightly denser.
You probably know by now that I don’t always play by the rules. Experimenting is half the fun! Purists will hiss through their teeth when they see I’ve added yeast to my sourdough sponge, but it made lovely, light loaves of bread. I just used it as insurance, but if you have a robust sourdough starter and don’t mind a little more rise time, by all means skip the commercial yeast!
If you aren’t familiar with using a sponge when making bread, I really urge you to give it a try. It isn’t complicated or difficult. In a few minutes you can mix it up, tuck it in, and go to bed. When you wake up in the morning it will be ready to go to work.
A sponge creates a lighter loaf of bread, with more flavor, and is worth the extra bit of effort.
For this recipe you will need sourdough starter, rye flour, and bread flour. Bread flour makes a big difference. Rye flour is very low in gluten, and between that and the minimal amount of yeast in the recipe, the dough needs the extra ‘oompf’ bread flour offers.
Try to resist cutting into it while it’s hot, because it’s still baking inside. But DO get some while it’s warm!
Actual hands-on time for this bread is maybe 30 minutes, (a few more if you knead by hand) but it takes a long time to rise, so start your sponge the night before and just hang out the next day so you can let your dough set the pace.
1 cup sourdough starter (approximate; if you have a little less, that's fine)
1 teaspoon sugar
¼ teaspoon active-dry yeast
1 cup bread flour
1 cup warm water
BREAD:
Sourdough sponge
¾ cup warm water
½ cup very strong coffee
⅓ cup molasses
2 tablespoons cooking oil
3 cups rye flour
1 tablespoon salt
3½ cups bread flour
1 heaping tablespoon caraway seed (optional)
Cornmeal
Instructions
SPONGE: Start this the night before. Combine sourdough starter, sugar, yeast, bread flour, and warm water in a medium bowl. Stir well, cover with plastic wrap and let it sit overnight.
DOUGH: In a large bowl (a sturdy stand mixer with dough hook is recommended) combine the sponge, warm water, coffee, molasses, and cooking oil.
Add rye flour and beat for 1 minute.
Add salt, bread flour, and caraway seeds. Knead by machine for 5 minutes, or by hand on a floured surface for 7 to 8 minutes. Dough will be slightly sticky. If kneading with the mixer, dough should come cleanly away from the side of the bowl. If not, add more bread flour 1 tablespoon at a time. If kneading by hand, use a lightly floured surface and add a little flour at a time, just enough to make it easy to handle. A dough scraper will help.
Move dough into a large greased bowl. Use slightly damp hands to form it into a ball and turn to coat the surface. Cover with a towel and let the dough rise until double. Depending on many factors this may take two to three hours.
Prepare a large baking sheet by sprinkling it with cornmeal, then punch down the dough and form into two long loaves. Cover with a towel and allow to rise until double . . . 2 to 3 hours.
Heat oven to 375 F.
Slash across each loaf several times with a razor blade or a very sharp knife. Bake for 40 minutes, or until dark brown and the bottom sounds hollow when thumped with your knuckles.
Slide loaves onto cooling rack, brush with butter if desired, and allow to cool before cutting.
Add bread flour and salt last. (And caraway seeds, if desired. Some people use fennel too.)
The dough is a little sticky. You may need to use a rubber spatula to scoop into greased bowl. Damp hands work well to coax it into a ball.
Risen, and ready to punch down and form into two loaves.
My dough doesn’t look very smooth, partly because of the caraway seeds (I love them and tend to get carried away) and partly because I grind my own rye berries. This time I left them a little coarse. I’m pretty sure you’ll buy your rye flour at the store, which will be a little less . . . rustic.
You do YOU, of course, but here is how I form my loaves:
First I pull all of the edges up to the top to make a rough ball.
Then, start from one side and roll it like a sleeping bag. Pinch the ends into submission (make them round and pretty) and place seam down on baking sheet.
Ready to cover and let rise.
Slash the bread! Dusting with flour (my preference) is optional.
Try different shapes if you’d like. Just adjust the baking time for smaller loaves.
Before you dig in, you may want to sacrifice part of a loaf for absolutely killer croutons! What a treat. I had to hide some for salads because The Man was eating them hand over fist.
I love this bread. It’s fast and easy, uses only a few ingredients, and tastes like heaven . . . soft and fluffy inside, crispy and crackly outside, though for this recipe I added a little olive oil and skipped the steam bath in the oven, because as much as I adore that crackly crust, it wasn’t the look I was after.
The recipe makes enough for a large basket, flower decorations, and lots of rolls to fill your basket with. If you just want to make the basket and skip the rolls, cut the recipe in half.
Making the basket really isn’t hard at all. If you’ve ever made a lattice pie crust, you’ve got this! You know, under and over. Under and over. If there are any unattractive spots, cover them with flowers! I made roses for one and daisies and wild flowers for the other, then painted them with colored cream.
This recipe looks intimidating, but that’s just because I had a really hard time explaining the details of weaving with dough, Just look at the pictures; you’ll figure it out!.
Makes a large basket, flower decorations, and enough rolls to fill it to overflowing. If you only want to make the basket, cut the recipe in half! YOU WILL NEED AN OVEN-SAFE BOWL
Ingredients
2½ cups very warm water
2 packages active-dry yeast
1 teaspoon sugar
6 cups bread flour
2 teaspoons salt
1 tablespoon olive oil
heavy cream and food coloring if desired for flower decorations
Instructions
Cover the outside of an oven-safe mixing bowl with foil, pressing firmly to smooth out wrinkles. (I used an 8-inch bowl because that was all I had, but a larger one would be great.) For best results, spray foil lightly with a flour/oil baking spray.
In a large bowl (a sturdy stand mixer is highly recommended) combine warm water, yeast, and sugar. Allow to sit for 5 minutes to soften yeast.
With mixer running on low and using a dough hook, gradually add flour and salt. Once combined, add olive oil.
Knead by machine for 5 minutes, or by hand on lightly floured surface for 7 minutes. Dough should be smooth and buttery, not sticky.
Place dough in greased bowl. Cover and let rise until doubled - about 1 hour in a warm kitchen.
Heat oven to 375 F.
Punch down dough. Divide in half. Return one half to the bowl and cover to rise again. Place the other half on a lightly floured surface and roll out approximately 16 inches by 13 inches.
Use a sharp knife or pizza cutter to cut 8 long strips, about ⅓-inch wide. Turn prepared bowl upside down on a baking sheet and place one strip across the bowl, letting it drape down both sides to the baking sheet, leaving at least 1 inch extra at the bottom. Cut off any extra. (Keep scraps under plastic wrap to use later.) Repeat with the other 7 pieces, keeping them evenly spaced. I find it's easiest to start with one horizontal, then one vertical, and then fill in the gaps.
Cut 7 more strips. (Hint: If the long strips are too awkward to work with, cut them in half. You can hide a jointed piece under any vertical strip.) Lifting every other piece, weave the dough strip under and over the vertical strips at the top of the bowl. (Which is actually the bottom of the bowl, right? So confusing.) Add another ring, then press them down firmly. Once baked, this will be where it sits, so it needs to be firm and flat.
Continue down the side of the bowl. Try not to stretch the dough.
When you get to the bottom, Fold the vertical strips over the bottom ring and pinch firmly. (Some will go up and over, some with go under. Use your thumb to press around the bottom, at each vertical strip and in the space between.
To make roses, cut strips 4-5 inches long and roll up, pinching to thin dough as you go. Press firmly onto basket. Cut out and add other flowers and leaves using small cutters. (Remember to point the leaves down, because it will be flipped over when it's baked.) Paint with a little heavy cream colored with food coloring.
Bake for approximately 15-17 minutes, until it begins to turn golden brown. Remove from oven and allow to sit until almost cool. Gently pull pan and foil away from basket.
HANDLE: Twist two ½-inch wide strips of dough together. Place over upside down bowl and trim at the bottom, tucking the ends under the bowl. Place on baking sheet. Bake for about 12 minutes, until it starts to turn golden. Remove and let cool.
ROLLS: Increase temperature of oven to 400 F.
Punch down remaining dough. Cut into equal-size pieces (about 2 ounces each) and shape into balls. Use the scraps to make more rolls. Place 1 inch apart on parchment covered baking sheets and let rise for 30 minutes. Cut an "X" into the top of each and bake until tops are golden - about 15-17 minutes.
Handle can be attached with toothpicks, or simply set into the basket, supported by the rolls.
Place dough in greased bowl. Let it rise until doubled.
Fat and sassy! It took an hour to rise in my (very) warm kitchen. If your place is cooler, it could take longer.
I rolled mine long and skinny. Doesn’t matter, as long as it’s about 1/4-inch thick.
Lay 8 strips across bowl, evenly spaced. Leave at least 1 inch at the bottom. (Use more if you want a tighter weave.)
Weave the first strip, over and under. Pinch together where they meet.
2nd strip. Press down with hand before working your way down the bowl. The basket will sit on this, so make it nice and flat!
Fold extra dough (trimming if necessary) over bottom ring.
After folding ends over bottom ring, press around the bottom edge at junction of horizontal and vertical pieces and once in between each vertical piece. Just makes it purty.
Cut flowers and leaves using cookie or gum paste cutters, or press dough into fondant molds
Roll strips of dough to create roses.
Press decorations firmly onto basket. Paint with heavy cream and food coloring.
After basket is baked and removed from bowl, twist two pieces of dough together and lay across bowl, tucking ends under to hold in place. Bake. This is the handle. (Totally optional.)
I added some little dove rolls and decorated “egg” rolls to this basket. The egg rolls were uncooperative. Maybe a different bread dough would be better. The doves were fun and sweet. But that’s a blog for another day.
The world is going crazy right now, but I wish you a blessed Easter. For the record, baking is supposed to be very calming to the spirit. I recommend it highly!


 Love is baked right into this bread, with a heart-shaped swirl of cherries and walnuts. The dough is surprisingly simple to make, and creating the heart just takes an extra step or two; I’ll walk you through it.


 I never turn down a doughnut. Or two. Maple bars are my guilty pleasure, and I go back and forth between preferring cake doughnuts and raised, but one thing is clear to me: they must be fried to be irresistible. Baked doughnuts are fine, but . . . they just aren’t the same.


 I’m on a bit of a sourdough kick right now, and couldn’t resist creating a sourdough version of my Pumpkin Rye Bread. This is a little denser, chewier . . . just the way I like it. It also takes longer that the yeast version (though it is not a bit harder to make), so I recommend you start this bread in the evening and let the dough rise overnight in a cool spot.


 Who needs soda crackers in their soup when it’s so easy to make edible spoons? Yes, you can have your spoon and eat it too! Surprisingly, one spoon will make it through an entire bowl of soup without falling apart, but if you give each person two or three, they can crunch away as they go, which is half the fun.


 I love this bread. It’s fast and easy, uses only a few ingredients, and tastes like heaven . . . soft and fluffy inside, crispy and crackly outside, though for this recipe I added a little olive oil and skipped the steam bath in the oven, because as much as I adore that crackly crust, it wasn’t the look I was after.


