Sour Cream Apple Pie

What a sweetheart of a pie! Thin slices of apples are enveloped by creamy, delicately flavored custard. Sour cream makes it slightly tangy, contrasting with the sweet, crunchy cinnamon streusel topping.

I don’t remember where I got this recipe, but I know I’ve been making it for at least thirty years—and I don’t even like apple pie.

At least, I don’t like the kind with sticky, sugary, gooey filling that has so much cinnamon in it you can’t even taste the apples. Pies were not served in my household when I was growing up (with the exception of pumpkin pie at Thanksgiving), so the closest thing I remember was that nasty apple dessert in the TV dinners. Oh, and Hostess fruit pies. (I ate the glazed pastry and discarded the fruit filling.)

I’m sure there are good traditional apple pies out there. Your grandma probably makes a beauty! But give me this sour cream version any day.

The type of apples you use can make a big difference. I put some Granny Smith apples in this pie, but wasn’t crazy about how firm the apples were. If you want to use them, try steaming or simmering them briefly before adding to the sour cream mixture. If you have access to Honeycrisp, they’re wonderful in pie. Braeburn and Golden Delicious are very good too.

My recipe makes enough filling for a large deep-dish pie. If you are using a standard pie pan, you’ll have filling left over. You can bake it in lightly buttered ramekins, topping each with streusel mixture. (Make another half batch of streusel, if necessary.) Or you can toss in another cup of apple slices and make two pies.

Sour Cream Apple Pie
Print
Author:
Makes one large deep-dish pie.
Ingredients
  • PIE CRUST:
  • 2 cups all purpose flour
  • 1 teaspoon salt
  • 1 cup shortening, chilled
  • ¼ cup milk
  • 1 tablespoon vodka (or vinegar, if preferred)
  • PIE FILLING:
  • 1½ cups sour cream
  • 2 eggs
  • 2 teaspoons vanilla
  • ¼ teaspoon nutmeg
  • ½ teaspoon cinnamon
  • 1 cup granulated sugar
  • 3 tablespoons flour
  • ¼ teaspoon salt
  • 6 cups thinly sliced apples (best: Honeycrisp, Braeburn, Golden Delicious. A mixture is good!)
  • CINNAMON STREUSEL TOPPING:
  • ½ cup granulated sugar
  • ⅓ cup flour
  • 2 teaspoons cinnamon (reduce if you want a light-colored topping)
  • Pinch of salt
  • ¼ cup butter, melted
Instructions
  1. PIE CRUST: Combine flour and salt in a medium bowl. Cut in shortening until it looks like coarse crumbs.
  2. Mix milk and vodka (or vinegar) together and pour all at once into flour mixture. Toss lightly with a fork just until it forms a ball.
  3. Roll out between two sheets of parchment, lightly dusted with flour.. Roll from the center out, Remove top sheet of parchment. Lay pie pan upside down on dough. With a pastry cutter or sharp knife, cut a circle of dough at least 1½ inch bigger than the pan, all the way around. Place pan right side up and move dough to pan, carefully easing it in. (Hint: slide a flat baking sheet under the parchment. Gently place the pie pan upside down, centered on top of the dough. With one hand on the pie pan and one under the baking sheet, flip it all over. So easy!)
  4. Fold excess dough under and crimp or flute the edges. Place in the refrigerator to stay cool.
  5. PIE FILLING: In a large bowl, stir together the sour cream, eggs, vanilla, nutmeg, and cinnamon until well combined..
  6. Stir in the sugar, flour, and salt.
  7. Heat oven to 400 F.
  8. Peel and quarter apples. (Approximately 4 large apples or 6 medium). Remove the cores and slice thin—less than ¼ inch. When you have about 6 cups, stir into sour cream mixture.
  9. Remove pie pan from refrigerator and pour apple filling into crust, all the way to the top.
  10. Place pan in the oven with a baking sheet on the rack below, just in case of drips. Bake for 15 minutes. Without opening oven, reduce heat to 350 F and bake for an additional 45 minutes.
  11. CINNAMON STREUSEL TOPPING: Combine sugar, flour, cinnamon, melted butter and salt.
  12. Remove pie from oven and crumble the topping over it, covering the entire surface. (Add piecrust cutouts here, if desired.)
  13. Return pie to oven and bake for an additional 20-25 minutes, or until crust is light brown and topping is firm.
  14. Allow pie to cool on a rack until just barely warm. Wonderful when topped with vanilla ice cream!
  15. Store covered in the refrigerator.

Adding a little vodka (or vinegar) to the liquid makes a flakier pie crust.

Work the shortening into the flour mixture, using a pastry blender. Cold fingers work, too.

Add liquid and toss lightly with a fork until dough can be gathered into a ball.

Ease the dough into the pan, folding over edge and crimping.

Slice the apples thin (less than 1/4 inch), especially if you’re using Granny Smiths; they take forever to get soft! Stir into sour cream mixture.

Fill up that pie! The filling will puff up in the oven, but I’ve never had it drip. Just in case, put a baking sheet on the rack under it. (This will still allow air flow.)

After an hour of baking, remove pie and add topping. (I added some Valentine’s Day hearts too.) Return to oven until crust is toasty brown and topping is firm.

I made an extra half batch of dough and filled these cutouts with cinnamon sugar and sprinkles.

Baked! Let it cool until it’s JUST warm enough to melt vanilla ice cream.

Happy Valentine’s Day! Hope it’s sweet.

Corned Beef Hash Pie with Painted Crust

Okay, it’s not one of the healthiest meals around, but boy, is it rib-sticking. We love this easy hash, and tucking it in a flaky pie is a perfect way to use leftover corned beef. I wanted to make the pie for St. Patrick’s Day, not after, so I cooked up a corned beef just for this purpose. For a standard pie you’ll need about 3 cups of chopped corned beef.

Heavy cream mixed with food coloring made a simple, thick paint that held its color nicely while baking. I used an ice cube tray for a palette. As it turned out, this was an excessive amount of “paint”; most of it went down the drain once the pie was made. You may want to be a little more prudent than I if you try this.

Whipping cream and food coloring make wonderful pastry paint!

Have you ever attended one of those “Corks & Canvas” events where you all attempt to paint the same picture? If so, you may have seen me. I was that nutcase who painted with her fingers. It’s just a lot more natural for me than using brushes. (And yeah, it might have had something to do with the wine we were served.) I have to tell you, except for the tiny details, finger painting worked really well on the pie crust, too.

And I have the green fingertips to prove it.

The recipe below is enough for one standard pie. If you have a larger pan, or if you plan to layer (the rainbow, sheep, and a few of the hills were separate layers) you may want to make a bigger batch of crust and bump the filling up to four cups of potatoes and 4 cups of meat.

Corned Beef Hash Pie with Painted Crust
Print
Author:
Amounts are for standard pie pan. If you are using a large, deep-dish pan, you may wish to make more filling and crust.
Ingredients
  • HASH FILLING:
  • 2 tablespoons butter
  • 2 tablespoons cooking oil
  • 3 cups peeled, cubed (small cubes) potatoes
  • 3 cups chopped, cooked corned beef
  • ½ onion, chopped
  • 2 cups broth (I used beef, but chicken works well, too)
  • ¼ cup flour
  • CRUST:
  • 2 cups all-purpose flour
  • 1 teaspoon salt
  • 1 cup cold shortening
  • ¼ cup cold milk
  • 1 tablespoon vodka (or vinegar)
  • OPTIONAL: heavy cream and food coloring for painting designs on the crust
Instructions
  1. FILLING: In a large skillet on medium high heat, add butter and oil. When hot, add cubed potatoes. Stirring often, cook for 5 minutes. Turn heat down to medium low. Add corned beef and onions. Cook for 2-3 minutes, stirring occasionally.
  2. In a small bowl, whisk together broth and flour. Add to potato and meat mixture. Stir until it thickens, then remove from heat. Allow the mixture to cool.
  3. Heat oven to 350 F.
  4. CRUST: In a medium bowl, combine flour and salt. Cut in the shortening, using a pastry cutter, until shortening is about the size of small peas.
  5. Combine milk and vodka. Drizzle into flour mixture, tossing mixture with a fork or rubber spatula, until it is blended and begins to hold together.
  6. On a generously floured surface, roll half of the dough out until you can cut a circle larger than the top width of your pie pan. (Aim for at least 1 inch larger, all the way around.) Cut out circle, gently roll up on your rolling pin, and ease into the pan. Trim edge, leaving a little hanging over the edge of the pan.
  7. Roll the other piece out to the same size. If you are planning to paint the top crust, make sure the rolled crust has plenty of flour under it. Slide it onto a thin flexible cutting board or a floured baking sheet for ease in handling.
  8. Mix your choice of food coloring into small amounts of heavy cream (an ice cube tray works well.)
  9. Paint onto the crust, using soft paintbrushes. Try not to overwork the "paint" or the crust will get mushy. I found that my fingers worked better than brushes in large areas. Leave a 1-inch unpainted area around the outside of the circle; this will be the fluted edge.
  10. This is a little tricky: carefully slide the crust off the floured base, positioning it evenly. Fold both crusts under together and flute.
  11. (If you aren't painting the crust, fill the bottom crust with cooled hash, place the top crust over it, and, pressing the two crusts together, fold under, all the way around the pan. Flute the edges, brush the top with a little cream or an egg wash on the top if desired, and place pie on a baking sheet.)
  12. Bake 45-50 minutes at 350 F, until golden brown around the edges.

Cook the cubed potatoes, add meat and onions, then thicken with broth and flour.

Before it was baked.

H

So much flavor!

Happy St. Patrick’s Day!

Lorinda

Sour Cream Apple Pie

I’ve never liked apple piestoo sweet, too sticky. But this apple pie is different; the sour cream filling mellows out the flavor, the spices aren’t overwhelming, and the cinnamon streusel topping is waaaay better than a top crust.

I posted this recipe years ago in my Yummy Northwest column (Yummy Northwest is gone now, but I saved copies for posterity) and consider it one of my go-to recipes for cold weather and holidays. I’ll bet you will, too.

I’ve been making this for over forty years, and honestly can’t remember where I got the original recipe, but if I find the source I will definitely give credit to the genius who created this!

Sour Cream Apple Pie
Print
Author:
Ingredients
  • PIE CRUST:
  • 2 cups all-purpose flour
  • 1 teaspoon salt
  • 1 cup cold shortening
  • ¼ cup very cold milk
  • 1 tablespoon vodka (or vinegar, if preferred)
  • PIE FILLING:
  • 2 tablespoons flour
  • ¾ cup sugar
  • ¼ teaspoon salt
  • ¼ teaspoon nutmeg
  • ½ teaspoon cinnamon
  • 1 egg, lightly beaten
  • 1 cup sour cream
  • 1 teaspoon vanilla
  • 4 cups apples, peeled and thinly sliced (I like to use Granny Smith apples )
  • STREUSEL:
  • ½ cup sugar
  • ⅓ cup flour
  • 1 teaspoon cinnamon
  • ¼ cup butter, melted
Instructions
  1. CRUST: In a medium bowl, combine flour and salt. Cut in the shortening, using a pastry blender, until there are no lumps larger than peas.
  2. Combine milk and vodka (or vinegar) and add, tossing with a fork (or your fingers) until it holds together. Roll out a crust a little bigger than your pan, and ease it into the pan, crimping the edges. Use a small cookie cutter to cut shapes to decorate the edge of the crust, if desired. (I like to brush the shapes with a little melted butter and sprinkle with cinnamon sugar before adding. I bake a few separately to decorate the top of the baked pie, too.)
  3. Preheat oven to 400 F. For filling: mix flour, sugar, salt, and nutmeg in large bowl.
  4. Mix together egg, sour cream, vanilla, and apples. Stir into flour mixture and spoon into pie shell. Mix together ingredients for crumb topping and set aside.
  5. Bake pie at 400 F for 15 minutes. Reduce temperature to 350 F for 30 minutes. Remove pie from oven and sprinkle with all the prepared crumb topping. Return to oven for 15 minutes.
  6. Enjoy warm, with a scoop of vanilla ice cream!


I hurried through this post because someone asked for the recipe. I’ll make it again in the next few days (the sacrifices I make for you!) and add prep photos. But it’s pretty easy. You’ve got to give this one a try!

Sweet Cherry Pie

Bing cherries have hit the supermarket and I couldn’t rest until I’d turned some into a pie. Traditionally, bakers use tart pie cherries, but those aren’t always easy to find . . . so I improvised. (Any sweet cherry will do.) The Man actually used the word “superb” when he took his first bite.

You won’t need much sugar in this recipe, but fresh lemon is a must to add a touch of tang. The filling is thick, resulting in neat slices once the pie has cooled. Throw in a thick, flaky pie crust and a tower of whipped cream (or a scoop of vanilla ice cream) and you have a spectacular dessert.

I made the mistake of using an extra-large pie pan (because, red) so my pie wasn’t as deep as I would have liked, but if you use a standard deep-dish pie pan, 2 pounds of cherries is going to be just right.

I’m giving you a generous recipe for pie crust so the crust can be thicker and you’ll have a little left over if you’d like to play with decorations. I made some leaves and cherries, which would have been more obvious on a solid top crust instead of the lattice, but still . . . cute.

Sweet Cherry Pie
Print
Author:
Ingredients
  • FILLING:
  • 2 pounds of fresh sweet cherries, pitted and halved (about 5 cups)
  • ½ cup sugar
  • ¼ cup cornstarch (3 tablespoons if you like your pie soft)
  • juice and zest of 1 large lemon, separated
  • ¼ teaspoon salt
  • ¼ teaspoon cinnamon
  • CRUST:
  • 3 cups all purpose flour
  • 1½ teaspoon salt
  • 1¼ cup cold shortening
  • ¼ cup cold butter
  • 1 tablespoon vodka (or vinegar)
  • ⅓ cup cold milk
  • BEFORE BAKING:
  • 2 tablespoons butter
  • egg wash (1 egg beaten with 1 tablespoon water)
  • sparkling sugar
Instructions
  1. FILLING:In a large saucepan on medium heat, combine the cherries, sugar, cornstarch, lemon juice (reserve the zest for later) salt, and cinnamon. Stir frequently until mixture begins to bubble, then continue to cook for 6 minutes. Filling will be thick.
  2. Remove from heat and stir in lemon zest. Allow mixture to cool, stirring occasionally.
  3. CRUST: In a large bowl, combine the flour and salt. Cut in the butter and shortening, using a pastry blender or your fingers. Aim for lumps of butter no larger than good-sized peas.
  4. Combine the vodka and milk, and add all at once to the pastry. Stir just until combined.
  5. Divide in half. Roll one piece out on a well-floured board, rolling from the center to the outside - about ⅛ inch thick. Cut a circle at least 1 inch bigger all around than your pie pan. Roll lightly onto floured rolling pin and lift into pan. Fold excess under and crimp edges. Place pan in the refrigerator.
  6. With the other piece of dough, cut strips for a lattice crust, using a ruler to keep them straight. Mine were about 1-inch thick and long enough to reach across the top of the pie pan. Place a piece of parchment on a baking sheet and dust lightly with flour. Lay 4 or 5 strips parallel to each other, leaving space between each strip. Work with one side at a time, folding every other piece over at the center. Lay a piece across the remaining strips and gently replace the folded pieces. Now fold back the pieces that had remained down before, place another piece next to the other cross piece, and replace the folded pieces. Repeat once more to complete the side. Do the same with the other side and cut around the edge to make a circle the same size as the top of the pie. Press around the edges with your finger. Place the lattice crust in the freezer for now.
  7. Heat oven to 375 F.
  8. Once the filling has cooled, remove the pie from the refrigerator and fill. Cut the 2 tablespoons of butter into small pieces and drop them all over the top of the filling. Remove the lattice from the freezer and slide it onto the top of the pie. (You may need to use a thin cutting mat or baking sheet to help it along.)
  9. Brush with egg wash and sprinkle generously with sparkling sugar.
  10. Bake 55-60 minutes. If your crust begins to get too brown, cover lightly with foil.
  11. Allow the pie to cool for 1½ - 2 hours before cutting.

Cook the cherry filling until thickened.

Add lemon zest and set the filling aside to cool.

You don’t HAVE to use vodka, but it sure makes a nice, flaky crust!

Flute those edges! (I know . . . mine aren’t Martha Steward perfect. Hey . . . rustic is good!)

Bend every other strip down, place cross piece and replace the bent strips.

Bend remaining pieces back and add a cross piece.

Now we’re getting there!

Cut out leaves, cherries, and stems.

Added some leaves, stems, and cherries

Slightly warm. Now just add a scoop of vanilla ice cream or a mound of whipped cream!

Cut into this pie while it’s just barely warm! Mmmm.

If you like your pie a little on the soft side, reduce the cornstarch to 3 tablespoons. Otherwise, if you don’t gobble it up while it’s warm, it gets fairly firm in the refrigerator. Personally, I like it that way. Holds the ice cream up better, right?

I’m leaving for a short writing retreat, but when I get back I’ll have something good to post – I’m just out of time right now! Hint: it has fresh huckleberries in it!

Lorinda

Mini Maple Pecan Pies

I’m from the Pacific Northwest, and pecan pies were just not a “thing”. At least, not in my family. In fact, desserts were not a thing. We had pumpkin pies for Thanksgiving, cake for birthdays and Christmas, and that was pretty much it.

Somewhere along the line I was introduced to those cute little pecan tassies and fell in love, but still hadn’t tackled an actual pie until . . . well . . . a month ago. Don’t wait until you’re in your sixties to try one; think of all the sweet, gooey goodness you will have missed.

My first attempt was lovely. And runny! Not acceptable. But oh, did it taste good.

I switched to mini pies because I like to fuss, and that gave me more rolling, crimping, and decorating opportunities. My first batch was chewy! I mean, pull-out-your-teeth chewy. Once again, not acceptable. But yes, they tasted amazing.

I learned some lessons along the way. The most important? Don’t forget the butter, and do NOT overbake them. Here are a few other tips:

  • Though I love a flaky bottom crust as much as the next person, I decided the extra step of pre-baking the crusts wasn’t necessary. If you want to blind-bake your crusts, for the love of all that’s holy, don’t poke holes in the bottom. Just add pie weights and hope for the best. Pecan filling seeps down into those holes and turns to concrete on the bottom of your pans, especially if you overbake them. (Ask me how I know.) 10 minutes at 400 F was about right when I tried it. Meh . . . the pies I made without this step were just as good.
  • It may sound a little odd, and I’ll probably be lynched if any pastry chefs see this, but I tried putting balls of dough in a tortilla press, between generously floured pieces of parchment. Pressed once, flipped it over (making sure there was still enough flour to let the dough spread easily) and pressed again. Worked like a charm. You didn’t hear that from me!
  • The whiskey is completely optional. Just leave it out of the filling if you prefer.
  • Pecan halves are fine for large pies, but when you’re filling these small pie pans, chopped nuts work better. Decorate the top with pecan halves if you’d like.
  • Pie crust decorations can be added before baking or baked separately on a baking sheet at 425 F. Your choice. I kind of like to bake them separately; then I can place them where I want on each baked pie. Watch them closely; they go from raw to burnt very quickly. You can see that this batch of leaves was a little dark. Still yummy, though!

The next batch was beeeeautiful, if I do say so myself.

Mini Maple Pecan Pies
Print
Author:
Makes 8
Ingredients
  • PIE CRUST:
  • 3 cups all-purpose flour
  • 1 teaspoon salt (1¼ if using unsalted butter)
  • 1 cup chilled shortening
  • ½ cup cold butter, coarsely grated
  • 2 tablespoons maple whiskey (or use regular whiskey, vodka, or 1½ T vinegar)
  • ⅓ cup buttermilk
  • PIE FILLING:
  • ½ cup pure maple syrup
  • ½ cup corn syrup (light)
  • ½ cup white sugar
  • ½ cup brown sugar
  • 3 eggs plus 1 egg yolk (keep the white for brushing on the crusts)
  • 2 tablespoons maple whiskey (or regular whiskey)
  • 1 teaspoon maple flavoring
  • ¼ teaspoon salt
  • 3 tablespoons melted butter
  • 2 cups chopped pecans (plus pecan halves if you want to decorate the top)
Instructions
  1. CRUST:
  2. In a large bowl combine flour and salt. Cut in the shortening and butter until flour is blended in and no large lumps are visible.
  3. Combine the whiskey (or vinegar) with buttermilk. Drizzle into flour mixture while tossing with a fork. Stir just until combined. Dough should easily hold together when you squeeze it. If mixture is too dry, add more buttermilk, 1 teaspoon at a time.
  4. Either roll out half of the dough at a time between generously floured pieces of parchment OR separate the dough into 8 pieces and roll each between floured parchment. Either way, shape the dough into a ball, flatten with your hand, and roll out fairly thin, about ⅛-inch. Set mini pie pan (top inside dimension 4¼-inches) upside down on dough and circle about 1-inch larger than the pan all the way around. Cut out 8 circles, saving scraps to re-roll.
  5. Lift circles (use a dough scraper or large spatula if needed) and place in pans, easing them in to fit snugly. Fold the edges under and crimp or press with a fork.
  6. Brush the bottom of the crusts with whisked egg white, then move to the refrigerator while you make the filling.
  7. Heat oven to 350 F.
  8. FILLING:
  9. In a medium bowl combine maple syrup, corn syrup, white sugar, and brown sugar. Stir well.
  10. Add 3 eggs and one egg yolk, whiskey, maple flavoring, and salt. Stir.
  11. Add melted butter and pecans and stir well.
  12. Fill crusts with a generous ½ cup of filling - about ⅔ full, stirring the mixture in the bowl before you fill each crust, because the pecans will all float to the top.
  13. Place pies on baking sheets and bake approximately 30 minutes. Gently shake one of the pies. If there's a slight jiggle, that's okay, but if it's wiggly, let the pies cook for another 5 minutes. Remove from oven and allow the pies to cool completely on a rack.
  14. Serve, or cover and store in the refrigerator for up to 3 days. They may be frozen, too.

Add fats to flour and salt and cut in with pastry blender or two knives until no large lumps remain. Give it a light stir – there should be no pockets of flour; it all should be attached to fats.

Add buttermilk and whiskey, stirring with a fork.

Give it a squeeze! It should hold together. If not, add a teeny tiny bit more buttermilk.

You can roll out the dough and then cut as many circles as possible out of it.

Or roll and cut out one at a time (my favorite method).

OR, if you’re feeling like a rebel, you can try pressing balls of dough in a tortilla press. (Use parchment and lots of flour.)

Place crust in pan and crimp edges. Brush lightly with whisked egg white.

If you want to blind bake the crust, fill with weights (I used a coffee filter and beans) and bake 10 minutes at 400 F. Don’t poke holes in crust!

Mix syrups and sugars together.

Stir in eggs, salt, maple whiskey (or regular whiskey) and maple flavoring.

Add pecans and melted butter and stir well.

Fill the crusts. Use a generous half cup of filling.

Ready for the oven.

Baked.

Mmmm.

In case you’re wondering, these work very well for tassies, too. The crust-to-filling ratio is different; you might want to cut the filling recipe in half. I’d test that theory, but I think I’ve had enough pecan pie to last me at least a week or two!

Lorinda

Ruffles & Roses Banana Cream Pie

Treat your Valentine to a very special pie this year. A thick, ruffled pastry surrounds the vanilla wafer bottom crust topped with velvety banana cream filling. Add whipped cream, a few pastry decorations, or even a drizzle of chocolate sauce to take this dessert to the next level.

You don’t have to have a pie-shaped pan (though this might be a good excuse to splurge on one), but you do need a deep-dish pie pan because this makes a generous amount of filling. It might be a good idea to be prepared with a few cupcake liners in case you have extra filling. Just layer a spoonful of cookie crust, a few banana slices, and a dollop of filling and put the mini desserts in the freezer for another time.

And . . . speaking of freezers, if you want neat, tidy slices of banana cream pie, I recommend freezing the pie and cutting it frozen. Add the little decorations and fresh banana slices before serving. If you’re using fresh whipped cream, add it after the frozen pie has been cut. If you’re using topping in a tub, it can be added before freezing.

ONLY cut as many pieces as you need, and return the remaining pie to the freezer immediately, because once it’s frozen it won’t look pretty when you take it out of the fridge the next day. 

You don’t have to freeze it, of course, but a cream pie is, by nature, soft . . . and it can get a little messy when serving. If you’re more about eating it than taking photos of it, then this won’t bother you one bit. And oh, my is it creamy. Mmmm.

I just have to tell you, as much as I love the soft, creamy pie, I really can’t resist it when it’s frozen. I may have added a little chocolate sauce, some peanuts, and a cherry to create my own “banana split pie”. The frozen filling is just like rich ice cream.

Ruffles & Roses Banana Cream Pie
Print
Author:
This is a generous recipe, enough for a large, deep-dish pie pan. You may want to reserve a little of the cookie crust. If you have extra filling, layer a few cupcake liners or ramekins with crumbs, banana slices, and filling. Wrap well and freeze for later!
Ingredients
  • PASTRY CRUST:
  • 2 cups all-purpose flour
  • ½ teaspoon salt
  • 1 cup shortening, chilled
  • ¼ cup milk
  • 1 tablespoon vodka (or vinegar, if you prefer)
  • COOKIE CRUST:
  • 1 cup finely crushed vanilla wafers
  • 1 tablespoon brown sugar
  • 2 tablespoons butter, melted
  • FILLING:
  • 2 eggs, plus 2 yolks
  • 1 tablespoon fresh lemon juice
  • 1½ cups sugar
  • ½ teaspoon salt
  • ⅓ cup cornstarch
  • 4 cups whole milk
  • 2 tablespoons butter
  • 1 tablespoon vanilla
  • 4 large firm bananas (save one for garnish)
  • Whipped cream (or topping in a tub), banana slices, sprinkles, pastry garnishes, chocolate drizzle for decorating if desired
Instructions
  1. PASTRY:
  2. In a medium bowl, combine flour and salt. Work the cold shortening into flour until the size of peas.
  3. Combine the milk and vodka (or vinegar) and drizzle into flour mixture, tossing with a fork. Stir gently until it comes together.
  4. Working with half of the dough at a time, place between lightly floured pieces of parchment and roll until about ⅛-inch thick. Cut strips wide enough to reach from the bottom edge of your pie pan to about ½ inch over the top. Cut strips into manageable lengths (for me, this was about 6 -7 inches long) and, one at a time, lay them loosely along the side of your pie pan, gently pleating as you go to create ruffles. Each time you use a new piece, roll the end a little and nudge it up against the piece you just added, to hide the edge. Press the dough along the bottom edge of the pie pan as you go. (The cookie crust will fill the bottom later.) Gather dough scraps and reroll all at once if needed.
  5. Place a piece of foil along the bottom of the pie pan and fill with pie weights or beans. Any extra scraps may be cut into hearts or shaped into roses and leaves for decoration. Place those on the crust now, using a little milk to anchor them. Press firmly. Place crust in the refrigerator for 30 minutes. (Small shapes - like hearts - can be baked on cookie sheet for about 10 minutes, or until golden brown.)
  6. Heat oven to 375 F.
  7. Place pie pan on baking sheet for easy handling, and bake for 20 minutes. Remove from oven and carefully lift out the foil and weights.
  8. COOKIE CRUST: Combine crushed vanilla wafers, brown sugar, and melted butter. Put in bottom of pie pan and press down firmly, using a measuring cup or your hand. Be careful, the pan will be hot!
  9. Return to oven for an additional 20 minutes, or until the pie crust is golden. Cool on a rack.
  10. FILLING:
  11. In a small bowl, whisk together the two eggs and 2 yolks and the lemon juice. Set aside.
  12. In a large pan, combine the sugar, salt, cornstarch, and milk. Whisk constantly over medium heat until mixture is steamy and beginning to bubble. Reduce heat to low.
  13. Slowly add about 1 cup of the hot mixture into the egg mixture, whisking vigorously. Pour the egg mixture back into the pan and stir well.
  14. Cook over low heat, stirring constantly until mixture is thick and begins to make big bubbles in the center, about 2 minutes. Remove from heat and stir in the butter and vanilla. Pour into a heat-proof bowl and cover. Chill for 1 hour.
  15. Slice 3 bananas. Pour half of the cream filling into the pie pan. Cover with all of the banana slices. Top with remaining filling (as much as your pie will hold.) Chill for at least 4 hours. Top with whipped cream (or topping in a tub) and decorate if desired.
  16. If you want frozen banana pie (yum!) lay a sheet of plastic wrap on top of the filling, wrap well, and freeze. When ready to serve, cut as many pieces as you need and then return remaining pie to the freezer; it will not hold well in the refrigerator once it has been frozen. Allow the pie slices to thaw slightly, top with whipped cream, and serve.

Cut wide strips of pie dough to create ruffles

Pleat the ruffles and press along the bottom edge of pie pan.

I used a silicone mold for the roses and a cutter for the leaves and hearts.

Add foil and weights (I have a bag o’ beans I use over and over) and any pastry decorations you’re using.

Bake 20 minutes, then press cookie crumbs into the bottom of the pie. Bake an additional 20 minutes or until golden brown.

Cook filling until thick and bubbly, then whisk about a cup into the egg mixture and return all to the pan on low heat.

cook and stir on low heat until thick. It should be “blurping” big bubbles.

Add a layer of chilled filling, add sliced bananas, then top with more filling. Place plastic wrap right on top of the filling and chill for at least 4 hours

Add real whipped cream when ready to serve. (I made ruffles.) If you’re using tubbed topping, this can be done a couple of hours ahead. Decorate.

My apologies to Dean Martin, but I’m going to change his song just a bit:

“When the moon hits your eye like a big piece of pie, that’s amore”

Nothin’ says amore like a beautiful slice of pie, right?

Lorinda

Peanut Butter Pie Crust – and Chocolate Pie!


A peanut butter and banana sandwich is one of my very favorite comfort foods. And, of course, the combination of peanut butter and chocolate makes me very, very happy; my favorite candy bars fall in this category. So when The Man suggested I try adding peanut butter to my pie crust, it only took me seconds to get on board with that. Banana pie. Chocolate pie. A match made in heaven!

I had qualms about how the peanut butter would affect my crust, but my concerns about texture were unfounded. The pie crust, though slightly less flaky than my favorite recipe, didn’t turn out heavy or tough as I’d feared. It was actually, well, perfect. I don’t use that word lightly because I tend to tinker with things until I’m satisfied, but I wouldn’t change one thing about this crust – and was tickled with it on my very first attempt.

So I’ll just amuse myself by considering all of the possibilities this crust offers. And believe me, I have a whole list of interesting recipes waiting for their turn in the limelight. For now, I’ll concentrate on pies. Specifically, chocolate cream pie. In this post, I’ll give you the recipe I used for my chocolate pie, and in a future post you’ll get this:

Coming soon: Banana Cream Pie with Peanut Butter Crust

The pie crust itself is very easy to work with. I had no problem at all fashioning some of it into roses, leaves, hearts, stars, and even holly. With a cookie cutter or press, you can easily customize for Thanksgiving, Christmas, or Valentine’s Day.


Peanut Butter Pie Crust - and Chocolate Pie!
Print
Author:
This pie crust recipe makes enough for two deep-dish crusts or 1 generous crust and enough left to use for designing pie decorations. The dough can be frozen for later use.
Ingredients
  • CRUST:
  • 2 cups all-purpose flour
  • ½ teaspoon salt
  • 1 tablespoon brown sugar
  • ½ cup creamy peanut butter, chilled (not old-fashioned)
  • ½ cup shortening, chilled
  • ¼ cup buttermilk
  • 1 tablespoon vodka or vinegar
  • ¼ cup chopped chocolate, or semi-sweet chocolate chips
  • Finely chopped peanuts (optional)
  • FILLING:
  • 1 cup sugar
  • ¼ cup cornstarch
  • ¼ teaspoon salt
  • 1 tablespoon powdered espresso
  • 3 cups whole milk
  • 4 ounces unsweetened chocolate, coarsely chopped
  • 4 egg yolks
  • ¼ teaspoon vanilla
  • ¼ cup butter
  • Decorations (optional): whipped cream, chopped peanuts, shaved chocolate, pastry crust cutouts.
Instructions
  1. Heat oven to 375 F.
  2. Make crust: In a medium bowl, combine flour, salt, and brown sugar.
  3. With a pastry blender, work the peanut butter and shortening into the dry ingredients until well combined. There should be no large lumps.
  4. In a small bowl, combine buttermilk and vodka (or vinegar). Pour into dry ingredients and stir just until combined. Dough should not be too crumbly. If it is, drizzle in a tiny bit of water and combine.
  5. Divide dough into two pieces. One will be for the pie crust and the other will be for cut-out decorations if desired. (Hint: for ease of rolling, make the piece you will use for crust a little larger than the one for decorating.) If you don’t want to make decorations, divide into two equal pieces and freeze the other half for another time.
  6. Dust one piece of dough lightly with flour, place between two pieces of parchment, and roll out evenly until larger than the diameter of your pie pan, all the way around. Remove the top piece of parchment, place the pie pan upside down on the dough, and cut a circle at least 1 inch bigger than the pan, all the way around Remove scraps.
  7. Slide a flat baking sheet or large piece of cardboard under the bottom parchment and flip the pan, dough, and parchment over in one movement. Remove baking sheet and carefully remove parchment. Ease the dough into the pie pan, roll edges under, and crimp the edges.
  8. Line with foil and fill half way with dry beans, pie weights, or sugar. Bake for 20 minutes.
  9. Take crust from oven and gently remove foil and weights. Poke crust all over with a fork and return to oven. Turn heat down to 350 F. and bake for an additional 15 minutes, or until crust is golden brown.
  10. Remove crust from oven and place on cooling rack. Sprinkle with ¼ cup chopped chocolate and let it sit for 5-10 minutes, melting the chocolate. Spread over bottom of the crust and sprinkle with nuts if desired.
  11. Remaining dough can be used to make cutout designs for the pie or can be wrapped well and frozen.
  12. Make filling: In a small bowl, whisk together egg yolks. Set aside.
  13. In a large saucepan, whisk together sugar, cornstarch, salt, espresso powder, milk, and unsweetened chocolate.Cook at medium-high heat, stirring constantly until mixture begins to boil.
  14. Turn heat down to medium and continue cooking for 2 minutes, stirring constantly. Adjust heat as necessary to keep the mixture at a low boil.
  15. Add about ½ cup of the mixture into egg yolks and whisk together. Pour egg mixture into the pan, stir well, and return to low boil. Continue to stir and cook for 2 additional minutes. Remove from heat.
  16. Stir in vanilla and butter until the filling is smooth. Pour into the pie shell and let the pie cool. Cover with plastic wrap and chill for 4-6 hours.
  17. Serve with whipped cream, a sprinkle of chopped peanuts, and shaved chocolate if desired.

Of course, you could also make an easy chocolate pudding filling. It’s not quite as good, but in all honesty, this recipe is all about the crust!

Work peanut butter and shortening into dry ingredients with pastry blender

Add liquids and stir just until dough holds together.

Roll out between pieces of parchment

Place dough in pan and flute edges. (Or use a pan that does it for you!)

Bake 20 minutes. Remove pie weights and poke holes with fork. Back in the oven!

Bake 15 more minutes. Move to rack. Add chocolate (chopped or chips) and let it melt.

Spread.

Sprinkle with chopped peanuts if desired.

Whisk eggs, set aside. Cook filling.

Pour a small amount of hot filling into egg yolks. Whisk and return to the pan.

Stir in butter and vanilla, then pour into crust and cool. Refrigerate 4-6 hours

Jazz the pie up however you wish, right before serving.

I suggest you make extra crust and freeze it, because I have some fun ideas coming your way!

Lorinda

Mint Chocolate Chip Pie

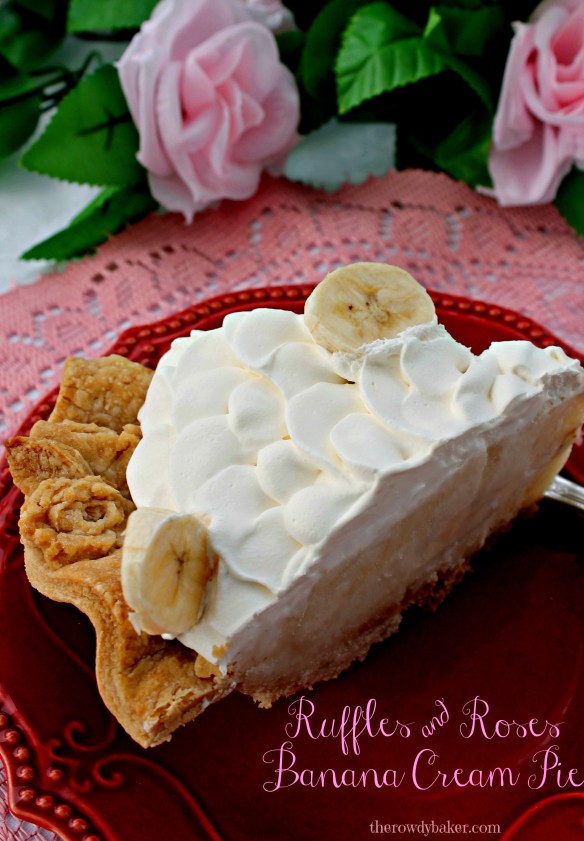
If you ask me what my favorite ice cream is, the answer will always be mint chocolate chip. It’s getting harder and harder to find the good stuff though; I’ve turned my nose up at brands with waxy chocolate and too much mint or coloring. It has to be just right!

For a fun twist on my favorite dessert, I created this refreshing Mint Chocolate Chip Pie. It’s soft and fluffy, lightly flavored, and laced with mini chocolate chips. (If you’re a purist you can substitute good quality dark chocolate instead.)

This pie would be wonderful for Christmas – or any time. But since I was making this for St. Patrick’s Day, I melted a few green candy melts, poured the candy into small heart molds, and then connected three of them with a dot of green chocolate and added a stem to create a shamrock. Several of those on top of the pie definitely added an Irish flair!

I’m one of those people who prefer the crust of a pie over the filling. In this case, the filling is delightful . . . but I’m still all about that crust! The thicker the better. This recipe will make two thin crusts, but I like rolling out a crust without worrying about getting the shape perfect, knowing that it will be big enough to cut out a perfect circle. You can make yours thinner if you prefer. Either way, you’ll still have some leftover crust. You could cut out shamrock shapes to decorate your pie, or just bake strips of crust, dusted with cinnamon sugar, for a treat. (C’mon – guilty pleasures are the best!)

Mint Chocolate Chip Pie
Print
Author:
Ingredients
  • CRUST:
  • 2 cups flour
  • 1 teaspoon salt
  • ½ cup cold butter
  • ½ cup cold shortening
  • ¼ cup buttermilk
  • 1 tablespoon vodka (or vinegar)
  • FILLING:
  • 2 cups (1 pint) heavy whipping cream (divided)
  • 1 cup white chocolate chips
  • green food color
  • ¾ teaspoon peppermint extract
  • 8 ounces cream cheese, softened
  • 1 cup powdered (plus 2 tablespoons) sugar, divided
  • ¼ teaspoon unflavored gelatin (optional, to stabilize the whipping cream)
  • 1 teaspoon water
  • ¼ cup mini chocolate chips
Instructions
  1. CRUST: In medium bowl, combine flour and salt. Cut butter into small cubes. Add butter and shortening and use pastry blender or fingers to combine. Mixture should have small lumps of fats visible - no larger than peas.
  2. In a small measuring cup, combine buttermilk and vodka (or vinegar). Add all at once to dry ingredients and toss/stir just until combined.
  3. Place dough on generously floured surface. Sprinkle flour over the top and roll out to a thickness between ⅛-inch and ¼-inch, depending on preference. Place pie pan upside down on dough and cut circle about 1 inch larger all around than the pan.
  4. Slide flat baking sheet or cutting sheet under the dough and flip the pan and dough over. Gently ease the dough into the pan and fold excess over to make the dough come to just above the top edge of the pan. Flute the edge with your fingers. Chill for 30 minutes.
  5. Heat oven to 350 F.
  6. With a fork, poke holes in the sides and bottom of the crust. Carefully line with foil, allowing the foil to cover the top edge of the dough. Fill with pie weights (or beans, rice, or sugar) and bake for 45-60 minutes, or until light golden brown. Remove foil and weights and allow pie to cool completely.
  7. FILLING: in a small saucepan on lowest heat (or in the microwave using 15 second increments) heat ½ cup cream and white chocolate chips until chips are melted.Add a few drops of green food coloring and peppermint extract and stir well. Allow to cool.
  8. In a large bowl, beat cream cheese and powdered sugar together until smooth. Add white chocolate mixture and beat until incorporated. .
  9. In a medium bowl, beat remaining 1½ cups cream until soft peaks form.
  10. In a small cup in the microwave, or a small metal measuring cup or pan on the stove, heat the gelatin and water until gelatin is dissolved (this should happen very quickly...just 5-10 seconds in the microwave) and drizzle over the whipped cream while mixing on high speed. Add 2 tablespoons powdered sugar and beat until stiff peaks form.
  11. Fold approximately ⅔ of the whipped cream into the filling, fold in chocolate chips, and spoon into the cooled crust. Pipe or spread the remaining cream onto the top of the pie. Chill for several hours (or overnight) before serving.

Cut circle of dough larger than pie pan. Slide a flat sheet under dough and flip.

Ease dough into pan and flute. Chill for at least 30 minutes.

Line crust with foil and fill with weights, beans, rice, or sugar. Bake.

Filling ingredients

Add green chocolate mixture to the cream cheese mixture.

Fold whipped cream into the filling

Fold in the chocolate chips.

May you have warm words on a cold evening,
a full moon on a dark night,
and the road downhill all the way to your door.

Lorinda

Chocolate Cherry Tart


Oh, heavens! This cherry tart has a rich chocolate crust that lies somewhere between a cookie and a pie crust, and filling that’s spiked with cherry brandy. (Totally optional.) Oh, and did I mention that I used canned cherry pie filling? I know that’s not my usual modus operandi, but I’m afraid my cherry tree is buried under a few feet of snow, and besides…I’m making you create the crust from scratch, which is probably enough of a challenge, right?

I had to do some experimenting to come up with a crust that didn’t turn soggy on the bottom, but I’m happy to say that if you follow my baking instructions, your tart will be tender (but definitely not gummy) on the bottom, and crunchy on the sides. Yum yum yum!

Tips:

  • If you don’t want booze in yours (eyeroll), you can skip the whole “cook the filling, lime juice, and cornstarch” step and just dump the cans of filling into the chilled tart crust. I wouldn’t even bother with the lime, (though it does add a nice flavor) because that would mean you’d have to dump the filling into a bowl, and…well…one more bowl to wash!
  • If you do use the brandy, be sure the cooked mixture is cool before putting it in the crust.
  • It’s critical to keep your dough chilled, and that egg white wash is a must! This will help keep the cherry mixture from seeping into your bottom crust.
  • Use whatever method works best for you when you move the crust to your tart pan. It’s thicker than a pie crust, but you can still roll it gently onto a rolling pin to transfer it. I like to roll mine out on parchment, center the tart pan upside down on the dough, slide one cookie sheet under the parchment and lay one gently on top of the dough, then flip. Whatever works best for you!
  • After you’ve eased your dough into the pan, turn the excess inward and press firmly against the inside edge. Trim off any dough that sticks over the edge of the pan.
  • Put a baking sheet in the oven while it preheats, then slide the chilled tart onto the hot sheet. This blast of heat from below will also help your crust to cook through. Be careful when you do this; you don’t want it to slide right into the back of the oven!

Here’s what you’ll need:

Filling ingredients.

Crust ingredients. (Whoops. And an egg white!)

Chocolate Cherry Tart
Print
Author:
Makes one 11-inch tart.
Ingredients
  • FILLING: (If not using alcohol, just use canned filling and skip the other ingredients)
  • 2 cans cherry pie filling
  • 1 tablespoon fresh lime (or lemon)
  • 1 tablespoon cornstarch
  • ¼ cup cherry brandy
  • CRUST:
  • ½ cup water
  • ½ cup sugar
  • ½ teaspoon salt
  • 1 cup dark chocolate chips
  • ½ cup cold butter
  • 2 cups all purpose flour
  • 1 egg white, whisked
  • ***
  • Serve with whipped cream or ice cream if desired.
Instructions
  1. FILLING:
  2. In a large pot on medium heat, combine two cans of cherry pie filling, lime, and cornstarch. Cook and stir until mixture bubbles and turns clear (about 5 minutes). Remove from heat and stir in the cherry brandy. Set aside to cool.
  3. CRUST:
  4. In a medium pot over medium heat, bring water, sugar, and salt to a boil.
  5. Remove from heat and add the chocolate chips, whisking until smooth. Allow mixture to cool completely before moving to the next step!
  6. In a medium bowl, grate the butter using a grater with large holes. Add flour and stir until all of the butter is coated.
  7. Add the cool chocolate mixture and stir until mostly combined, then dump out onto lightly floured surface and knead gently just until it comes together into a ball. Flatten into a disk, wrap in plastic, and refrigerate for 20-30 minutes. (No longer - the chocolate will harden and make it difficult to roll out.)
  8. Lightly spray an 11-inch tart pan with cooking spray. I like to use a flour and oil mixture, like Baker's Joy.
  9. Roll out dough to make a circle about an inch bigger than your tart pan, all the way around. (Your pan should be 11 inches, so the circle would measure approximately 13 inches in all directions.)
  10. Gently ease the dough into the pan. Roll any excess at the top towards the inside of the pan, pressing firmly against the sides. If any dough sticks up past the edge, trim it off.
  11. With a pastry brush, cover the bottom of the crust with egg white. Freeze for 15 minutes (or refrigerate for 30).
  12. Preheat oven to 400 F. Place a baking sheet on the bottom rack while preheating.
  13. Place tart pan onto a flat baking sheet or cutting board. Spoon filling into crust and slide it from the flat sheet onto the hot baking sheet in the oven.
  14. Bake for 10 minutes. Without opening the oven, turn the heat to 350 F and bake an additional 40 minutes. Remove from oven and cool on a rack. When tart is barely warm, slide onto your hand, letting the ring fall down your arm. You may either leave the tart on the metal bottom or use a thin spatula to slide it from the base to a serving platter.
  15. Decorate with whipped cream if desired, or serve with ice cream.

Add lime (or lemon) juice and cornstarch. It will look cloudy – that’s okay.

Cook it until it’s bubbly and fairly clear.

Add flour to grated butter and stir to coat.

Stir chocolate mixture into butter and flour. Make sure the chocolate isn’t warm!

Knead gently until it forms a ball, flatten into disk, wrap and chill. (You should see little bits of butter throughout.)

My favorite method to transfer dough to pan. Center pan upside down on dough, slide baking sheet under parchment, one on toop of dough, and flip.

Brush bottom of crust with egg white and chill. Add filling and bake!

I used stabilized whipped cream on this tart. To stabilize cream, I beat 1 cup of heavy cream until soft peaks form, add 2 tablespoons of powdered sugar and beat until combined. Then I heat about 1/2 teaspoon Knox gelatin in 1/2 teaspoon water until it’s melted and drizzle a little in the cream while mixing on high. I don’t use it all…maybe half, but it’s too hard to melt a smaller amount!

For the tart at the beginning of the post, I beat 4 ounces of room temperature cream cheese, added 1 cup of powdered sugar and 1 cup of heavy cream and beat until it was thick and fluffy. I think I like the piped hearts better because the cherries still show.

Or…you could just eat it with a scoop of vanilla ice cream.

Disclaimer: My husband preferred the tart without alcohol; he didn’t like the smell of cherry brandy. It MAY be because I had already spent a fortune at the liquor store picking up other booze for Valentine’s Day baking and went cheap on the brandy, but I liked it. A lot. I’ve never tried Kirsch, but that might be a good alternative if you have some.

Ready, set, GO!

So…onward. There are lots of ideas swirling around in my head; as soon as I corral them into something resembling recipes, you’ll be seeing lots of chocolate, cherries, raspberries, and sprinkles.

Feelin’ the love…

Lorinda

Flags and Flowers Pie Crust


Flags and Flowers Cherry Pie - The Rowdy BakerPick a filling, any filling! Cherry, apple…whatever says “Memorial Day” to you. What people will remember is the crust – flaky and delicious, and decorated with flags and flowers, with a star in the center to let steam out.

To have a generous portion of pie crust to work with (think thick, rustic crust and lots of dough to make shapes out of) I doubled my usual recipe.

Flags and Flowers Pie Crust
Print
Author:
A double recipe of pie crust will give you nice thick deep dish crusts, and plenty of extra dough for decorating..
Ingredients
  • 4 cups flour
  • 2 teaspoons salt
  • 2 cups shortening (chilled)
  • ½ cup cold milk
  • 2 tablespoons vodka (or vinegar, if you prefer)
Instructions
  1. Prepare your pie filling of choice.
  2. In a large bowl, combine flour and salt.
  3. Cut shortening into the mixture (using a pastry blender or your fingertips) until there are no lumps bigger than a pea.
  4. Combine milk and vodka and add to the dry ingredients all at once.
  5. Use a fork or rubber spatula to lightly combine. Separate into two balls..
  6. Between two sheets of floured parchment, flatten one of the balls of dough and roll out to a size at least 2 inches bigger all the way around than your pie pan. Add a little flour as needed to keep it from sticking to the parchment. Remove top parchment and, using your pie pan as a guide, cut out a circle approximately 1 inch bigger around than the pie pan. Set aside the scraps for decorations.
  7. Slide a flat baking sheet under the bottom parchment and place your pie pan upside down in the center of the dough. With one hand under the baking sheet and one on the top of the pie pan, flip it over. Remove the baking sheet and gently peel back the parchment. Ease dough into the pan. Place in the refrigerator.
  8. Roll the second ball of dough the same size as the first, between sheets of floured parchment. Remove the top parchment and cut the circle of dough, saving the scraps, Using a cookie cutter, cut a star shape out of the middle. Slide a baking sheet under the bottom parchment and refrigerate while you work on the decorations.
  9. Combine all scraps and roll out thinly between parchment.
  10. Cut out 8 rectangles for flags. With a toothpick make guidelines for stripes and a large square in the upper left hand corner, poked with the toothpick for "stars". With a large sharp knife, cut thin strips to make stripes. Lay them on the rectangles, letting them fall over the edge, and press gently. Trim the excess dough from the sides.
  11. Make roses: Roll a small strip of dough to make the center. Cut round circles and overlap them around the center, pinching the outer edges to make them thin so they'll curl down a bit. Shape with your fingers. Holding the flower right below the petals, pinch off the excess dough from the bottom so the flowers will set neatly on the crust. Make 8 roses.
  12. Heat oven to 375 F.
  13. Remove crusts from the refrigerator.
  14. Fill the bottom crust and cover with the top, keeping the star centered. Crimp the edges.
  15. Arrange flags and roses around the outer edge.
  16. Place a baking sheet under the pie and bake approximately 40 minutes, or until the top crust is a rich golden brown.

Mark lines with toothpick. Add thin strips of dough - let it fall of the sides for now. And crumbly areas can be cleaned with toothpick.

Mark lines with toothpick. Add thin strips of dough – let it fall of the sides for now.

Trim the edges.

Trim the edges.

I neglected to get rose-in-progress photos. But it’s easy, honest! Just roll a little strip of dough for a center. Cut small circles and overlap – pinching the dough on the top to thin it and make it curl nicely. Use your inner artist! Hold the rose loosely in one hand with fingers under the blossom, and pinch off the extra dough so it will sit pretty.

Arrange flags and flowers.

Arrange flags and flowers.

At this point, you could brush the pie with an egg wash, or sprinkle it with sugar – or even colored sugar. You could even paint the stars and stripes with food color. I wanted rustic, so I left it alone.

BAKE!

Flags and Flowers Piecrust from The Rowdy Baker

And of course, you are the kitchen artist here. Make all stars, one large flag, or sculpt an eagle. Use canned pie filling or make your own. Whatever you do, it will be wonderful! Have a good Memorial Day.

Lorinda