Mallo Mountain Cookies

A three generational road trip from California to Connecticut (to drop my granddaughter off at college) was full of adventures and lots of laughter. You’re invited to travel along as I share recipes inspired by my favorite memories.

If you are ever in Altoona, Pennsylvania you must stop at the Boyer Candy Factory Outlet. You can stock up on essentials like Mallo Cups, Clark Bars, and my new favorite. . . Jimmie Stix. (I won’t be using Jimmie Stix in a recipe because I ATE THEM ALL.) Seriously, retro candy never tasted so good.

Mallo Cups are filled with creamy marshmallowy filling. There is a little coconut in there too, which is very subtle in flavor and texture. Since I’m not a fan of coconut in candy, I was a little leery about this, but found the coconut added something special to the candy cups.

I brought quite a few home with me, but since it took me a few tries to nail the cookie recipe, I ran out and had to order more online. I found that the small (.5 ounce) cups worked best. You can order directly from Boyer: Boyer Candies

Or you might want to try Ebay. I ordered some from there (hello . . . .free shipping!) and they were mailed quickly in a protective bag with a small freezer pack inside. Nicely done!

Topping graham-based cookies with Mallo Cups created little cookie mountains in various stages of volcanic activity. Some stayed solid, some oozed marshmallow filling, and a few erupted dramatically. All were delicious.

No mixer is needed for this recipe. It all gets stirred up by hand in one saucepan! No chilling, no rolling . . . so easy. (I don’t use a microwave, but if you do, you can simply melt the butter and chocolate in a sturdy microwave-proof bowl instead of using the stove.)

Mallo Mountain Cookies
Print
Author:
Makes 24 cookies if you're using the .5 oz Mallo Cups. If you have larger cups, add a little more dough to each cookie, which should yield approximately 18.
Ingredients
  • 24 Mallo Cups - .5 oz. each
  • 9 full graham crackers (1 sleeve) finely crushed
  • ½ cup butter
  • 4 ounces milk chocolate (if using chips, this is ¾ cup)
  • ½ cup brown sugar
  • 2 eggs
  • 1 teaspoon vanilla
  • 1¾ cups all-purpose flour
  • 1 teaspoon baking powder
  • pinch of salt (if using unsalted butter, increase to ¼ teaspoon)
Instructions
  1. Preparation: Line two large baking sheets with parchment. Unwrap 24 Mallow Cups and set aside. Remove ¼ cup of the graham cracker crumbs and set aside in a small bowl. Heat oven to 375 F.
  2. In a large saucepan on lowest heat, melt the butter and chocolate, stirring often.
  3. Remove from heat and add the brown sugar and graham cracker crumbs (except for the reserved crumbs in bowl). Stir to combine.
  4. Add eggs and vanilla. Stir well.
  5. Stir in flour, baking powder, and salt. Allow mixture to sit for 5-10 minutes; it will thicken during that time.
  6. Each cookie will use 1 rounded tablespoon of dough (about 4 teaspoons). My medium-size cookie scoop is perfect for this. Using your hands, roll each scoop into a ball and dip in the reserved crumbs, leaving the top bare. Place on baking sheet and press one of the Mallo Cups onto the ball of dough, pressing firmly until you can see a little dough around the edge of the cup. (The Mallo Cup will not be pressed all the way into the dough.) Repeat, keeping cookies 2 inches apart.
  7. Bake for 11 minutes, remove from oven and allow the cookies to cool on the baking sheet for a minute or two before transferring to a cooling rack.

Finely crush the graham crackers. Remember to set aside 1/4 cup for rolling the balls of dough in.

Melt the butter and chocolate, then stir in the graham cracker crumbs and brown sugar.

Add eggs and vanilla. Stir well.

Add the flour, baking powder, and salt. Stir just until combined and let mixture sit for 5 minutes to thicken.

Dip each ball of dough in reserved crumbs, at least halfway up. You can roll the entire ball in crumbs, but you may need to crush another cracker or two.

Press a Mallo Cup on each ball of dough and bake.

I’m doing this as inspiration strikes, so don’t be surprised if I backtrack to Reno or speed ahead to Connecticut!

Enjoy,

Lorinda

Cranberry Pecan Snowballs

One bite of these buttery snowball cookies will tell you they aren’t your mama’s tea cakes. The dough is subtly flavored with orange zest, and a sweet cranberry filling hides in the center. If you choose to add a fresh cranberry, it will add a burst of tangy flavor.

Whether you call them Russian Tea Cakes, Mexican (or Italian) Wedding Cakes, or Snowballs, they are a holiday tradition worth making. They do tend to be just a little bit dry (like shortbread) so a small dab of filling to soften the center worked well. Of course, if you don’t want all the bells and whistles, you can simply leave out the filling entirely. But oh, not the orange zest! It’s so good.

I am pretty hands-on, and use my thumb to make the hole in each ball of dough (where the filling is added) but if it makes you more comfortable, it can be made with the round handle of a wooden spoon . . . or you can wear disposable gloves. The only tricky part is to make the dough at the top of the hole thinner—and don’t over fill, of course—so the cookie can be neatly pinched closed. If a little filling squeezes out, just wipe it off and patch the spot with a small piece of dough before rolling into a smooth ball.

Easy as 1,2,3! Fill, pinch and roll.

Cranberry Pecan Snowballs
Print
Author:
For best results, once cookies are filled and formed, chill for 1 hour before baking. They can be chilled on the baking sheets, or the balls of dough can be put in a large cake pan and then transferred. You can skip this step, but they will be slightly flatter.
Ingredients
  • FILLING:
  • 4 ounces cream cheese, softened
  • 1 tablespoon cranberry sauce (jellied or whole berry)
  • a few drops of red food coloring (optional)
  • ¼ cup white chocolate chips
  • 24 fresh cranberries (optional)
  • DOUGH:
  • 1 cup butter, softened
  • ¾ cup powdered sugar
  • 1 cup finely chopped pecans (I toast mine first for the best flavor)
  • Zest of one large orange (about 1 packed tablespoon)
  • 2 teaspoons vanilla
  • 2 cups all-purpose flour
  • ½ teaspoon salt
  • Powdered sugar to roll cookies in
Instructions
  1. FILLING: In a small bowl, beat together the cream cheese and cranberry sauce. If desired, add a few drops of red food coloring.
  2. Melt the white chocolate in a small pan on lowest heat, or in a microwave-safe bowl in the microwave at fifteen second increments. Don't get it too hot - just until melted. Add to cream cheese mixture and beat until smooth. Place in a pastry bag and set aside. (You can skip the pastry bag and just use a ½ teaspoon measuring spoon to fill the cookies, but it will be messier.)
  3. DOUGH: In a large bowl, beat butter until creamy. Add powdered sugar and beat for 1 minute, scraping sides of the bowl often.
  4. Add chopped pecans, orange zest, and vanilla. Beat well.
  5. Add flour and salt. Beat just until blended.
  6. Make balls of dough, using a generous tablespoon of dough for each. (You should have about 24.) Make a deep hole in each. The easiest way is to cup your hand around the dough with it poking out of the circle made by your thumb and forefinger. Use a finger on your opposite hand (or the rounded handle of a wooden spoon) to make the hole, then widen it so it's a little thinner at the top. Using a pastry bag, fill the hole about half way. Press a raw cranberry (if you're using them) on the filling and gently pinch the dough over the hole. Roll between your hands to form a round ball. Place 1½ inches apart on ungreased (or parchment lined) baking sheet.
  7. Repeat until all cookies are formed. If you have time (and room in your fridge) chill for 1 hour.
  8. Heat oven to 325 F. Bake cookies 15-17 minutes, until just the bottoms are lightly browned.
  9. Let the cookies rest on the baking sheet for a minute or two before sliding onto a cooling rack.
  10. When the cookies are barely warm, dredge them in the powdered sugar. Wait until completely cool and repeat. Store in an airtight container.

Beat butter well (see how fluffy?) Add powdered sugar and beat for 1 minute.

Stir in finely chopped pecans, orange zest, and vanilla

Mix in the flour and salt. It will look crumbly at first, but keep beating; it will come together!

I found that the easiest way for me to fill the cookies was to wrap my hand around the ball of dough and use my other hand to make the hole, fill it, pop in a cranberry, and pinch the top.

But you might prefer working on a flat surface, like this:

Poke a hole in each ball with your thumb and thin the sides out. Add about a half teaspoon of filling

Add a fresh cranberry

Carefully pinch the cookie closed and roll gently between your palms to make a ball

The tops of your cookies shouldn’t brown, but the bottoms will turn a light golden brown.  I think my camera exaggerated the color, but I may have left this batch in the oven a minute too long. Meh . . . that’s what the powdered sugar is for!

Dredge warm cookies in a bowl of sifted powdered sugar. Wait until cool, then repeat. (For the second coat you can put the sugar in a paper bag and shake a few at a time.)

Wishing you peace,

Lorinda

Triple Chocolate Macadamia Nut Cookies

Santa may visit twice this year if you have these mouthwatering cookies sitting out for him.

Do you remember the old Neiman Marcus cookie recipe? I’m old, so I do! You can read about it online, but the urban legend goes like this: a woman requested a cookie recipe from the department store and was told it would cost her “two fifty”. She had them charge her card, only to find they meant $250. Outraged, she retaliated by sharing the recipe far and wide.

I’ve seen many recipe variations, but the copy I had (way back when) called for ground oatmeal, grated chocolate, and macadamia nuts. I’m happy to add the nuts, but simplified things by skipping the grinding and grating. (Grating chocolate is not fun.) I’ve tweaked the recipe over the years until it looks very little like the original, but it’s OH SO GOOD.

The baked cookies are slightly shiny on top, like a brownie, but have a chewy texture. Make sure not to overbake them or they’ll get crunchy. They’re actually pretty tasty that way, too . . . but better slightly soft.

Triple Chocolate Macadamia Nut Cookies
Print
Author:
Makes approximately 4 dozen large cookies If using salted nuts, don't add additional salt.
Ingredients
  • 3 ounces dark chocolate
  • 1 cup butter
  • 1 cup brown sugar
  • 1 cup white sugar
  • 2 eggs
  • 2 teaspoons vanilla
  • 2¼ cups all-purpose flour
  • 2 cups "quick" oats
  • 2 teaspoons baking powder
  • ½ teaspoon baking soda
  • ¼ teaspoon salt (eliminate if using salted nuts)
  • 1½ cups milk chocolate chips
  • 1½ cups white chocolate chips
  • 1½ cups macadamia nuts cut into halves or pieces
Instructions
  1. Heat oven to 375 F. Cover two baking sheets with parchment
  2. Melt the 3 ounces of dark chocolate, using a small pan on the stove on lowest heat, or microwave in a microwave-safe bowl for 15 second increments, stirring each time until melted. Set aside.
  3. In a large bowl, beat the butter until smooth.
  4. Add brown sugar and white sugar and beat well - about 2 minutes by electric mixer.
  5. Add eggs and vanilla, and beat for two minutes, until mixture lightens in color and looks fluffy.
  6. Slowly mix in the melted chocolate.
  7. Add flour, oatmeal, baking powder, baking soda, and salt. Mix just until combined.
  8. Stir in the chocolate chips and macadamia nuts.
  9. Drop balls of dough onto prepared pan, approximately 2 tablespoons each. A rounded cookie scoop works best. Leave at least 1½ inches between each scoop of dough.
  10. Bake for 11 minutes. Cookies should still feel fairly soft to the touch. Don't overbake or they will be crunchy instead of chewy!
  11. Move pan to a cooling rack and let it cool for 1 minute, then slide cookies onto rack. Repeat with remaining dough.


Beat the butter until creamy, then add both sugars and beat again!

Add eggs and vanilla, and beat until mixture lightens and is fluffy

Slowly add melted chocolate. Mix until combined.

Add flour, oatmeal, baking powder, baking soda, and salt

Mix in chocolate chips and macadamia nuts. Ready to bake!

Place large scoops of dough at least 1 1/2 inches apart. Bake!

I used pretty big scoops – about 2 tablespoons. If you make them smaller, you might want to deduct a minute from the baking time.

Baked.

It’s a challenging year, but i wish you joy and health and peace of mind.

Lorinda


Lemon and Violet Tea Cakes

For Mothers Day, May Day, or a spring tea, these sweet little tea cakes will steal the show! So easy to make (and to eat), you may find yourself trying out all the different variations you can think of. Try adding: lime zest, chopped nuts, colored sprinkles, or culinary lavender. Skip the coconut if it isn’t to your liking, and just add a cup or so of nuts.

You almost certainly have eaten similar cookies during the holidays; they’re a classic, known as Russian Tea Cakes, Mexican Wedding Cakes, and a variety of other names. Buttery, melt-in-your-mouth tender, and minimally sweet (if you don’t count the powdered sugar they are usually rolled in), they are one of my favorite cookies on the Christmas platter. I just traded coconut for the nuts. Oh, and added lemon. And violets.

Coconut was something that just seemed to go with the lemon and violet theme. I’m not a huge fan, but I chopped it up into tiny pieces (no long stringy stuff for me) and found it delightful.

IMPORTANT: Violets (violas) are edible. Pansies, too. Both are perfect for this application. But beware; African Violets are NOT edible. Nope. Steer clear! When in doubt, do your research. I bought seeds for edible violets last year and had more flowers than I could use. They made it through our cold winter (zone 5) and are blooming like crazy again this year. Try that. Or you can order fresh violas online (if you’re Daddy Warbucks). I understand that some grocery stores offer them in season. Not where I live! One more option is candied violets. They aren’t as pretty as fresh, but still nice.

Lemon and Violet Tea Cakes
Print
Author:
Makes 24
Ingredients
  • 1 cup butter, room temperature
  • ¾ cup powdered sugar
  • 1 tablespoon fresh lemon juice
  • 1 tablespoon grated lemon zest (I needed 3 large lemons for this)
  • ¼ teaspoon lemon extract (or ½ teaspoon vanilla)
  • ½ cup coconut, chopped fine
  • 2 cups all-purpose flour
  • GLAZE
  • 1 cup powdered sugar
  • 2 tablespoons water or lemon juice
  • 1 teaspoon meringue powder (optional)
  • 24 fresh violets, stems trimmed off as close to flowers as possible.
Instructions
  1. Heat oven to 300 F. Cover two baking sheets with parchment.
  2. COOKIES: In a large bowl, beat the butter and powdered sugar until creamy.
  3. Add lemon juice, zest, extract, and coconut. Beat well.
  4. Add flour and beat just until combined. (Mixture will look crumbly.)
  5. Use a rounded tablespoon of dough for each cookie (a cookie scoop works well) and roll into balls, taking care to make them smooth and round. Space at least 1 inch apart on prepared baking sheet.
  6. Bake for about 20 minutes, or until the bottoms are golden brown.
  7. GLAZE: In a small bowl, whisk together the powdered sugar, water (or lemon juice) and meringue powder. Mixture should be fairly thin, easily pouring off a spoon.
  8. Dip the top of each cookie in the glaze and allow it to drip before turning it right side up on a piece of parchment. Immediately place a violet on top, pressing down lightly to flatten. Allow cookies to dry for at least 15 minutes, then add a little more water to the small amount of glaze left in the bowl and paint it gently over each flower. Let cookies dry thoroughly before storing.

Add lemon, zest, extract, and coconut to creamed butter and sugar mixture

Don’t over mix. It’s okay if it looks crumbly. It will come together when you scoop.

Make round balls and place cookies at least 1 inch apart

I use meringue powder for a firmer glaze, but you can skip it if you don’t have any.

Dip into glaze and place flower on icing immediately

Thin the glaze a bit and paint a layer over flowers, then let dry.

Wishing you the joy of sunshine, flowers, and sweet things!

Lorinda

Raspberry Rose Cookies

Cookie dough roses are baked right into these raspberry flavored hearts, creating a treat your valentine won’t be able to resist. A thin icing is all they really need, but decorating them was so much fun, I just had to play.

(Humor me . . . just one more picture? It’s excessive, but they were so photogenic, I couldn’t choose!)

Go classy and understated, or let your artistic side run wild. Your choice!

These cookies may look delicate, but they are sturdy enough to be decorated by little hands. Flavored gelatin not only provides the raspberry “zing” and color, it gives the shortbread cookie base a denser, chewier texture.

I tried using half shortening and half butter to ensure a pretty pink color, but they just didn’t have the flavor I wanted. Back to all butter, which gives them a hint of salmon color. You could add a touch of pink coloring if you’d like.

They’ll hold their shape, so any designs you add to the hearts before baking will still be there when they come out of the oven. Cake decorating tips, gum paste tools, cookie stamps or silicone molds all work very well for this.

I used a small heart cutter and gum paste tool to create designs. You could use a straw to cut out holes all the way around to look like lace. A small rose in the center would have been pretty too.

Press hearts with a silicone texture mat for texture, or press dough into a floured silicone mold and carefully ease the shape out onto the heart. Clockwise from upper left: Hand shaped rose on plain heart, rose design made by silicone mold on plain heart, textured heart, textured heart with small rose.

Raspberry Rose Cookies
Print
Author:
Makes approximately 18-20 cookies
Ingredients
  • COOKIES:
  • 1 cup butter, softened
  • 1 cup powdered sugar
  • 2 tablespoons raspberry flavored gelatin
  • 1 egg white
  • 2 cups all-purpose flour
  • ½ cup cornstarch
  • ⅛ teaspoon salt
  • ICING:
  • 1½ cups powdered sugar
  • 3 tablespoons water to make thin glaze
  • Red or pink food coloring (green if you are adding leaves)
  • Royal icing, colored sugar, sparkling sugar if desired
Instructions
  1. Heat oven to 350 F. Prepare two baking sheets by covering each with a sheet of parchment.
  2. COOKIES:In a large bowl, beat together the butter, powdered sugar, and gelatin for 3 minutes.
  3. Add egg white. Beat for 1 minute.
  4. Mix in the flour, cornstarch, and salt. Dough will be thick.
  5. Work with half of the dough at a time, keeping the remainder wrapped at room temperature. Roll out dough ¼-inch thick. No thicker, or roses will brown before cookie bakes.
  6. Cut out heart shapes using 3-inch cutter. (Mine was slightly smaller.)
  7. Using the base of a large decorating tip or 1-inch round cutter, cut a hole in the middle of each heart. Save the circles. Before gathering scraps, use the round cutter to make more circles; you will use these for rose petals. Place hearts on prepared baking pans, 1 inch apart.
  8. To create roses, Press one small circle into a roughly oval shape. Slowly roll from one end to the other, to create the center of the rose. If dough cracks, just press it gently to smooth. Flatten another circle, and, holding it a little higher than the center, wrap it around. It doesn't need to go all the way around - the idea is to overlap petals. Don't worry about how long the "stem" you're holding is. That will be cut off when you're through. Repeat until you have a rose you like. I prefer 5 petals: the center, 1 around the center, and then 3 around the outside. As you work, gently pat the top edge of the petals to smooth if they crack, and roll the top edge back slightly on a few petals. When finished, use a knife or scissors to cut off the excess at the bottom (or pinch it off with your fingers) and place the rose in the hole in the heart, carefully pressing at the base to secure. Shape some leaves, if you wish.
  9. Bake 9-11 minutes, depending on the thickness of your cookies. The bottoms should be just starting to brown a little, but don't overbake or the roses will brown. (If this happens, a little icing and colored sugar on the edges will cover it nicely.) Cool completely on a rack.
  10. GLAZE: Whisk together the powdered sugar and water. In a small cup, combine 2 tablespoons of glaze and a drop of red or pink coloring. Do the same for green, if you added leaves to your roses. Brush a smooth, thin coating of the white glaze on each cookie, avoiding the rose. With a paintbrush, lightly paint the roses red or pink and the leaves green. Let cookies dry for at least 1 hour before storing or decorating.

Cut out hearts Use a large decorating tip to make a hole in each. Keep the circle of dough for rose petals!

Flatten the 1-inch circle into a rough oval shape. Start and one side and roll up, smoothing top edges if it cracks.

Add second and third petal, overlapping.

I like to stop at 5 petals. But each rose is a little different; follow your instincts!

Pinch or cut off excess dough on bottom of roses. Settle each rose into a heart, pressing gently into the hole.

Bake on parchment 350 F. for 9-11 minutes.

You can use a small decorator tip to put design on outer edge.

You can also make tiny roses and leaves. Use a straw or large tube tip to make the hole to set the rose in.

Brush the cookie with white glaze, then paint the roses and leaves.

Once the cookies are dry, decorate to your heart’s content. I used royal icing and some colored sugar.

XOXOXO

Lorinda

Christmas Kisses (Meringue Topped Brownies)

Hang up that mistletoe, because a kiss just doesn’t get any sweeter than this! Each chewy chocolate brownie is filled with a sweet surprise and topped with a crisp peppermint meringue rosette, creating a harmony of flavors and textures. These little two-bite treats are sure to brighten up a holiday cookie platter or buffet table. And make sure to put one next to Santa’s glass of milk to give him a break from all of those sugar cookies.

If you prefer cake brownies, well . . . move along; there’s nothing to see here! Nope, these are chewy with a crunchy edge, just the way I love them.

It took me a few tries to get this right. Okay, five. It took me five tries. My first attempt was with a chocolate cookie crust. They were delicious, but so messy. SO MESSY. Meringues crackle and crumble when you bite into them, which is expected, but add a crumbly crust that falls everywhere, and it simply wasn’t going to work. I could just see these being served at a tea and having to hand out bibs!

I tried baking the brownies for a bit first, and the final result was a dry, hard, brownie brick. Nope.

The third time I realized that they were hollow. The bottom of the meringues melted into the brownies, and the meringues puffed and were hollow (as meringues are) which would have been kind of neat, if the tops didn’t pop off so easily. I could see them filled with ganache, and almost went that direction (you can, if you wish) but ultimately tried, tried again.

On the fourth batch I went for a slower, shorter bake time. Goo. ‘Nuff said.

So . . . I tried an experiment, hoping to give the meringues something to hold onto besides brownie batter. Peppermint patties erupted in the oven, but the other three optionssoft peppermint candy, chocolate kisses (point down) and peppermint kisses (point up)—all worked great. Whew. You have a choice!

Left to right: Soft peppermint puffs (give the best support), Chocolate kiss, and peppermint kiss.

And if you’d like to really add some bling, dip the tips of each kiss in a little melted white chocolate and sprinkle with crushed peppermint candy, grated chocolate, or sprinkles.

Here’s the recipe . . . tips and photos are below.

Christmas Kisses (Meringue Topped Brownies)
Print
Author:
Makes 48 kisses. Ultra fine sugar is recommended for the meringue, but regular sugar can be used. It just may need a little more beating to dissolve properly.
Ingredients
  • BROWNIE LAYER
  • ½ cup butter, melted
  • 2 tablespoons cooking oil
  • 1½ cup white sugar
  • 2 eggs
  • 1 teaspoon vanilla
  • ⅔ cup unsweetened cocoa powder (I used half regular, half special dark)
  • ¼ cup grated or very finely chopped dark chocolate
  • ¾ cup flour
  • ¼ teaspoon baking soda
  • ¼ teaspoon baking powder
  • ¼ teaspoon salt
  • Candy for filling - 48 each peppermint puffs or chocolate kisses)
  • MERINGUE:
  • 4 egg whites (at room temperature)
  • ½ teaspoon cream of tartar
  • ¾ cup ultrafine sugar (Baker's Sugar)
  • ¼ - ½ teaspoon peppermint extract
  • red food coloring (optional)
  • White chocolate melts, crushed candy cane, grated chocolate for decorating if desired
Instructions
  1. Heat oven to 250 F. Place 48 paper liners in mini muffin pans.
  2. BROWNIES:
  3. In a large bowl, stir together the melted butter, cooking oil, and sugar.
  4. In a small bowl, whisk together the eggs and vanilla until frothy, then add to large bowl and stir to combine.
  5. Add cocoa powder, grated chocolate, flour, baking soda, baking powder, and salt. Stir just until combined. A few wisps of flour showing is just fine.
  6. Using a pastry bag with large tube tip (or you can use a spoon) divide the brownie mixture between the 48 cavities - approximately 2 level teaspoons each.
  7. Add a piece of candy to each cup, pressing down firmly. If using a chocolate kiss, place it point down. Set aside.
  8. MERINGUE:
  9. In a squeaky clean bowl, beat egg whites until thick and foamy, then sprinkle in the cream of tartar and continue to beat until soft peaks form.
  10. Trickle in the superfinen sugar, a tablespoon or two at a time, beating well before adding more. Take your time to ensure the sugar dissolves completely.
  11. Once all sugar has been added, beat until mixture is at stiff peak stage and holds its shape. Depending on many factors (weather, size of eggs, etc.) this can take 5 or 6 minutes.
  12. Add peppermint extract and beat until combined.
  13. For striped meringues, use red paste food coloring to paint stripes up the inside of a large pastry bag fitted with a large open star tip. (It's easiest to do this in two steps, folding down the top of the bag and painting from the tip up, then unfolding the bag and continuing the stripes.)
  14. Pipe in a circular motion upwards. Leave a little edge of brownie showing to make them easier to handle. (Use up extra meringue mixture by piping on a baking sheet covered with parchment.)
  15. Place pans in the oven (including extra meringues) and let them cook for 30 minutes, then WITHOUT OPENING THE OVEN DOOR, turn oven off and leave the kisses in there overnight.
  16. If desired, dip the tip of each in melted white chocolate and sprinkle on crushed candy cane, grated chocolate, or chocolate jimmies.
  17. Store in airtight container.


Beat eggs and vanilla, and add to butter and sugar mixture.

Add the dry ingredients and stir JUST until combined.

Pipe (or spoon) into paper liners.

Add candy to support the meringue. (I could have just cropped out the peppermint patties, but I want to show you what happens if you use them!)

Perfect peaks on the meringue.

Paint red stripes in pastry bag OR just add a couple of drops of red coloring to meringue for pink rosettes.

Pipe on the meringue. Leave a little brownie edge to make them easier to remove from the pan.

Just say “no” to peppermint patties!

TIPS:

  • Start the day before, because these really should be left overnight in the oven.
  • When you wake up in the morning and remove the kisses from the oven, immediately place them in an airtight container.
  • Putting the chocolate kiss point down seemed to support the meringue better
  • Skip the stripes if you’d like. They’re pretty plain white or light pink, too.
  • Regardless of what you may have heard, meringues are simple to make, and unless you are in Florida and the humidity is ghastly, don’t sweat the weather. I made this batch while it was snowing like crazy outside.
  • You can skip the paper liners if you use a baking spray (like Baker’s Joy) in the cavities. Just use a table knife to pop the kisses out when they’re cool.
  • This recipe can easily be halved to make 24. (If you don’t have a 1/8 cup measure for the 3/8 cups of flour and superfine sugar, use 1/4 cup plus 2 tablespoons.)

I’m hoping to get one more Christmas post up, but things are crazier than usual around here, so just in case . . .

Merry Christmas to you and yours!

Lorinda

“Apple Pie” Shortbread Cookies

Tender shortbread cookies filled with sweet apple pie filling may be a new fall tradition at your house. I’ve added these to my shortbread pie cookie collection, and I think this is (take a step back,“Chocolate Pie Shortbread Cookies”) now my very favorite variety.

Imagine biting into one of these and sinking your teeth into warm apple filling. It’s heavenly! Promise me you’ll try one before it’s cooled off entirely. Don’t get me wrong—they’re great the next day—but warm off the rack? Delightful.

Proper shortbread uses a lot of butter, so this is not an inexpensive or low- cal recipe, but when the cookie melts in your mouth you will forget cost, time, and calories. The cookies are that good. Oh, and speaking of time . . . these aren’t hard, but weaving the lattice tops takes a little patience. Plan on a few hours of baking bliss, or find a helper to make it go faster. Believe me, rushing through it just makes more work for you; the little strips of dough will sense your impatience and be less cooperative. Enjoy the process!

Hint: If you plan to make these for a special occasion like Thanksgiving, when you’ll be running around doing lots of last-minute things, make the cookies the week before and freeze them, assembled but unbaked. So easy that way, and if you’re serving right after the meal, they can go in when the rolls come out of the oven. (Make sure you set the timer; you know how crazy things get. Or is that just me?) They’ll still be warm when everyone is ready for dessert.

My husband, having a constant stream of goodies presented to him, has become a little hard to impress. His comment after eating one of these warm cookies? “This is so much more than a cookie!” We won’t discuss how many he ate.

I know this recipe looks daunting, but that’s because it’s hard to explain how to make the lattice tops. It’s just wordy. I’m sure you could figure it out (I’m embarrassed to tell you how long it took me to find the fastest method) but it’s all down in black and white for you!

Apples vary in juiciness, which is why I have you strain them so the amount of thickener is consistent. If you have leftover cooked juice, it’s wonderful in tea (or wine).

NOTE: Recipe was edited to change the size of the cookie cutters. (I need to learn to read a ruler correctly.) The large cutter was about 3 1/2 inches, and the small one was 3 inches. Even so, those are BIG cookies. Feel free to downsize.

"Apple Pie" Shortbread Cookies
Print
Author:
Makes 24 substantial cookies!
Ingredients
  • APPLE FILLING:
  • 4 cups chopped apple (about 3 large apples)
  • ¼ cup plus 3 tablespoons apple cider, divided
  • ½ cup sugar
  • ½ cup brown sugar
  • 2 teaspoons cinnamon
  • ½ teaspoon allspice
  • ¼ teaspoon salt
  • 3 tablespoons cornstarch
  • COOKIE DOUGH:
  • 2 cups butter (4 sticks), room temperature
  • 2 cups powdered sugar
  • 1 tablespoon apple cider (may use milk)
  • 2 eggs, separated
  • 4 cups all-purpose flour
  • ½ teaspoon salt
  • ½ teaspoon nutmeg (optional)
  • 1 cup cornstarch
  • ½ cup cinnamon sugar
Instructions
  1. FILLING: In a medium pan on medium heat, combine chopped apples, ¼ cup cider, sugar, brown sugar, cinnamon, allspice, and salt. Bring to a boil, stirring occasionally, then cook at a low boil (reduce heat if necessary) for 5 minutes. Remove from heat.
  2. Strain apples, reserving the liquid.
  3. In a small bowl or cup, combine 3 tablespoons cider with 3 tablespoons cornstarch. Stir well and set aside.
  4. Return apples to the pan, along with 1 cup of the reserved liquid. (add apple cider to reach 1 cup of liquid, if necessary.)
  5. Bring apple mixture back to a boil and stir in the cornstarch mixture. Cook and stir until thick - about 1 minute. Cool thoroughly.
  6. DOUGH: In a large bowl (this is a heavy dough, so a sturdy mixer and dough hook is recommended) combine softened butter and powdered sugar. Beat well.
  7. Add apple cider and egg yolks and beat until incorporated. (Reserve egg whites in small bowl.)
  8. Add flour, salt, and nutmeg. Beat just until combined. Add cornstarch and beat until thoroughly combined. Dough will be stiff.
  9. Heat oven to 350 F.
  10. Working with half of the dough at a time, roll out to ¼-inch thickness. (A little thinner is fine, but don't go thicker.) For best results, roll between lightly floured sheets of parchment. Choose two round cutters, one slightly smaller than the other. My large cutter was 3½ inches and my small one was 3 inches.Cut dough into strips the width of your big cutter, and then from the short side, cut those strips into smaller strips a little less than ½-inch thick. (Each small strip would be 4½-inches by about ½-inch.)
  11. Weave 6 pieces into lattice, leaving a little space between strips. (Lay one piece vertically, one horizontally, making a plus sign. Place two more vertical pieces, one on each side of vertical piece. Lift the top of the center piece and slide a strip under it horizontally, laying over the other two vertical pieces. Lift the bottom of the center piece and slide a strip under it horizontally, over the other two vertical pieces.)
  12. Press lattice firmly with the palm of your hand. Center the small cutter over the lattice and cut out a round. Hold it down firmly with one hand while you remove the scraps and place them in a pile. SCRAPS WILL BE USED TO MAKE THE COOKIE BOTTOMS LATER.
  13. With a thin spatula, move the cookie top to a piece of parchment or cutting board. Repeat until you have 24 lattice tops, using as much of the remaining dough in the bowl as necessary.
  14. Whisk together the reserved egg whites and 1 tablespoon water. Brush lightly over lattice tops and sprinkle with cinnamon sugar.
  15. Gather all of the scraps and any remaining dough and roll out to a little less than ¼-inch thickness. Cut rounds with large cutter. Press around the edge of each with your finger to thin and enlarge the rounds slightly. Brush with egg white wash.
  16. Heap 1 level tablespoon of apple mixture in the center of each round (a small scoop works well) and cover with one lattice top. Press the edge of the lattice top down firmly, then use your finger to flute the edge of the bottom round up, pressing firmly into the lattice layer. Place 1 inch apart on parchment covered baking sheet.
  17. Bake 12-14 minutes, or until edges are beginning to brown. Move to a rack to cool.


Cook the filling.

Strain the cooked apples. Don’t throw that juice away!

Add the cornstarch mixture to the boiling apples. Once thickened, let it cool completely.

Are you ready to rock?
(No pics of mixing dough. That’s pretty basic stuff!)

Roll out dough between sheets of floured parchment.

Cut strips the width of your large cutter; then cut those pieces into smaller strips

These strips are almost 1/2-inch wide. You can also make skinnier strips and use 8 pieces for a more dainty lattice.

Brush with egg wash and sprinkle generously with cinnamon sugar. Use a thin spatula to move each lattice onto filling.

Cut out bottom rounds. Press around edge to thin and enlarge slightly.

Brush bottom with egg wash. Heap a level tablespoon of filling in the center of each round. Add a lattice top and press firmly around the base

Use fingertip to flute edges . Press firmly against base of lattice top. (If you don’t press them together, the fluted edges may lay back down again as they bake!)

Going in the oven.

Enjoy!

Lorinda


Drunken Punkin Cookies

Soft pumpkin cookies filled with rum-soaked raisins, pecans, white chocolate morsels, and Buttershots-spiked cream cheese will keep you warm and cozy this fall. They’re even brushed with a thin boozy glaze hot out of the oven, and then again once the cookies have cooled. It’s hard to get enough alcohol in cookie dough without compromising the texture, so it took a variety of approaches to pull it off.

Buy the kids some Oreos; these babies are for you!


Drunken Punkin Cookies
Print
Author:
Makes 36
Ingredients
  • COOKIE DOUGH:
  • 1 cup raisins
  • ½ cup strong rum
  • 1 cup butter, softened
  • 1 cup sugar
  • 1 egg + 1 yolk (the extra white will be used in the cream cheese swirl)
  • ½ cup solid pack pumpkin
  • 2 cups flour
  • 1 teaspoon baking powder
  • 1 teaspoon baking soda
  • ½ teaspoon cinnamon
  • ¼ teaspoon powdered ginger
  • ¼ teaspoon salt
  • 1 cup chopped pecans (toast them for the best flavor)
  • CREAM CHEESE SWIRL:
  • 4 ounces cream cheese, softened
  • ¼ cup sugar
  • 1 egg white
  • 3 tablespoons Butterscotch liqueur (like Buttershots)
  • 3 tablespoons flour
  • ¼ teaspoon baking powder
  • GLAZE:
  • 4 tablespoons alcohol (I used a mixture of rum and Buttershots)
  • 1 cup powdered sugar
Instructions
  1. Place raisins and ½ cup rum in a small pan. Bring to a simmer over med-low heat. Cover, reduce to low, and simmer for 5 minutes. Remove from heat and let raisins sit for at least 30 minutes, or until lukewarm. They should be plump and rum should be reduced.
  2. Heat oven to 350 F. Cover baking sheets with parchment.
  3. COOKIE DOUGH: In a large bowl, beat together the butter and sugar until light and fluffy. Add the egg and egg yolk. Beat well.
  4. Add raisins (with the reduced rum), pumpkin, flour, baking powder, baking soda, cinnamon, ginger, salt, pecans, and white chips. Mix until incorporated.
  5. CREAM CHEESE SWIRL: In a small bowl, beat together the cream cheese, sugar, egg white, butterscotch liqueur, flour, and baking powder until smooth.
  6. Add the cream cheese mixture to the dough and fold it in just 6-7 times, leaving big white streaks. Then pull your cookie scoop or spoon through, aiming for a mixture with more dough than swirl. I like to gather a little cream cheese first, then scoop through dough, which puts the pretty swirl on top of the cookie as it bakes.
  7. Bake for approximately 12 minutes, or until the top springs back when pressed. While cookies are baking, make glaze:
  8. GLAZE: Whisk together the alcohol and powdered sugar until smooth. Brush it over hot cookies, then give them another light glaze once they've cooled.

Beat eggs into creamed butter and sugar, then dump in everything except cream cheese mixture

Beautiful dough! Great even without the cream cheese, but you’d be giving up the butterscotch liquor, which would be SO sad.

Fold in the cream cheese mixture. Go easy – you want to see big streaks of white!

Try to get both the cream cheese mixture and the pumpkin dough in one scoop.

Scoop and drop!

Bake on parchment covered baking sheets

Brush hot cookies with glaze, then give them another coat once they’ve cooled.

Cheers!

Lorinda

German Chocolate Cookies

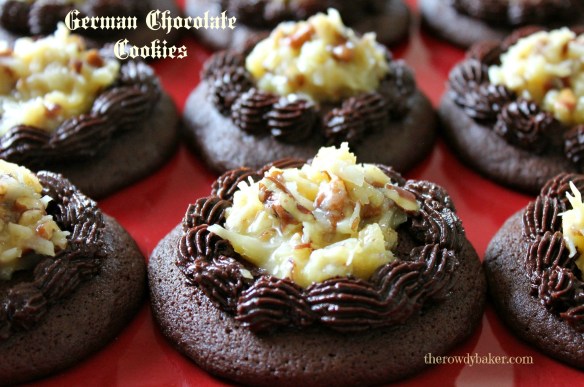
Last month I posted a photo of a German chocolate cake I’d made for a friend’s birthday, and got lots of requests for the recipe. I meant to make it for you but got sidetracked by the thought of cookies instead. Soft cookies, similar to a cake brownie, topped with coconut-pecan filling inside a ring of chocolate ganache.

Disclaimer: These aren’t German cookies. There’s been a little confusion about that. They’re meant to look like German Chocolate Cake, which is actually a recipe that was created in the United States by a baker named Samuel German. So . . . just humor me and roll with it, ‘kay?

My husband, who obviously is treated to lots of goodies (and isn’t much of a German chocolate fan) says these may be his favorite cookie of all. That’s saying a lot!

The filling and ganache both have to sit for a couple of hours before assembly, so plan accordingly. The filling can be refrigerated for days, so you can always make it ahead if that’s easier for you. Just cover it and hide it well in the refrigerator; it’s yummy to eat by the spoonful. I know this for a fact.

The recipe for the filling was slightly adapted from one of my very favorite cookbooks, “The Village Baker’s Wife”, by Gayle and Joe Ortiz. They don’t take shortcuts. I sometimes do. In the past, since I seem to have a mental block about owning a double boiler, I’ve made it on the stove in a heavy pan without any problems. That’s how I wrote the recipe below, assuming I can’t be the only person who doesn’t own one of those pans. But just for grins I improvised and tried my own version, which worked very well. So if you want to err on the side of caution and go the double boiler route, try a heat-safe bowl over a big pot of boiling water.

I also took my filling’s temperature just to make sure that the cooking time was long enough to bring the eggs to a safe temperature, and it was perfect. You’re good to go.


German Chocolate Cookies
Print
Author:
Makes about 30 large cookies A cookie scoop is highly recommended for symmetrical cookies.
Ingredients
  • COOKIES:
  • 2 ounces unsweetened chocolate
  • ½ cup milk
  • 1 teaspoon vanilla
  • ¾ cup butter, room temperature
  • 1 cup brown sugar
  • ½ cup white sugar
  • 2 eggs
  • 1½ cups all-purpose flour
  • 1½ teaspoons baking powder
  • ½ teaspoon salt
  • ¼ cup Dutch process unsweetened cocoa
  • GANACHE:
  • 1 cup heavy whipping cream
  • 7 ounces dark chocolate, chopped (I used Lindt 85% so it wouldn't be too sweet)
  • FILLING:
  • ½ cup heavy whipping cream
  • ½ cup sugar
  • 2 egg yolks
  • ¼ cup (a half stick) butter, cut into several small pieces
  • 1 teaspoon vanilla
  • 1 cup toasted pecans, finely chopped
  • 4 ounces sweetened flaked coconut (about 1 cup, firmly packed)
Instructions
  1. COOKIES: Place unsweetened chocolate and milk in a small pan. Cook on low heat, stirring frequently, until melted. Remove from heat, add vanilla, and set aside to cool.
  2. In a large bowl, cream the butter, brown sugar, and white sugar thoroughly.
  3. Add eggs and beat until mixture is light and creamy, scraping the bowl often - 1 to 2 minutes.
  4. Sift together the flour, baking powder salt, and cocoa.
  5. Mix half of the dry ingredients into the batter. Scrape the bowl and add half of the milk/chocolate mixture. Beat until combined. Repeat. The dough will be soft and fluffy.
  6. Refrigerate for 60 minutes.
  7. Heat oven to 375 F.
  8. Using a large cookie scoop (mine holds a rounded tablespoon of dough), scoop onto parchment-lined baking sheets, leaving 1½ inches between each ball of dough. Bake for approximately 10 minutes. Move baking sheet to a cooling rack. Allow the cookies to remain on the baking sheet for 2-3 minutes before sliding the parchment onto the rack. Cool completely.
  9. GANACHE: Place chopped chocolate into small bowl.
  10. Heat the whipping cream on medium-low in a small pan until bubbles appear around the edge of the pan. Remove the pan from the stove. Pour half of the cream over the chocolate and wait 5 minutes before gently stirring. Return the remaining cream to the stove, heat until bubbly again and pour over the chocolate mixture. Stir gently until smooth. Cover loosely and set aside, stirring occasionally. Ganache will be ready to pipe onto cookies when it is thick enough to hold a shape.
  11. FILLING: Stir whipping cream, sugar, and egg yolks together in a heavy medium-size pan. Add the butter and turn the heat to low. Stirring often, cook until butter is melted. Cook for an additional 10-15 minutes, stirring frequently. The mixture should be slightly thick. Pour into a medium bowl, stir in vanilla, and set in a larger bowl of cold water to cool completely, stirring occasionally.
  12. Once cool, add pecans and coconut. Cover and place in the refrigerator until needed.
  13. When ganache is thick enough to pipe, place in a pastry bag fitted with a small star tip. Pipe a decorative ring on each cookie.
  14. Fill rings with filling. Serve, or refrigerate in an airtight container.

Chocolate and cream, and sifted dry ingredients, ready to be added to batter.

Add half of the sifted dry ingredients to the batter and mix well.

Then add half of the liquids. Mix and repeat!

Scoop chilled dough onto parchment, leaving plenty of room between cookies.


Baked, with nicely rounded tops.

Stir vanilla into cooked filling. Let it cool.

Add pecans and coconut

Good ingredients make good ganache!

Pipe a ring on each cookie, add filling, make a big pot of coffee, put your feet up, and enjoy!

Chocolate Shortbread Bird Nests

These crisp chocolate shortbread nests are filled with ganache and pretty blue eggs, a perfect treat to place by each plate on your Easter table.

You’ll be surprised by how easy and fun these are to make—a great project for the whole family. They’re a little fragile after they’ve been baked, so if your littles are . . . well . . . little, you may want to supervise the filling and egg placement. To make the process even easier, you can always use canned frosting instead of making ganache.

Chocolate Shortbread Bird Nests
Print
Author:
Makes about 4 dozen
Ingredients
  • ½ cup butter, softened
  • ½ cup shortening
  • 1 cup powdered sugar
  • 1 egg yolk
  • 3 tablespoons coffee or milk
  • 2 cups all-purpose flour
  • ⅓ cup unsweetened cocoa powder
  • ¼ teaspoon salt
  • ½ cup cornstarch
  • GANACHE:
  • ½ cup heavy cream
  • 6 ounces dark chocolate, chopped (I used mini-chips)
  • Small candy eggs
Instructions
  1. In a large bowl (a stand mixture is recommended) beat the butter, shortening, and powdered sugar together until creamy.
  2. Add egg yolk and coffee (or milk) and mix well.
  3. Add flour, cocoa powder, salt, and cornstarch. Beat well. Be patient - it may take a few minutes before the mixture comes together.
  4. Divide into two parts and chill for 1 hour.
  5. Heat oven to 350 F.
  6. Lightly spray mini cupcake pan with baking spray (an oil/flour mixture).
  7. On floured surface roll half of the dough out approximately ⅛-inch thick. To keep the cookies similar in size, cut out 3-inch rounds (or squares). Using a thin spatula or bench scraper, chop one piece into thin strips. Lift the strips into a cavity of prepared pan, loosely surrounding the sides. Leave a few stray pieces sticking out of the top. Place a scrap of dough into the bottom of the cup if needed and press gently. Repeat with all of the remaining dough.
  8. Bake approximately 8-9 minutes. Allow cookies to cool for several minutes, then gently lift each out of the pan and place on a cooling rack. Once cooled the cookies should be fairly crisp. If not, add another minute to the remaining cookies.
  9. GANACHE: Heat heavy cream until it's steamy. Remove from heat, add chocolate and let it sit for 3-4 minutes. Stir well.
  10. Add a dollop of ganache to the bottom of each nest and decorate with small candy eggs.

Chop fine strips to create nesting material.

Loosely arrange shortbread strips in prepared cups. Bake!

Hint: Once they’ve cooled a bit, try putting something lightweight but stiff (cardboard, a flexible cutting board, etc.) over the top and then flipping the whole works over. It’s easier than lifting each one out of the pan.

So simple. Even the ganache is easy to make. Hope you’ll try this!

Lorinda