
 Dinner doughnuts! That’s what my husband dubbed these after one blissful bite. This simple fried bread has a garlic butter and parmesan center that is flavorful but not overwhelming. It soaks into the bread a bit as it fries so you aren’t faced with butter dripping down your chin. (Never a good thing.)
I’m all about texture, preferring my bread crispy and crackly, but the chewy crust on these puffy rolls was delightful, contrasting nicely with the soft, buttery bread inside. I considered adding chopped pepperoni to the filling, but . . . well . . . I didn’t have any. Garlic, however, is something I have lots and lots of, so I made the most of it. Next time I may try the pepperoni, or maybe some sun-dried tomatoes.

Sorting garlic.
I’m not going to lie to you here; these are probably not on anyone’s diet. That’s all I’m going to say about that!
I use a potsticker press because it seals the dough nicely and makes it easy to work with. Keep it lightly floured for best results. (You can buy these online for just a few dollars, and they come in hand for all kinds of recipes.) If you don’t have one, just fold the circle over on the filling and press the edge firmly with a fork. Looks really don’t matter, because they’re just going to puff up into potato-like shapes. Who cares, when they taste the way they do?
Once fried you can leave them as they are, or you can brush them with melted butter and sprinkle them with coarse salt and a little cheese. I waited too long to do this and my cheese wasn’t very cooperative, defiantly refusing to melt. A few seconds under the broiler took care of that. Hah!
In my usual “go big or go home” approach, this recipe makes a whopping 24 rolls. The recipe can easily be cut in half, or you can freeze some for another time. (I vote for just eating them hand over fist.) Besides, if you’re going to go to the trouble to deep fry, you might as well go for the gusto.
They’re also good the next day, especially if you warm them up a little.
| Garlic Frittelle (Italian Dinner Doughnuts) | Print |
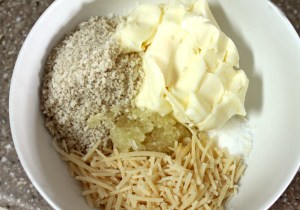
- Filling:
- ½ cup salted butter, softened (if using unsalted, add an additional ¼ t.salt)
- 1 generous tablespoon (3-4 cloves) garlic, minced
- ¼ cup shredded fresh Parmesan cheese (more to taste)
- ¼ cup breadcrumbs
- 1 teaspoon salt
- Bread:
- 2½ cups very warm water
- 1 teaspoon sugar
- 2 packages active dry yeast
- 5 cups bread flour (more for dusting work surface)
- 1 tablespoon salt
- 2 tablespoons olive oil
- oil for frying (I use peanut oil, but canola or safflower are also good options.)
- melted butter and grated cheese if desired to top hot rolls
- In a small bowl, combine all filling ingredients. Cover and refrigerate.
- In a large bowl (a stand mixer with a dough hook is best) combine water and sugar. Sprinkle yeast over it and let it sit for 5 minutes. (It won't foam a lot, but as long as your yeast is fresh, it will do its job.)
- Add flour and beat until well-combined.
- Add olive oil. Continue to knead by machine for 5 minutes, or drop dough onto floured surface and knead by hand for 7-8 minutes. The dough will be soft and slightly sticky.
- Cover and allow the bread to rise for 1 hour.
- Working with half the dough at a time, roll it out on a floured board ¼-inch thick. Cut with a large round cutter - about 3½ inches across. Place 1 generous teaspoon of garlic mixture on each round of dough and press in half, using a lightly floured potsticker press (or fold the dough over the mixture and press firmly around the edge with a fork).
- Heat at least 2 inches of oil to 375 F. Fry a few at a time, turning once, until rich golden brown - just a few minutes. Place between sheets of paper towel to absorb extra oil.
- Brush hot rolls with melted butter and sprinkle with coarse salt and shredded cheese if desired.

Add oil and knead.

Dough will be soft and slightly sticky but should come cleanly away from the sides of the bowl.

Roll and cut

Place dough and filling in the press. (Or just fold over, if you don’t have a press.)

Press gently. The dough is soft and will stick together.

Fry, baby. Fry!

They may LOOK like potatoes, but trust me – inside that chewy crust is soft, pillowy bread and a pop of garlic goodness.

Precious little fat bombs, how I love you! Hey, garlic’s healthy, right? Serve them with a huge salad and call it good, folks.
Lorinda
 It’s August and I’m fighting triple-digit weather with something sweet, frozen, and slightly boozy. I needed this! These sugar cones are filled with an indulgent combination of cream cheese, strawberries, whipping cream, and rum . . . and sugar, of course. I call them “Cheesecake Cones” even though I know it’s not really cheesecake; this is more like a cream cheese fruit fluff. Whatever it is, it’s good—and though the chocolate shell coating might melt in the heat, the rest of it won’t drip down your arm like ice cream.


