Ruffles & Roses Banana Cream Pie

Treat your Valentine to a very special pie this year. A thick, ruffled pastry surrounds the vanilla wafer bottom crust topped with velvety banana cream filling. Add whipped cream, a few pastry decorations, or even a drizzle of chocolate sauce to take this dessert to the next level.

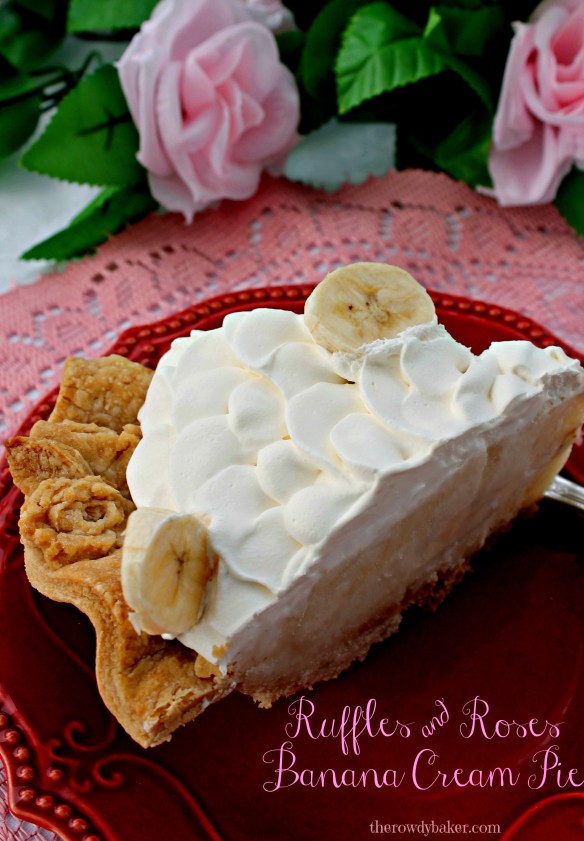
You don’t have to have a pie-shaped pan (though this might be a good excuse to splurge on one), but you do need a deep-dish pie pan because this makes a generous amount of filling. It might be a good idea to be prepared with a few cupcake liners in case you have extra filling. Just layer a spoonful of cookie crust, a few banana slices, and a dollop of filling and put the mini desserts in the freezer for another time.

And . . . speaking of freezers, if you want neat, tidy slices of banana cream pie, I recommend freezing the pie and cutting it frozen. Add the little decorations and fresh banana slices before serving. If you’re using fresh whipped cream, add it after the frozen pie has been cut. If you’re using topping in a tub, it can be added before freezing.

ONLY cut as many pieces as you need, and return the remaining pie to the freezer immediately, because once it’s frozen it won’t look pretty when you take it out of the fridge the next day. 

You don’t have to freeze it, of course, but a cream pie is, by nature, soft . . . and it can get a little messy when serving. If you’re more about eating it than taking photos of it, then this won’t bother you one bit. And oh, my is it creamy. Mmmm.

I just have to tell you, as much as I love the soft, creamy pie, I really can’t resist it when it’s frozen. I may have added a little chocolate sauce, some peanuts, and a cherry to create my own “banana split pie”. The frozen filling is just like rich ice cream.

Ruffles & Roses Banana Cream Pie
Print
Author:
This is a generous recipe, enough for a large, deep-dish pie pan. You may want to reserve a little of the cookie crust. If you have extra filling, layer a few cupcake liners or ramekins with crumbs, banana slices, and filling. Wrap well and freeze for later!
Ingredients
  • PASTRY CRUST:
  • 2 cups all-purpose flour
  • ½ teaspoon salt
  • 1 cup shortening, chilled
  • ¼ cup milk
  • 1 tablespoon vodka (or vinegar, if you prefer)
  • COOKIE CRUST:
  • 1 cup finely crushed vanilla wafers
  • 1 tablespoon brown sugar
  • 2 tablespoons butter, melted
  • FILLING:
  • 2 eggs, plus 2 yolks
  • 1 tablespoon fresh lemon juice
  • 1½ cups sugar
  • ½ teaspoon salt
  • ⅓ cup cornstarch
  • 4 cups whole milk
  • 2 tablespoons butter
  • 1 tablespoon vanilla
  • 4 large firm bananas (save one for garnish)
  • Whipped cream (or topping in a tub), banana slices, sprinkles, pastry garnishes, chocolate drizzle for decorating if desired
Instructions
  1. PASTRY:
  2. In a medium bowl, combine flour and salt. Work the cold shortening into flour until the size of peas.
  3. Combine the milk and vodka (or vinegar) and drizzle into flour mixture, tossing with a fork. Stir gently until it comes together.
  4. Working with half of the dough at a time, place between lightly floured pieces of parchment and roll until about ⅛-inch thick. Cut strips wide enough to reach from the bottom edge of your pie pan to about ½ inch over the top. Cut strips into manageable lengths (for me, this was about 6 -7 inches long) and, one at a time, lay them loosely along the side of your pie pan, gently pleating as you go to create ruffles. Each time you use a new piece, roll the end a little and nudge it up against the piece you just added, to hide the edge. Press the dough along the bottom edge of the pie pan as you go. (The cookie crust will fill the bottom later.) Gather dough scraps and reroll all at once if needed.
  5. Place a piece of foil along the bottom of the pie pan and fill with pie weights or beans. Any extra scraps may be cut into hearts or shaped into roses and leaves for decoration. Place those on the crust now, using a little milk to anchor them. Press firmly. Place crust in the refrigerator for 30 minutes. (Small shapes - like hearts - can be baked on cookie sheet for about 10 minutes, or until golden brown.)
  6. Heat oven to 375 F.
  7. Place pie pan on baking sheet for easy handling, and bake for 20 minutes. Remove from oven and carefully lift out the foil and weights.
  8. COOKIE CRUST: Combine crushed vanilla wafers, brown sugar, and melted butter. Put in bottom of pie pan and press down firmly, using a measuring cup or your hand. Be careful, the pan will be hot!
  9. Return to oven for an additional 20 minutes, or until the pie crust is golden. Cool on a rack.
  10. FILLING:
  11. In a small bowl, whisk together the two eggs and 2 yolks and the lemon juice. Set aside.
  12. In a large pan, combine the sugar, salt, cornstarch, and milk. Whisk constantly over medium heat until mixture is steamy and beginning to bubble. Reduce heat to low.
  13. Slowly add about 1 cup of the hot mixture into the egg mixture, whisking vigorously. Pour the egg mixture back into the pan and stir well.
  14. Cook over low heat, stirring constantly until mixture is thick and begins to make big bubbles in the center, about 2 minutes. Remove from heat and stir in the butter and vanilla. Pour into a heat-proof bowl and cover. Chill for 1 hour.
  15. Slice 3 bananas. Pour half of the cream filling into the pie pan. Cover with all of the banana slices. Top with remaining filling (as much as your pie will hold.) Chill for at least 4 hours. Top with whipped cream (or topping in a tub) and decorate if desired.
  16. If you want frozen banana pie (yum!) lay a sheet of plastic wrap on top of the filling, wrap well, and freeze. When ready to serve, cut as many pieces as you need and then return remaining pie to the freezer; it will not hold well in the refrigerator once it has been frozen. Allow the pie slices to thaw slightly, top with whipped cream, and serve.

Cut wide strips of pie dough to create ruffles

Pleat the ruffles and press along the bottom edge of pie pan.

I used a silicone mold for the roses and a cutter for the leaves and hearts.

Add foil and weights (I have a bag o’ beans I use over and over) and any pastry decorations you’re using.

Bake 20 minutes, then press cookie crumbs into the bottom of the pie. Bake an additional 20 minutes or until golden brown.

Cook filling until thick and bubbly, then whisk about a cup into the egg mixture and return all to the pan on low heat.

cook and stir on low heat until thick. It should be “blurping” big bubbles.

Add a layer of chilled filling, add sliced bananas, then top with more filling. Place plastic wrap right on top of the filling and chill for at least 4 hours

Add real whipped cream when ready to serve. (I made ruffles.) If you’re using tubbed topping, this can be done a couple of hours ahead. Decorate.

My apologies to Dean Martin, but I’m going to change his song just a bit:

“When the moon hits your eye like a big piece of pie, that’s amore”

Nothin’ says amore like a beautiful slice of pie, right?

Lorinda

Cherry Nut Fudge

This easy fudge is full of sweet dark cherries and walnuts . . . and a little bit of Baileys Chocolate Cherry Liqueur. You don’t have to add the liqueur, of course (a dash of cherry flavoring is a good substitute) but it sure adds a festive touch for Valentine’s Day.

I used silicone heart molds to create perfect little fudge hearts. You could also pour the fudge into a large heart-shaped pan, or into a regular sheet pan and cut hearts out with cookie cutters. (I’m sure you can think of something to do with the leftover scraps.) This makes a lot of little hearts, so unless you have several silicone pans, have a small pan lined with parchment to put excess fudge into.

When I say the fudge is easy, I mean it’s not a complicated recipe. It does require your undivided attention at the stove for ten minutes or so, though. You can do that, right? For simplicity, leave the fudge plain. If you want to play with your food, you can “ice” it with a thin layer of melted chocolate and decorate with sprinkles, or roses made of royal icing or candy clay.

The heart on the left below is unadorned. The heart on the right was flipped over and the smooth side was coated with chocolate and gussied up with a few candy roses.

You’ll need a candy thermometer for this recipe. I started out with the recipe on the jar of marshmallow fluff, but because I added frozen sweet cherries to the mixture, it took a lot longer to reach the proper temperature – about ten minutes instead of the four minutes in the instructions on the jar. Not something you should guess at!

Speaking of temperatures, did you know that altitude really matters when making candy? My home is at an altitude of 2,500 feet, so I deduct five degrees from the target temperature. Subtract one degree for every 500 feet in elevation.

This recipe calls for 12 ounces of chopped chocolate. I use good dark chocolate and include 1 ounce of unsweetened chocolate because I want my fudge to be really rich. I tend to have little chunks of different brands of chocolate in the cupboard, so I just throw them all together on my kitchen scale until I have 12 ounces. Mix and match! (And yes, to make it even simpler, you can use dark chocolate chips.)

Cherry Nut Fudge (with a little something extra)
Print
Author:
Ingredients
  • 1 cup (packed firmly) frozen dark sweet cherries, coarsely chopped
  • 3 cups sugar
  • ⅔ cup evaporated milk
  • ¾ cup butter
  • 12 ounces dark chocolate, chopped
  • 1 7-ounce jar marshmallow creme (or fluff)
  • 1 cup chopped walnuts
  • ¼ cup Baileys Chocolate Cherry Liqueur (or substitute 2 teaspoons vanilla and ½ teaspoon cherry flavoring)
  • Optional for decorating: Melted chocolate, sprinkles, nuts, candy, royal icing flowers
  • Candy thermometer and silicone molds (or 9x13-inch cake pan)
Instructions
  1. If using a 9x13-inch pan or heart-shaped cake pans instead of silicone molds, butter lightly and place parchment in the bottom of the pan. Silicone molds do not need to be greased.
  2. In a large saucepan over medium heat, combine cherries, sugar, evaporated milk, and butter. Stir frequently until mixture comes to a boil, then stir constantly until it reaches 234 F. on a candy thermometer. (Adjust for high altitude if necessary, lowering temperature by 1 degree for each 500 feet.)
  3. Remove from heat and stir in chocolate and marshmallow creme.
  4. Add walnuts and liqueur (or flavorings) and stir until well mixed.
  5. Spoon or scoop into ungreased silicone molds (tap lightly to level the fudge) or spread into prepared pans.
  6. Allow mixture to cool completely, then cover and place in cool location. Refrigerate for firmer fudge (and easier cutting.)
  7. Decorate fudge by spreading with a small amount of melted chocolate and adding desired candy, nuts, or icing flowers.


Chop up the chocolate! (Yes, you can use dark chocolate chips if you prefer.)

Prepare and set aside everything that you will add at the end. Trust me, you don’t want to be trying to stir and chop at the same time!

Combine cherries, sugar, milk, and butter in large pan

Almost done! Love that purple color.

Remove from heat and stir in the chocolate and marshmallow.

Add nuts and Baileys (or vanilla and cherry flavorings if you’re substituting) and stir well

Fill silicone molds or prepared pans and chill until firm.

I use a knife to put a thin layer of chocolate on the smooth side of each heart because I love the little “snap” when I bite into one. Or two. It would be fun to write names or little conversation heart sayings on each one, too. So many possibilities!

More sweet treats coming soon,

Lorinda


Grape Balls of Fire!

If you’re making snacks for a football game, these spicy appetizers will be a guaranteed fan favorite. Meatballs are dipped in a fiery glaze and baked in a spicy puff pastry wrap. Set aside some of the glaze for dipping, and watch the hearty treats disappear.

I have a real aversion to storebought frozen meatballs, but if you like them, by all means, use them and save yourself some time! I used ham balls because I had just made a bunch of them. They were wonderful, (you’ll find the Taste of Home recipe here: Brown Sugar Glazed Ham Balls) but beef would be great too!

I admit to being a total wimp when it comes to spicy foods, so I ask you to use your judgment and season the glaze to taste. You may want to add a whole lot more hot sauce that I used. If you’re making your own meatballs, you could add a little Chinese hot mustard to the raw meat, or red pepper flakes for another layer of spiciness. This is a recipe that is just begging for you to make it your own!

Tips:

  • If you want to use store-bought puff pastry (not phyllo dough!) you can roll the spices onto the dough before cutting out the circles.
  • If you make your own dough, don’t panic if it’s very, very crumbly and messy at first. With each roll, fold, and turn, it will get more cooperative. Every time I make this I think I’ve done something wrong, but it always comes together!
  • The dough can be made ahead, which will make the assembly a snap. I even cut out the circles, dusted them with flour, and stored them in a zipper-type freezer bag for 3 days and they worked perfectly. I left the dough a tiny bit thicker and cut out smaller circles, then when I was ready to use them I used a small roller to thin and enlarge the dough.
  • When you dip the balls in glaze and roll in breadcrumbs, your fingers will get messy, so either get an assembly line going or be near a sink or bowl of water.
  • After baking, immediately move pastries from the cupcake pan onto a cooling rack so the bottoms won’t get soggy.
  • The tops will open up a little during baking to show the top of the meatball. If you don’t want this, you can go with Plan ‘B’ and use two smaller rounds of dough (imagine a flying saucer) like this:

It’s a little bit more work, but pretty. Not sure if “pretty” is critical if you’re making this for a group of football fans, though! Your call.

The pastry on the left uses two rounds. The one on the right uses one larger round.

Grape Balls of Fire!
Print
Author:
Makes approximately 24 appetizers. Pastry dough can be made ahead and stored for a day or two in a heavy plastic storage bag.
Ingredients
  • SPICY ROUGH PUFF PASTRY:
  • 2 cups flour
  • 1 teaspoon spicy garlic seasoning (or ½ teaspoon garlic salt and ½ teaspoon red pepper flakes)
  • 1 teaspoon Chipotle seasoning - more to taste.
  • 1 cup (2 sticks) cold butter
  • ⅔ cup very cold water
  • GLAZE:
  • ⅔ cup brown sugar
  • ⅔ cup grape jelly
  • 3 tablespoons apple cider vinegar
  • 3 tablespoons chili paste
  • ¼ teaspoon ground cayenne (more to taste)
  • a few dashes hot sauce of your choice
  • ASSEMBLY:
  • 24 cooked MEATBALLS, approximately 1-inch to 1½-inches
  • 1 cup breadcrumbs (I use Panko)
  • 1 egg plus 1 teaspoon water for egg wash
Instructions
  1. PASTRY: Combine flour and seasonings directly on work surface.
  2. Cut cold butter into small chunks, 1-inch or less
  3. Using a bench scraper, knife, or sturdy spatula, chop butter into flour until butter pieces are about the size of a large pea.
  4. With scraper in one hand and cold water in the other, drizzle and toss until all the water has been incorporated. Don't overwork it - it should look like a shaggy mess.
  5. Use your scraper or spatula to shape into a 5x8 inch rectangle, with a short edge facing you.
  6. Roll out dough to approximately 6"x10", using the metal scraper to form straight edges. Keeping the short edge facing you, Flip the bottom edge up to the middle (it will be crumbly...just do the best you can) and the top edge down to the bottom. This will create three equal sized layers. Give the dough a turn to the left, lightly flouring the surface if necessary to keep it from sticking, and repeat. Repeat 3 more times. Wrap snugly in plastic wrap and place in the refrigerator for at least 30 minutes, or up to 3 days.
  7. GLAZE: In a medium saucepan combine brown sugar, grape jelly, vinegar, chili paste, and cayenne. Stirring constantly, bring to a boil over medium heat. Boil for 2 minutes, stirring once or twice. Remove from heat and add hot sauce to taste. Reserve ½ cup glaze in a small bowl for dipping.
  8. Heat oven to 400 F. Grease (very lightly!) the bottom of each cavity in 2 cupcake pans.
  9. Remove dough from the refrigerator. If the dough has been in the fridge for more than an hour, allow it to warm up slightly on the counter for a few minutes. Following the previous instructions, roll and turn two more times, then roll out dough very thin - about 15 x 22". (Similar to wonton or eggroll wrappers.)
  10. Cut circles from the dough, keeping them as close together as possible. Stack scraps, each piece on top of the previous piece) for re-rolling if necessary. For a meatball that is 1½ inches across, you'll need a 4½-inch or 5-inch circle.
  11. Dip each meatball in the glaze, roll in breadcrumbs (this will keep help absorb the glaze), and place in the center of the dough circle. Moisten the edge of the dough all around with egg wash and lift the dough up, pleating it around the meatball and pressing together at the top. Place in the prepared cupcake pan and brush lightly with egg wash.
  12. Bake 18 minutes, or until golden brown.
  13. Serve with glaze.

Add spicy seasoning to flour on work surface.

Cut butter into small pieces

Chop the butter (don’t blend!) into the flour. Butter pieces should be about the size of large peas.

Use a scraper to corral it into an 8×5-inch rectangle.

See this crumbly mess? This is what the first “fold” may look like. Don’t worry!

The next roll and fold will look better!

Final fold before it goes in the fridge. The small, flattened pieces of butter that are visible are your friends. They will make the pastry flaky.

Glaze ingredients.

Boil the glaze ingredients for 2 minutes, then add hot sauce. Allow glaze to cool until it’s thick and sticky. Mmmmm.

Coat meatball with glaze, then roll in breadcrumbs. (I use Panko.)

Place meatball on the circle of dough. Brush egg wash around the outer edge of dough.

Bring edges up, gather together at the top and pinch together, like an Asian dumpling.

Brush with egg wash and they’re ready to bake

Baked. Lift them out of the pan and let them cool on a rack. Or . . . just eat ’em!

Okay, I know these are a little more work than Pigs in a Blanket, but c’mon. Puff pastry! Meatballs! If you’ll try these, I promise to come up with a very easy recipe next time.

Lorinda