I’ve never liked apple pies—too sweet, too sticky. But this apple pie is different; the sour cream filling mellows out the flavor, the spices aren’t overwhelming, and the cinnamon streusel topping is waaaay better than a top crust.
I posted this recipe years ago in my Yummy Northwest column (Yummy Northwest is gone now, but I saved copies for posterity) and consider it one of my go-to recipes for cold weather and holidays. I’ll bet you will, too.
I’ve been making this for over forty years, and honestly can’t remember where I got the original recipe, but if I find the source I will definitely give credit to the genius who created this!
4 cups apples, peeled and thinly sliced (I like to use Granny Smith apples )
STREUSEL:
½ cup sugar
⅓ cup flour
1 teaspoon cinnamon
¼ cup butter, melted
Instructions
CRUST: In a medium bowl, combine flour and salt. Cut in the shortening, using a pastry blender, until there are no lumps larger than peas.
Combine milk and vodka (or vinegar) and add, tossing with a fork (or your fingers) until it holds together. Roll out a crust a little bigger than your pan, and ease it into the pan, crimping the edges. Use a small cookie cutter to cut shapes to decorate the edge of the crust, if desired. (I like to brush the shapes with a little melted butter and sprinkle with cinnamon sugar before adding. I bake a few separately to decorate the top of the baked pie, too.)
Preheat oven to 400 F. For filling: mix flour, sugar, salt, and nutmeg in large bowl.
Mix together egg, sour cream, vanilla, and apples. Stir into flour mixture and spoon into pie shell. Mix together ingredients for crumb topping and set aside.
Bake pie at 400 F for 15 minutes. Reduce temperature to 350 F for 30 minutes. Remove pie from oven and sprinkle with all the prepared crumb topping. Return to oven for 15 minutes.
I hurried through this post because someone asked for the recipe. I’ll make it again in the next few days (the sacrifices I make for you!) and add prep photos. But it’s pretty easy. You’ve got to give this one a try!
Treat your Valentine to a very special pie this year. A thick, ruffled pastry surrounds the vanilla wafer bottom crust topped with velvety banana cream filling. Add whipped cream, a few pastry decorations, or even a drizzle of chocolate sauce to take this dessert to the next level.
You don’t have to have a pie-shaped pan (though this might be a good excuse to splurge on one), but you do need a deep-dish pie pan because this makes a generous amount of filling. It might be a good idea to be prepared with a few cupcake liners in case you have extra filling. Just layer a spoonful of cookie crust, a few banana slices, and a dollop of filling and put the mini desserts in the freezer for another time.
And . . . speaking of freezers, if you want neat, tidy slices of banana cream pie, I recommend freezing the pie and cutting it frozen. Add the little decorations and fresh banana slices before serving. If you’re using fresh whipped cream, add it after the frozen pie has been cut. If you’re using topping in a tub, it can be added before freezing.
ONLY cut as many pieces as you need, and return the remaining pie to the freezer immediately, because once it’s frozen it won’t look pretty when you take it out of the fridge the next day.
You don’t have to freeze it, of course, but a cream pie is, by nature, soft . . . and it can get a little messy when serving. If you’re more about eating it than taking photos of it, then this won’t bother you one bit. And oh, my is it creamy. Mmmm.
I just have to tell you, as much as I love the soft, creamy pie, I really can’t resist it when it’s frozen. I may have added a little chocolate sauce, some peanuts, and a cherry to create my own “banana split pie”. The frozen filling is just like rich ice cream.
This is a generous recipe, enough for a large, deep-dish pie pan. You may want to reserve a little of the cookie crust. If you have extra filling, layer a few cupcake liners or ramekins with crumbs, banana slices, and filling. Wrap well and freeze for later!
Ingredients
PASTRY CRUST:
2 cups all-purpose flour
½ teaspoon salt
1 cup shortening, chilled
¼ cup milk
1 tablespoon vodka (or vinegar, if you prefer)
COOKIE CRUST:
1 cup finely crushed vanilla wafers
1 tablespoon brown sugar
2 tablespoons butter, melted
FILLING:
2 eggs, plus 2 yolks
1 tablespoon fresh lemon juice
1½ cups sugar
½ teaspoon salt
⅓ cup cornstarch
4 cups whole milk
2 tablespoons butter
1 tablespoon vanilla
4 large firm bananas (save one for garnish)
Whipped cream (or topping in a tub), banana slices, sprinkles, pastry garnishes, chocolate drizzle for decorating if desired
Instructions
PASTRY:
In a medium bowl, combine flour and salt. Work the cold shortening into flour until the size of peas.
Combine the milk and vodka (or vinegar) and drizzle into flour mixture, tossing with a fork. Stir gently until it comes together.
Working with half of the dough at a time, place between lightly floured pieces of parchment and roll until about ⅛-inch thick. Cut strips wide enough to reach from the bottom edge of your pie pan to about ½ inch over the top. Cut strips into manageable lengths (for me, this was about 6 -7 inches long) and, one at a time, lay them loosely along the side of your pie pan, gently pleating as you go to create ruffles. Each time you use a new piece, roll the end a little and nudge it up against the piece you just added, to hide the edge. Press the dough along the bottom edge of the pie pan as you go. (The cookie crust will fill the bottom later.) Gather dough scraps and reroll all at once if needed.
Place a piece of foil along the bottom of the pie pan and fill with pie weights or beans. Any extra scraps may be cut into hearts or shaped into roses and leaves for decoration. Place those on the crust now, using a little milk to anchor them. Press firmly. Place crust in the refrigerator for 30 minutes. (Small shapes - like hearts - can be baked on cookie sheet for about 10 minutes, or until golden brown.)
Heat oven to 375 F.
Place pie pan on baking sheet for easy handling, and bake for 20 minutes. Remove from oven and carefully lift out the foil and weights.
COOKIE CRUST: Combine crushed vanilla wafers, brown sugar, and melted butter. Put in bottom of pie pan and press down firmly, using a measuring cup or your hand. Be careful, the pan will be hot!
Return to oven for an additional 20 minutes, or until the pie crust is golden. Cool on a rack.
FILLING:
In a small bowl, whisk together the two eggs and 2 yolks and the lemon juice. Set aside.
In a large pan, combine the sugar, salt, cornstarch, and milk. Whisk constantly over medium heat until mixture is steamy and beginning to bubble. Reduce heat to low.
Slowly add about 1 cup of the hot mixture into the egg mixture, whisking vigorously. Pour the egg mixture back into the pan and stir well.
Cook over low heat, stirring constantly until mixture is thick and begins to make big bubbles in the center, about 2 minutes. Remove from heat and stir in the butter and vanilla. Pour into a heat-proof bowl and cover. Chill for 1 hour.
Slice 3 bananas. Pour half of the cream filling into the pie pan. Cover with all of the banana slices. Top with remaining filling (as much as your pie will hold.) Chill for at least 4 hours. Top with whipped cream (or topping in a tub) and decorate if desired.
If you want frozen banana pie (yum!) lay a sheet of plastic wrap on top of the filling, wrap well, and freeze. When ready to serve, cut as many pieces as you need and then return remaining pie to the freezer; it will not hold well in the refrigerator once it has been frozen. Allow the pie slices to thaw slightly, top with whipped cream, and serve.
Pleat the ruffles and press along the bottom edge of pie pan.
I used a silicone mold for the roses and a cutter for the leaves and hearts.
Add foil and weights (I have a bag o’ beans I use over and over) and any pastry decorations you’re using.
Bake 20 minutes, then press cookie crumbs into the bottom of the pie. Bake an additional 20 minutes or until golden brown.
Cook filling until thick and bubbly, then whisk about a cup into the egg mixture and return all to the pan on low heat.
cook and stir on low heat until thick. It should be “blurping” big bubbles.
Add a layer of chilled filling, add sliced bananas, then top with more filling. Place plastic wrap right on top of the filling and chill for at least 4 hours
Add real whipped cream when ready to serve. (I made ruffles.) If you’re using tubbed topping, this can be done a couple of hours ahead. Decorate.
My apologies to Dean Martin, but I’m going to change his song just a bit:
“When the moon hits your eye like a big piece of pie, that’s amore”
Nothin’ says amore like a beautiful slice of pie, right?
This easy fudge is full of sweet dark cherries and walnuts . . . and a little bit of Baileys Chocolate Cherry Liqueur. You don’t have to add the liqueur, of course (a dash of cherry flavoring is a good substitute) but it sure adds a festive touch for Valentine’s Day.
I used silicone heart molds to create perfect little fudge hearts. You could also pour the fudge into a large heart-shaped pan, or into a regular sheet pan and cut hearts out with cookie cutters. (I’m sure you can think of something to do with the leftover scraps.) This makes a lot of little hearts, so unless you have several silicone pans, have a small pan lined with parchment to put excess fudge into.
When I say the fudge is easy, I mean it’s not a complicated recipe. It does require your undivided attention at the stove for ten minutes or so, though. You can do that, right? For simplicity, leave the fudge plain. If you want to play with your food, you can “ice” it with a thin layer of melted chocolate and decorate with sprinkles, or roses made of royal icing or candy clay.
The heart on the left below is unadorned. The heart on the right was flipped over and the smooth side was coated with chocolate and gussied up with a few candy roses.
You’ll need a candy thermometer for this recipe. I started out with the recipe on the jar of marshmallow fluff, but because I added frozen sweet cherries to the mixture, it took a lot longer to reach the proper temperature – about ten minutes instead of the four minutes in the instructions on the jar. Not something you should guess at!
Speaking of temperatures, did you know that altitude really matters when making candy? My home is at an altitude of 2,500 feet, so I deduct five degrees from the target temperature. Subtract one degree for every 500 feet in elevation.
This recipe calls for 12 ounces of chopped chocolate. I use good dark chocolate and include 1 ounce of unsweetened chocolate because I want my fudge to be really rich. I tend to have little chunks of different brands of chocolate in the cupboard, so I just throw them all together on my kitchen scale until I have 12 ounces. Mix and match! (And yes, to make it even simpler, you can use dark chocolate chips.)
1 cup (packed firmly) frozen dark sweet cherries, coarsely chopped
3 cups sugar
⅔ cup evaporated milk
¾ cup butter
12 ounces dark chocolate, chopped
1 7-ounce jar marshmallow creme (or fluff)
1 cup chopped walnuts
¼ cup Baileys Chocolate Cherry Liqueur (or substitute 2 teaspoons vanilla and ½ teaspoon cherry flavoring)
Optional for decorating: Melted chocolate, sprinkles, nuts, candy, royal icing flowers
Candy thermometer and silicone molds (or 9x13-inch cake pan)
Instructions
If using a 9x13-inch pan or heart-shaped cake pans instead of silicone molds, butter lightly and place parchment in the bottom of the pan. Silicone molds do not need to be greased.
In a large saucepan over medium heat, combine cherries, sugar, evaporated milk, and butter. Stir frequently until mixture comes to a boil, then stir constantly until it reaches 234 F. on a candy thermometer. (Adjust for high altitude if necessary, lowering temperature by 1 degree for each 500 feet.)
Remove from heat and stir in chocolate and marshmallow creme.
Add walnuts and liqueur (or flavorings) and stir until well mixed.
Spoon or scoop into ungreased silicone molds (tap lightly to level the fudge) or spread into prepared pans.
Allow mixture to cool completely, then cover and place in cool location. Refrigerate for firmer fudge (and easier cutting.)
Decorate fudge by spreading with a small amount of melted chocolate and adding desired candy, nuts, or icing flowers.
Chop up the chocolate! (Yes, you can use dark chocolate chips if you prefer.)
Prepare and set aside everything that you will add at the end. Trust me, you don’t want to be trying to stir and chop at the same time!
Combine cherries, sugar, milk, and butter in large pan
Almost done! Love that purple color.
Remove from heat and stir in the chocolate and marshmallow.
Add nuts and Baileys (or vanilla and cherry flavorings if you’re substituting) and stir well
Fill silicone molds or prepared pans and chill until firm.
I use a knife to put a thin layer of chocolate on the smooth side of each heart because I love the little “snap” when I bite into one. Or two. It would be fun to write names or little conversation heart sayings on each one, too. So many possibilities!
This rich, slightly boozy chocolate cake is paired with a light, slightly boozy whipped tart cherry buttercream filling. (Are you seeing a theme here?) And if that isn’t enough to make you put on your apron, it’s covered with chocolate ganache and sprinkled with chopped walnuts. Add a dollop of whipped cream, and you’d think you were eating a sundae…only better.
Boozy sundaes are the best!
Of course you don’t have to add alcohol. A little cherry flavoring in the cake would be fine. Ditto with the buttercream – just add more flavoring. Obviously you’d want to do this if you were planning to serve the cake to children, because contrary to what we have all been told, alcohol doesn’t always magically disappear when heated.
I used a 6-inch Wiltons heart pan. I sure wish I had two of them, because I had to bake one at a time, and this recipe makes four. It just took a little more time, but the batter held up very well at room temperature. Each cake was leveled and then sliced into two thin layers. I only used five layers for the finished cake, but wisely compensated for the “wonky” layers I knew I’d get. (I seem to be missing that gene. You know, the one where you can see if something is level. You should see the way pictures hang on my wall!)
Hubby happily ate the scraps.
This isn’t an inexpensive cake to make. The dried cherries are pricey, good ganache uses good chocolate, and of course you’ll need the chocolate cherry liqueur and the cherry brandy, but those two liqueurs are wonderful to have around. They are great in so many dishes…or just for sipping!
Seriously, if there’s any time to indulge in something completely decadent, it’s in February! You can use the excuse of Valentine’s Day, George Washington’s birthday (hellloooo…cherries) or a morale booster as winter begins to turn into a slushy, gray mess. Any or all of those reasons work for me.
Tips:
If you can’t find the dried cherries, by all means used canned sweet cherries – or frozen cherries – or even maraschino cherries. Just blot them well and skip the whole “soaking them in booze” step. I’m sure you’ll find something to do with that extra liqueur.
I just can’t be brutal and cut much off the top of the small cakes to level them. I take off what I must, but there is still a flat half and a slightly rounded half. I use the flat halves for layering, so they’ll stay somewhat level, and then one with a slightly rounded edge for the top. It looks pretty that way, and lets the ganache cascade off nicely.
Speaking of cascading, stop before you think you should. That stuff will keep working its way down and you don’t want huge puddles at the bottom. Hold off on the nuts until you’re sure the lava flow has stopped, otherwise they will be going along for the ride.
I used five of the eight baked layers, which was plenty tall. One tore, and two were a little out of level. If you trust your slicing skills better than I trust mine, just bake three of the cakes and make a few cupcakes with the remaining batter.
Do you know why this recipe looks so HUGE? There are three components, and I’m very wordy about how to do each – the cake, the filling, and the ganache. It’s not as scary as it looks! It all begins with a rich, tender, killer chocolate cake:
1 cup oil (I use peanut or walnut oil - any light flavored oil will work)
1 cup VERY strong coffee (see note at bottom of cake ingredient list)
⅔ cup milk
⅓ cup Baileys Chocolate Cherry Liqueur (or substitute with milk plus 1 teaspoon cherry flavoring)
3 large eggs
1 teaspoon vanilla
NOTE: For best flavor, strong coffee can be made by bringing ½ cup ground coffee and 1½ cups water to a boil. Remove from heat and allow to cool. Strain into measuring cup to equal 1 cup.
FILLING:
½ cup tart dried cherries, chopped into small pieces
½ teaspoon cherry flavoring (a little more if you aren't using the brandy)
10 drops red food coloring
6 cups powdered sugar
⅓ cup heavy whipping cream
GANACHE:
8 ounces good quality dark chocolate, chopped
1 cup heavy whipping cream
walnuts or sprinkles, if desired
Instructions
Heat oven to 350 F. Grease and flour (or use an oil and flour spray like Baker's Joy) pans. A piece of parchment, cut to fit pan, can be put in the bottom for ease of release. For layered heart cake, use 6-inch heart pans. Cakes may be baked one at a time if only one pan is available. (Make sure pan is cooled and greased between cakes.) Two 9-inch round pans may be used instead.
In a large bowl, sift the flour, salt, baking powder, baking soda, cocoa, and sugar.
Add oil, coffee, milk, and Baileys (or milk and flavoring, if preferred). Beat for 1 minute on medium speed, scraping sides of bowl.
Add eggs and vanilla. Beat 1 additional minute.
Pour batter into pans: Fill the 6-inch heart pans half way, approximately 1½ cups of batter in each. Or divide evenly between 9-inch pans.
Bake 25 minutes. Test with a toothpick. It should come out cleanly when inserted in the center of the cake.
Allow cakes to cool in pans for 5 minutes, then carefully turn out onto rack to cool completely. Chill for easiest handling! Cut a thin slice off of the top of each cake to level it, and then cut each cake into two equal layers.
FILLING:
In a small pan on medium heat, combine the dried cherries and 2 tablespoons cherry brandy (or water, if preferred). Bring to a simmer, remove from heat, and let sit for 20-30 minutes.
In large bowl, beat the butter and shortening until smooth and creamy. Add remaining tablespoon of brandy (or milk, if preferred) cherry flavoring, and food coloring, and beat well.
Gradually add powdered sugar and beat until completely incorporated. Mixture will be thick.
With beater on medium high speed, slowly add cream and continue to beat until stiff peaks form - approximately 3 minutes.
Drain the cherries (keep the brandy they were soaking in for later) and stir into the filling.
Spread between 5 cake layers, crumb coat the sides (this is a very thin coating to hold in the crumbs) and chill for about an hour to let the coating set.
While the coating is setting, make the ganache.
GANACHE:
Place chopped chocolate into small bowl.
In small pan on medium heat, bring the cream to a heavy simmer. It should be bubbly, but not at a boil. Remove from heat.
Pour half of the hot cream over the chocolate and let it sit for 2 minutes. Stir gently with a rubber spatula.
Return the cream to the stove and bring back to a simmer. Pour over chocolate mixture.
Fold slowly until cream and chocolate are combined. Set aside, but stir occasionally.
If you are using liqueur in this recipe, use a wooden skewer to poke holes in the top of the chilled cake, almost through the bottom layer. Carefully pour remaining brandy (from the cherries) into the holes. OR you can use a tablespoon or two of Baileys. Not too much or the cake will get mushy!
Ice the cake, sides and top, with the remaining filling.
If your ganache is thick but still pourable, it's ready to be spooned over the top of the cake. If it's still very thin, wait a little longer; it will thicken as it sets.
Filled. I used the bottom half of each cake for the layers (they’re flatter) and then a more rounded top half for the top of the cake. This will allow the ganache to flow better.

 I’ve never liked apple pies—too sweet, too sticky. But this apple pie is different; the sour cream filling mellows out the flavor, the spices aren’t overwhelming, and the cinnamon streusel topping is waaaay better than a top crust.
 Treat your Valentine to a very special pie this year. A thick, ruffled pastry surrounds the vanilla wafer bottom crust topped with velvety banana cream filling. Add whipped cream, a few pastry decorations, or even a drizzle of chocolate sauce to take this dessert to the next level.
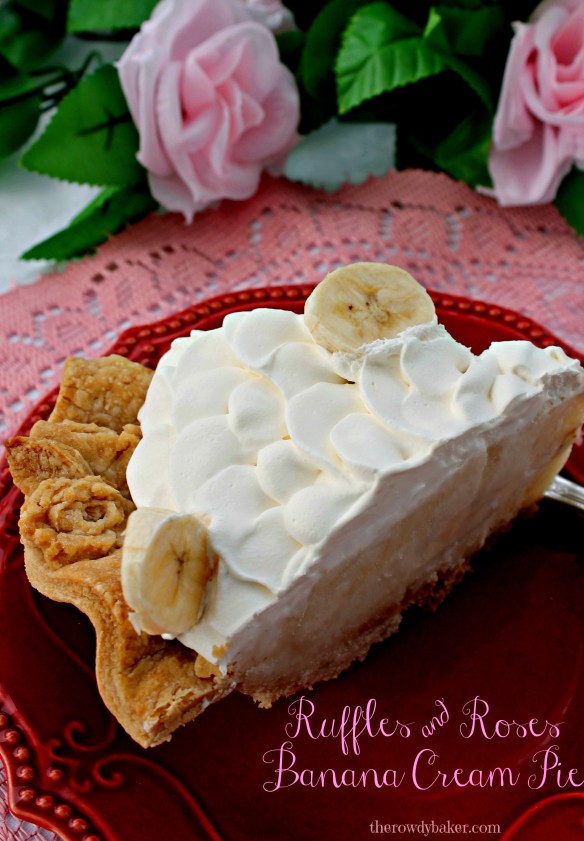


 This rich, slightly boozy chocolate cake is paired with a light, slightly boozy whipped tart cherry buttercream filling. (Are you seeing a theme here?) And if that isn’t enough to make you put on your apron, it’s covered with chocolate ganache and sprinkled with chopped walnuts. Add a dollop of whipped cream, and you’d think you were eating a sundae…only better.


