Sourdough Pumpkin Rye Bread

I’m on a bit of a sourdough kick right now, and couldn’t resist creating a sourdough version of my Pumpkin Rye Bread. This is a little denser, chewier . . . just the way I like it. It also takes longer that the yeast version (though it is not a bit harder to make), so I recommend you start this bread in the evening and let the dough rise overnight in a cool spot.

I use a cast iron Dutch oven with a domed lid for baking sourdough bread. The pan helps the bread keep its shape and the lid holds the steam in and gives the loaf a wonderful crust. If you don’t have one, you can simply put a pan of water in the bottom rack of your oven when you start preheating. The bread can go on a baking sheet on the rack above the water and the steam will give your bread that magical sourdough crust.

This loaf has been dropped into a preheated (OH so hot) Dutch oven. Lid goes on for baking. (You’ll notice for this loaf I put the orange strip down first with the dark dough on top of it, then rolled, for a lighter colored loaf.)

This is ideal for Thanksgiving or Christmas, but you know I can’t just leave a recipe alone, right? So . . . with Halloween as an inspiration, I made a batch with food coloring for more contrast, and cut designs on an outer layer of rye dough. I love the way it turned out!

With the exception of food coloring, the ingredients are the same; it’s just formed differently. The loaf at the top of the post was rolled up like a cinnamon roll, and the Halloween version was made of a ball of brown dough wrapped in orange dough, wrapped in the remaining brown dough.

Get creative. As long as you handle the dough gently to keep as many of those precious air bubbles in it as possible, you can play to your heart’s content. I think a whole lot of balls of dough pressed together and then formed into a smooth ball or covered with a layer of dough would be fun. Next time!

Sourdough Pumpkin Rye Bread
Print
Author:
Ingredients
  • ½ cup (about 5 oz) sourdough starter
  • 1½ cups filtered water
  • ½ cup solid pack pumpkin
  • 4 cups bread flour (divided)
  • 1½ teaspoon salt (kosher or sea salt is best)
  • 1 cup rye flour
  • 1 tablespoon caraway seeds
  • 1 tablespoon molasses
  • 1 teaspoon unsweetened cocoa powder (2 if you're going for darker dough)
  • 1 teaspoon espresso powder
  • Food coloring (optional) for richer colors
Instructions
  1. Begin this bread in the evening and bake the next day. The first rise takes 8-10 hours.
  2. In a large bowl, combine sourdough starter, pumpkin, and water. (Add orange food coloring here, if desired.) Stir in 3 cups of bread flour, and salt until completely blended.
  3. Pile 1 cup of bread flour on work surface and drop half of the dough onto it. Using a bench scraper to help if necessary, knead until dough is smooth and doesn't stick to hands - about 5 or 6 minutes. You will use up most of the flour. Form dough into a ball and place in greased bowl.
  4. To make the rye dough, you can either knead by hand or machine. If kneading by hand, add caraway seeds, molasses, cocoa powder, and espresso powder. Mix well, then place 1 cup of rye flour on work surface, drop the dough onto it, and proceed as you did with the orange dough. You may need a little additional flour; if so, don't use more rye flour - use bread flour. If kneading by machine, use a dough hook. Add rye flour and the remaining ingredients and knead for 5 minutes. Add a little more bread flour if dough is overly sticky. Form into ball and place next to the orange dough in the bowl.
  5. Cover with plastic wrap and let the dough sit in a cool place overnight.
  6. The next day, carefully separate the two balls of dough (don't worry if a little of one color sticks to the other.) Handle the dough as gently as possible so you don't lose all the bubbles. Press, stretch, or gently roll each piece into a long wide strips, about 3 inches wide by 14 inches.
  7. Place one on top of the other. If the dark strip is on the bottom, more dark will show on the outside of the loaf, and vice versa. Roll the two pieces up together and pinch the end to seal.
  8. Turn so the swirl is on top and use the sides of your hands to tuck the dough under a little, scooching the bread along the work surface to smooth the bottom.
  9. Place in a bowl lined with floured plastic wrap or a floured dishcloth. Cover and let rise until doubled. Depending on your sourdough starter, this could take anywhere from 1 - 4 hours.
  10. Baking in a Dutch oven: Set the bottom half of Dutch oven on second lowest rack in oven and preheat to 450 for at least 30 minutes. (No grease is necessary if it is well seasoned.) Open oven and pull out rack. Gently lift dough from bowl and CAREFULLY drop it into the VERY hot pan. Use a scissors or sharp knife to make three quick cuts across the bread, cover with the lid, and return it to the oven. Reduce heat to 425 and bake for 20 minutes. Remove lid and bake for an additional 20 minutes, or until the bread is beginning to brown.
  11. BAKING on BAKING SHEET: Put a large pan of water on bottom rack of oven and preheat to 450 F. for 30 minutes. Dust the center of a baking sheet with flour or corn meal. Lift dough from bowl and place on baking sheet. Open oven door carefully (the steam is very hot) and quickly put the bread on a rack above the water. Reduce heat to 425 F and bake about 40 minutes, or until bread is beginning to brown.
  12. Remove from oven and tip out onto cooling rack. The bottom of the bread should be brown and sound hollow when tapped. Allow bread to cool before cutting.

NOTE: Photos are for the original recipe. Halloween bread photos and instructions will be at the bottom of the post

Combine sourdough starter, pumpkin, and water.

Stir in 3 cups bread flour and the salt. It will be kind of . . . gloppy. That’s okay!

On work surface, drop half of the dough onto 1 cup bread flour and (using a dough scraper to begin with, if necessary) knead until smooth (about 5 – 6 minutes).

It should hold its shape and shouldn’t stick to your hands or the work surface. It will use most of the flour to reach this point.

To remaining dough, add molasses, caraway seeds, cocoa, and espresso powder. Mix well.

This is where there should be a photo of me, kneading the rye dough on a bed of rye flour. The photographer (ahem) was negligent. Sigh. Just figure it’s the same as incorporating the flour in the orange dough, only you MAY need a little more flour (because of the molasses). If so, use bread flour, not more rye.

Snuggle them up, cover with a cloth or plastic wrap, and let them rise in a cool place overnight.

Next day, pat each ball of dough into a long strip, about 3 inches wide, and 14 inches long. (Longer makes smaller marbling, shorter makes big, bold streaks.)

Lay one piece on the other (whichever color you want to show most on the outside should be on the bottom) and roll it up. Pinch the end to seal. Turn so the swirl is on the top and use the sides of your hands to tuck the bottom underneath a little, while “scooching” the bread toward you and turning.

Line a bowl with plastic wrap or a dish towel, and sprinkle generously with flour. Place dough in the center. Cover, and let rise until doubled. Depending on your starter this could take anywhere between 1 – 4 hours. Mine took 2.

This loaf has been dropped into a preheated (OH so hot) Dutch oven. Lid goes on for baking.


HALLOWEEN VERSION!

Use the same ingredients but add a generous squirt of orange coloring when you add the pumpkin and water, and then add black food coloring to the remaining dough when you add the molasses. Follow the recipe instructions for adding the remaining flour and tuck them into the bowl to rise.

Waiting to be put to bed for the night.

The next day, instead of forming two strips and rolling them together, divide the dark dough into two pieces. Roll one into a ball, place on slightly flattened orange dough and bring the orange dough up to completely cover the dark dough. Pinch together well and flip it over, smooth side up.

Pull orange dough up and over the ball made with half of the dark dough.

Flatten, gently stretch, or carefully roll out the remaining dark dough, large enough to completely encase the orange ball. Lay it over the orange dough ball and tuck under the bottom. Gently “scootch” the ball toward you, spin a little to the right, pull toward you again. Repeat until the dough is smooth.

Drape the remaining dark dough over the ball. (That’s my hand under there. I may have gotten carried away and made it a little too big. The stuff stretches! The extra dough just got tucked under, creating a thicker dark marbling at the bottom. You can’t go wrong with this!

Line a bowl with a dishtowel or plastic wrap, dusted in flour, and set the dough in the bowl. Cover and let rise until doubled. This can take anywhere from 1-4 hours, depending on the enthusiasm of your sourdough starter.

Ready to rise

Lift out and, using scissors, knife, or razor, cut designs in the dough, snipping deeply enough to see the orange, and even the brown center. Bake as instructed in the recipe.

Snip snip!

Okay, WHEW. I think I’m ready to move on from bread now.

I make these recipes seem WAY more complicated than they are, because I don’t want to leave any questions in your mind when you’re elbow-deep in flour. If I had a  little more technological ability I’d just do a video. (Maybe in the future, but don’t hold your breath.)

As Julia Child said: “Learn how to cook- try new recipes, learn from your mistakes, be fearless, and above all have fun!”

Lorinda


Pumpkin Rye Bread

Two of my favorite breads have been marbled together to create a crusty, flavorful symbol of autumn harvest. This loaf could be:

  • The focus of a charcuterie board.
  • A Thanksgiving centerpiece.
  • The foundation for the best turkey or grilled cheese sandwich ever.
  • A Halloween masterpiece. (Add a little orange and black food coloring.)

I actually made two versions—this, and one using sourdough. I loved the chewy texture of the sourdough loaf, but I can only put one recipe in a blog, and this one was quicker to make. (You’re welcome!) I will, however, post the sourdough recipe too in a few days. Check back!

It takes a little more effort to make this than a normal loaf of bread, because you will have to knead the orange half by hand. (The rye half can be kneaded by machine if you wish.) But there is nothing hard about this at all.


Pumpkin Rye Bread
Print
Author:
Ingredients
  • 1½ cups very warm water (about 120 degrees)
  • 1 teaspoon sugar
  • 1 package active-dry yeast
  • ½ cup solid pack pumpkin
  • 4 cups bread flour, divided
  • 1½ teaspoon salt
  • 1 cup rye flour
  • 1 tablespoon caraway seed (more to taste)
  • 1 tablespoon molasses
  • 1 teaspoon unsweetened cocoa powder
  • 1 teaspoon espresso powder
  • Optional: 1 egg white whisked with 1 teaspoon water and flaked rye (or oatmeal)
  • Food coloring - orange and black to create Halloween colors
Instructions
  1. In a large bowl combine very warm water, sugar, and yeast. Let sit until bubbles begin to form - about 5 minutes.
  2. Add pumpkin, 3 cups of bread flour, and salt. Mix until completely combined. Mixture will be a heavy batter.
  3. Spread the remaining 1 cup of bread flour on work surface and drop half (about 1½ cups or 1 pound) dough on the flour. Sprinkle some of the flour on top of the dough and knead until just slightly sticky - about 5 minutes. It's very soft to begin with; use a dough scraper if necessary. Form kneaded dough into a ball and place in a greased bowl. Leave any leftover flour on work surface.
  4. The remaining dough in the bowl will be your brown rye bread. To knead by hand, stir in caraway seeds, molasses, cocoa, and espresso powder,. Push bread flour aside and place 1 cup rye flour on the work surface, then drop the dough onto the top and knead as you did the orange dough. If more flour is needed, don't add more rye - use bread flour. (If kneading by machine, simply add the remaining ingredients to the dough and switch to a dough hook and knead for 5 minutes.) Form a ball and place it into the bowl next to the orange dough.
  5. Cover and let rise for 1 hour.
  6. On floured surface, press or roll the rye dough into a rectangle approximately 12 inches long, with the width a little shorter than the length of your bread pan. Repeat with the orange dough. Place orange dough on top of brown dough. (It doesn't have to fit perfectly.)
  7. Fold the bottom third up and then the top third down over the bottom third. Pinch edges closed. Using the edges of your hands, gently tuck the dough under all the way around, several times until you achieve a smooth loaf. If the orange dough shows through the top a little, that's fine.
  8. Place in prepared loaf pan, cover with a cloth or plastic wrap, and let rise until double - about 1 hour.
  9. Heat oven to 375 F and lightly grease a large loaf pan. (I like to spray with a flour/oil spray like Baker's Joy.)
  10. If desired, brush the top of the loaf with egg white wash and sprinkle with flaked rye (or oats). Make several slits diagonally or straight across the top using a sharp knife, razor, or scissors.
  11. Bake for approximately 40-45 minutes, or until light brown. When released from the pan the bottom should sound hollow when tapped. .
  12. For best results, let the bread cool before cutting.


Combine water, sugar, yeast, and let it sit until you see a few small bubbles forming (about 5 minutes).

Add flour, pumpkin (sheesh, that looks RED!) and salt. Mix well. It will be more like a heavy batter than a dough.

Place half the dough on top of 1 cup flour on work surface. Knead for about 5 minutes. You probably won’t need all the flour, but that will depend on if you divided the dough evenly. If it isn’t sticking to your hands, it has enough flour!

Form into a ball and place in greased bowl.

To the remaining half add molasses, cocoa, espresso powder, and caraway seeds. If using the machine to knead, add rye flour. If kneading by hand, don’t add the flour yet. Dump the wet dough onto a cup of rye flour. Knead well and form into a ball.

Snuggle them up, cover with a cloth or plastic wrap, and let them rise.

The orange dough is softer and will rise a little more. That’s okay!

Press or roll each ball into a rectangle about 12 inches long and not quite as wide as the length of your pan. Lay orange dough on brown.

Flip bottom third up, then top third down over the bottom third.

Pinch it all the way around the edges.

Use the sides of your hands to gently tuck the bread under ALL the way around until you have a smooth loaf. Place it in the pan to rise until doubled.

Once it has risen, you can brush the top with an egg wash and sprinkle with flaked rye if you’d like.

Snip! Snip! Cut a few slits in the top, straight or diagonal, with a sharp instrument of choice.

Put down that butter! Try to restrain yourself (I know it’s hard) and wait until it’s cooled off to cut it, otherwise you’ll let out all that important steam. Warm is okay.

This is going to be a fall tradition around here from now on. Hope you and yours enjoy it too!

Lorinda

Pumpkin Spice Cake (Garden Spider’s Revenge)

Surprisingly light, pleasantly spicy, and easy to make, this two-layer cake deserves a place on your table from now through Christmas. Brown sugar buttercream frosting complements it perfectly without overwhelming; it allows the flavor of the cake to shine through.

Oh . . . you may have noticed that I decorated this one for Halloween. A little gross,  with a tipped over wheelbarrow that spilled its pumpkins on the ground, next to a trowel and straw hat that have been abandoned because the unlucky gardener—who had obviously gotten on the bad side of a huge garden spider—has been wrapped tightly in the spider’s silk. A lot of webs, a little blood . . . good times! You may not want to decorate your cake like this for Thanksgiving, but it’s a slam-dunk winner for a Halloween party.

This blog is about the cake and frosting, but I’ll also tell you what I used for Halloween decorations at the bottom of the post, in case you want to creep out your family and friends.

Pumpkin Spice Cake
Print
Author:
Makes two 9-inch round layers or 36-38 cupcakes (bake for approximately 18 minutes)
Ingredients
  • 2½ cups cake flour
  • 2 teaspoons baking powder
  • 1 teaspoon baking soda
  • 1 tablespoon cinnamon
  • ½ teaspoon salt
  • ¼ teaspoon ginger
  • ¼ teaspoon ground cloves
  • ¼ teaspoon nutmeg
  • ¼ teaspoon allspice
  • 2 cups sugar
  • 1¼ cups cooking oil
  • 1 cup solid pack pumpkin
  • 4 eggs
  • ½ cup buttermilk
  • 1 teaspoon vanilla
  • FROSTING:
  • 1½ cups butter - room temperature
  • ½ cup shortening
  • ¾ cup brown sugar
  • 2 teaspoons vanilla
  • 6-7 cups powdered sugar
  • Cream or milk (if needed)
Instructions
  1. CAKE: Heat oven to 350 F. Place rounds of parchment in two 9-inch round cake pans. Spray sides and parchment lightly with baking spray (like Baker's Joy). Or grease and flour the pans and place a parchment round in the bottom of each.
  2. Sift together the flour, baking powder, baking soda, cinnamon, salt, ginger, cloves, nutmeg, and allspice. Set aside.
  3. In a large bowl, beat the sugar, oil, and pumpkin well.
  4. Add eggs one at a time, beating thoroughly and scraping the side of the bowl with each addition.
  5. Combine buttermilk and vanilla.
  6. Add half of the flour mixture to the bowl and mix until incorporated. Add half of the buttermilk mixture and mix until incorporated. Scrape the sides of the bowl and repeat. Mix just until the batter is smooth.
  7. Divide evenly between prepared pans. Bake for approximately 25 minutes, or until a toothpick comes out cleanly when inserted in the middle of one cake. Don't overbake or cake will be dry.
  8. Cool for a few minutes on rack, then turn out of pans to cool completely.
  9. FROSTING:
  10. In a large bowl, beat the butter and shortening together until smooth. Add brown sugar and vanilla and beat for 2 minutes.
  11. Slowly add powdered sugar until desired consistency, scraping the sides of the bowl often. Beat 2-3 minutes. To achieve a good spreading consistency, add a little cream or milk if too thick, or if mixture is too soft, add a little more powdered sugar. This frosting needs to be soft and easy to spread, because the cake is very light.
  12. Place one cake on serving plate and cover the top with a generous amount of frosting. Place second cake on top (flattest side up) and press gently to level it. Cover entire cake with remaining frosting.
  13. Decorate if desired with finely chopped nuts, sprinkles, or holiday candies.

Sift the dry ingredients and set aside.

Beat sugar, oil, and pumpkin (yes, it was colorful, but maybe not THIS red . . . ) then add eggs – one at a time. Seriously, take your time and beat well after each egg.

Add flour and liquids alternately.

Divide batter between two prepared 9-inch pans and bake.

Bake just until toothpick comes out clean . . . about 25 minutes.

This frosting is so good. Add liquid if necessary so it will spread easily. The cake is very light, and you don’t want to mash it!

There should be plenty of frosting for piping around the bottom. I left it plain because I was adding candy pumpkins. If you’re making this for an occasion other than Halloween, decorate the top with chopped nuts, candy, edible leaves . . . whatever you like.


So, stop here if you are making this cake for Thanksgiving or Christmas (or any other festive occasion). If you want to know how I made my Halloween decorations, read on.

The toppings on my cake were a mishmash of ideas.

When I frosted my cake I pressed “dirt” onto the top. (Chocolate and regular graham crackers, finely crushed and blended.)

The wheelbarrow was made from red fondant, with long cinnamon stick handles. The wheel was two candy melt discs stuck flat side together (heat one side briefly on a warm saucepan, then press together). wrapped in a strip of licorice to look like a tire. Use a little melted Isomalt (more about this stuff later) or melted candy melt as glue. If using Isomalt, be careful, and use gloves! A thin piece of cinnamon stick was pushed through the center of the candy melts to act as an axle, then both sides were stuck to the long handles. A little black licorice was also used as a trowel, with a handle made from a Kraft caramel.

I made a small batch of simple shortbread for the fence in the background. I have a fence cookie cutter, but you could just make posts. I also used the cookie dough to create the straw hat.

The poor gardener was made by wrapping cotton candy around a head, two arms, and two feet made from white chocolate. I added a little pink, orange, and brown to get a flesh color, but it could have used a bit more. I poured it into molds. What, doesn’t everyone have body part molds??? If not, you could use candy clay, fondant, or gum paste to create your own. Or just use cotton candy and let everyone imagine there is a person in it. (Oh, and I painted some hair and two eyes on the head with food coloring.)

I only ended up making one person on the cake, but had plenty of body parts to choose from 😀

They all looked a little too jolly to be victims, so I wrapped the cotton candy up over their mouths. Silenced!

There was some trial and error (and possibly some foul language) when it came to that spiderweb. I played with spun sugar with very limited success, and finally broke down and used Isomalt. If you’ve never used Isomalt, it’s similar to sugar but stays clear when heated, instead of amber, and is a little more forgiving. It’s hot hot HOT, so if you play with it, please be careful. I like to use it for windows in my gingerbread houses, so had some on hand. (I order the crystals through Amazon.) There are some wonderful videos online, but basically I just heated it until it melted, cooled it briefly, and when it thickened slightly I used a fork to drizzle/whisk it over the entire garden scene (not too much, just a hint of webbing) and then on a large piece of parchment. First I aimed at making “spokes”, then went in circles around and around. Dip, whisk. Once it cooled, I trimmed it to size carefully with scissors and placed it over my garden scene.

I used black fondant to shape the spider. (Hint: stick those legs on with a little water. They tend to drop off at inopportune times, otherwise.)

I bought the candy pumpkins. (I do have limits to my patience!) For the blood oozing out of the man’s mouth and down the side of the cake, I remelted the remaining isomalt and added a little red food coloring. Powdered food coloring is best, but I didn’t have any, so used paste. It thickens really quickly when you do that, so I had to work fast. Drizzle! (Or just buy a tube of red cake gel.)

That’s it. Gross cake accomplished!

Happy Halloween. (Sweet dreams . . . bwa ha ha.)

Lorinda


Drunken Punkin Cookies

Soft pumpkin cookies filled with rum-soaked raisins, pecans, white chocolate morsels, and Buttershots-spiked cream cheese will keep you warm and cozy this fall. They’re even brushed with a thin boozy glaze hot out of the oven, and then again once the cookies have cooled. It’s hard to get enough alcohol in cookie dough without compromising the texture, so it took a variety of approaches to pull it off.

Buy the kids some Oreos; these babies are for you!


Drunken Punkin Cookies
Print
Author:
Makes 36
Ingredients
  • COOKIE DOUGH:
  • 1 cup raisins
  • ½ cup strong rum
  • 1 cup butter, softened
  • 1 cup sugar
  • 1 egg + 1 yolk (the extra white will be used in the cream cheese swirl)
  • ½ cup solid pack pumpkin
  • 2 cups flour
  • 1 teaspoon baking powder
  • 1 teaspoon baking soda
  • ½ teaspoon cinnamon
  • ¼ teaspoon powdered ginger
  • ¼ teaspoon salt
  • 1 cup chopped pecans (toast them for the best flavor)
  • CREAM CHEESE SWIRL:
  • 4 ounces cream cheese, softened
  • ¼ cup sugar
  • 1 egg white
  • 3 tablespoons Butterscotch liqueur (like Buttershots)
  • 3 tablespoons flour
  • ¼ teaspoon baking powder
  • GLAZE:
  • 4 tablespoons alcohol (I used a mixture of rum and Buttershots)
  • 1 cup powdered sugar
Instructions
  1. Place raisins and ½ cup rum in a small pan. Bring to a simmer over med-low heat. Cover, reduce to low, and simmer for 5 minutes. Remove from heat and let raisins sit for at least 30 minutes, or until lukewarm. They should be plump and rum should be reduced.
  2. Heat oven to 350 F. Cover baking sheets with parchment.
  3. COOKIE DOUGH: In a large bowl, beat together the butter and sugar until light and fluffy. Add the egg and egg yolk. Beat well.
  4. Add raisins (with the reduced rum), pumpkin, flour, baking powder, baking soda, cinnamon, ginger, salt, pecans, and white chips. Mix until incorporated.
  5. CREAM CHEESE SWIRL: In a small bowl, beat together the cream cheese, sugar, egg white, butterscotch liqueur, flour, and baking powder until smooth.
  6. Add the cream cheese mixture to the dough and fold it in just 6-7 times, leaving big white streaks. Then pull your cookie scoop or spoon through, aiming for a mixture with more dough than swirl. I like to gather a little cream cheese first, then scoop through dough, which puts the pretty swirl on top of the cookie as it bakes.
  7. Bake for approximately 12 minutes, or until the top springs back when pressed. While cookies are baking, make glaze:
  8. GLAZE: Whisk together the alcohol and powdered sugar until smooth. Brush it over hot cookies, then give them another light glaze once they've cooled.

Beat eggs into creamed butter and sugar, then dump in everything except cream cheese mixture

Beautiful dough! Great even without the cream cheese, but you’d be giving up the butterscotch liquor, which would be SO sad.

Fold in the cream cheese mixture. Go easy – you want to see big streaks of white!

Try to get both the cream cheese mixture and the pumpkin dough in one scoop.

Scoop and drop!

Bake on parchment covered baking sheets

Brush hot cookies with glaze, then give them another coat once they’ve cooled.

Cheers!

Lorinda

Spiced Pumpkin Cupcakes

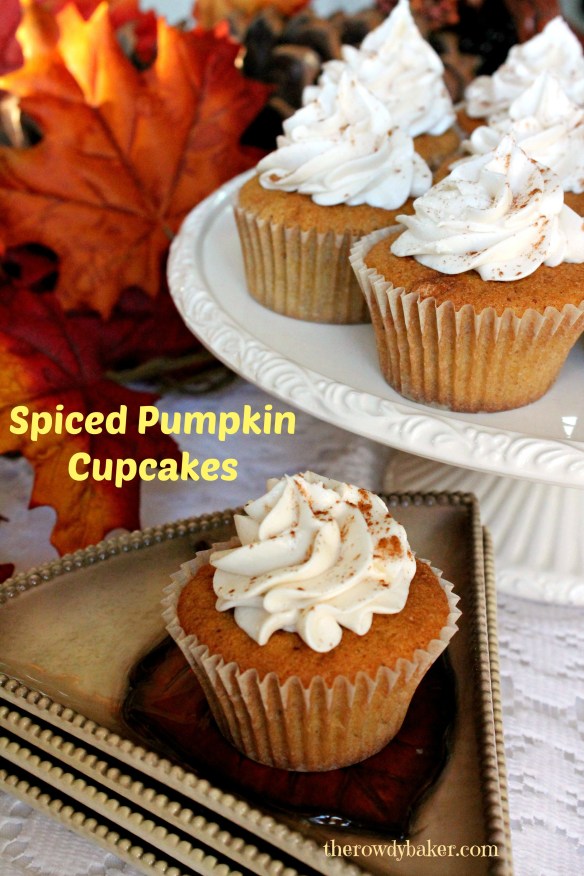
Seductively soft and spicy, impossibly light and fluffy, these elegant cupcakes will look beautiful on your Thanksgiving table this year. Whipped cream cheese buttercream icing is piled high and dusted with cinnamon. Irresistible!

Did you know that there are people who don’t like pie? Honest! (Shaking my head sadly.) Hard-to-please guests will enjoy the simplicity of this dessert and appreciate being given an alternative to traditional pies.

When I first created this recipe it was huge, making 48 cupcakes. I’ve cut it in half for you, but if you are expecting a big crowd (or just big eaters) you can easily double it. I’m all about making 48 at a time and freezing some as soon as they’re cool for later in the holiday season. You can ice them in holiday colors or even with stabilized whipped cream.

I’ve never been too tempted by cake batter . . . until now. (Cookie dough? I’m all over it.) This batter tastes just like pumpkin pie. I know, raw eggs and even raw flour can be risky; it’s a risk I’ll take for this guilty pleasure.

Velvety Spiced Pumpkin Cupcakes
Print
Author:
Makes approximately 24 cupcakes. Recipe can be doubled.
Ingredients
  • CAKE:
  • ¼ cup oil (canola or peanut oil are good)
  • ¼ cup butter, room temperature
  • ½ cup white sugar
  • ½ cup brown sugar
  • 3 eggs, separated, room temperature
  • ¼ cup solid-pack pumpkin
  • ½ teaspoon vanilla
  • 1¼ cups cake flour
  • ½ teaspoon baking soda
  • ½ teaspoon baking powder
  • ⅛ teaspoon salt (add another pinch if you're using unsalted butter)
  • 1½ teaspoons pumpkin pie spice
  • ½ cup buttermilk
  • ICING:
  • ½ cup butter, softened
  • 4 oz cream cheese, softened
  • ½ cup shortening
  • 1 teaspoon vanilla
  • 6 cups powdered sugar
  • a pinch of salt
  • ¼ teaspoon cinnamon (plus more for dusting over the top)
  • ⅓-1/2 cup heavy cream
Instructions
  1. Heat oven to 350 F. Prepare two cupcake pans by adding 24 paper liners.
  2. In a large bowl, beat together the oil, butter, white sugar, and brown sugar until light - at least 2 minutes.
  3. Add egg yolks one a time, mixing until well blended and scraping the sides of the bowl after each addition.
  4. Add pumpkin and vanilla. Beat until incorporated.
  5. Sift together the flour, baking soda, baking powder, salt, and pumpkin pie spice.
  6. Add dry ingredients and buttermilk alternately, one-third of each at a time, beginning with the flour mixture and ending with the buttermilk.
  7. In a separate bowl, beat the egg whites until stiff peaks form. Fold thoroughly into the batter. (It's fine if you see a few white fluffy spots.)
  8. Divide between the 24 liners, approximately ⅔ full.
  9. Bake 18-20 minutes, or until a toothpick comes out clean when inserted in the middle of a cupcake. Cool completely on a baking rack before icing.
  10. ICING:
  11. In a large bowl, combine the butter, cream cheese, shortening and vanilla. Beat well.
  12. Add salt and cinnamon. Gradually add powdered sugar, beating on medium speed. Add a little of the cream if mixture gets too thick.
  13. Begin with ⅓ cup cream. Add one tablespoon at a time until incorporated. Beat at high speed until light and fluffy; 1-2 minutes. If icing is too thick, drizzle in remaining cream a little at a time.
  14. Pipe onto cupcakes and dust lightly with cinnamon.

Sift the dry ingredients! This is a light, airy cake – you’ve got to jump through some hoops.

Cream the butter, oil, and sugars. Add yolks one at a time.

See how fluffy the batter is now? Time to add the pumpkin.

Fold in the stiffly-beaten egg whites.

Fill about 2/3 full.

Pipe on the icing and sprinkle with cinnamon

“Pumpkin Pie” Shortbread Cookies

pumpkin pie shortbread cookies holding watermarkedTender shortbread cookies, made to look like tiny slices of pumpkin pie, make a perfect hostess gift for Thanksgiving – or just a fun treat to nibble on!

I’ve been obsessed with pie-cookies lately, and finally narrowed down my posts to three seasonal flavors: “Pecan Pie” Shortbread cookies. and “Chocolate Pie” Shortbread cookies., and these pretty Pumpkin Pie Shortbread Cookies. Make all three for a beautiful Thanksgiving display, and freeze any leftovers. pumpkin pie shortbread cookies watermarked


"Pumpkin Pie" Shortbread Cookies
Print
Author:
Makes 48 petite cookies. If you have time, double the recipe; they'll go fast!
Ingredients
  • 1 cup (2 sticks) butter, room temperature
  • 1 cup powdered sugar
  • 1 egg yolk
  • ½ teaspoon vanilla
  • ⅛ teaspoon salt
  • 2½ cups flour - DIVIDED
  • ½ cup cornstarch
  • ⅓ cup solid pack pumpkin
  • 2 tablespoons brown sugar
  • 2 teaspoons cinnamon
  • ½ teaspoon ginger
  • ¼ teaspoon allspice
  • ¼ teaspoon nutmeg
  • White chocolate for decorating, if desired
Instructions
  1. Heat oven to 350 F.
  2. In a large bowl, beat together the butter and powdered sugar until smooth and creamy.
  3. Add the egg yolk, vanilla, and salt. Mix well, scraping sides of bowl.
  4. Add 2 cups flour (reserve remaining ½ cup for the "filling"), and cornstarch, and mix until completely incorporated.
  5. Remove half of the dough and place it in a small bowl.
  6. To the dough in the large bowl, add pumpkin, brown sugar, ½ cup flour, and spices Mix well.
  7. Roll the vanilla dough out between two large pieces of parchment paper, about ⅛-inch thick, and cut out 6 large circles – about 4-1/2 inches across – using a small bowl, sour cream container, or margarita glass! Place them on a plate and keep them covered with plastic wrap. It’s fine to re-roll the dough as long as you’re rolling it between sheets of parchment. (Alternatively, you can separate the dough into 6 equal balls and roll them out separately between parchment. Any scraps left over are handy for patching up thin spots while shaping pies.)
  8. Separate the pumpkin dough into 6 portions and roll them into balls, then flatten until they're approximately 3" circles.
  9. Working with one piece of each color at a time (keep the rest covered so it won’t dry out) center the pumpkin circle over the white circle. There should be at least ½-inch of white dough showing around the pumpkin. Slowly bring the white dough up the sides. A knife or spatula works very well for this. Don’t worry if it cracks around the bottom edge. This isn’t pie crust! Use your fingers to press and mold the dough (think Play Doh) until it’s fairly straight and even all the way around the top, Press firmly down on the "filling" while you bring the dough around it. The white dough should stick up a little higher than the pumpkin dough.
  10. Crimp the dough all the way around, using the tips of your fingers. Don’t be afraid to press firmly along the sides as you go – this will keep the fluted edge from falling off as it bakes.
  11. With a sharp knife, cut pie into 8 small wedges. Move to an ungreased cookie sheet, spaced at least ½-inch apart. Repeat until the baking sheet is full. The cookies can be quite close together; they don’t spread.
  12. Place baking sheet in the freezer for 15 minutes, or refrigerate for 30 minutes.
  13. Bake for approximately 10 minutes, or until the bottoms are just turning light golden brown. Move to a rack to cool.
  14. When all cookies are cool, add a dollop of melted white chocolate to the top.

It will look dry and crumbly, and you may think it will never come together - but eventually it looks just like this!

It will look dry and crumbly, and you may think it will never come together – but eventually it looks just like this!

Ready to roll!

Ready to roll!

Roll and cut vanilla dough, OR separate into 6 balls and roll each individually.

Roll and cut vanilla dough, OR separate into 6 balls and roll each individually.

Bring the sides up around the pumpkin "filling"

Bring the sides up around the pumpkin “filling”

Crimp the edges and cut into 8 slices

Crimp the edges and cut into 8 slices

Ready to bake!

Ready to bake!

Pumpkin pie shortbread cookies horiz watermarked

And that, I believe, is my last pumpkin recipe for the year.

Probably.

We’ll see……….

Lorinda


Pumpkin Pecan Pinwheels


pumpkin pecan spiralsThis year I’m greeting Fall with hot coffee in one hand and a Pumpkin Pecan Pinwheel in the other!

These aren’t slam-dunk cookies to make in a hurry, no sirree. These are “impress-your-mother-in-law” cookies, not something to throw together before the kids get home from school in an hour.

It’s not that they’re difficult to make – they’re just a little time consuming because this dough must be chilled thoroughly before baking. You’ll have to mix the two batters and chill them for two hours, roll them up together and freeze for one hour before slicing and baking.

In this case, patience will be rewarded with gorgeous spicy pumpkin cookies with a swirl of chewy pecan…worth the effort, right?


Pumpkin pecan pinwheels horiz

The pecan filling is sort of magical. It gets spread out on the rolled up pumpkin cookie dough, and is – well – sloppy looking. Even after being sent to the freezer for an hour time-out, it oozes a bit when you slice the roll, and it’s hard not to think you’ve really messed up. Trust me! The egg whites in the pecan mixture cause it to puff up just perfectly, holding the cookie together in a most delicious way.

The meringue-like filling puffs and fills the spiral.

The meringue-like filling puffs and fills the spiral.

I like to put a light glaze on the cookies after they’ve cooled. Simply whisk water into 1/2 cup of powdered sugar until it’s fairly thin, then brush it on each cookie. Allow the glaze to dry completely before you put the cookies into an airtight container.

Here’s something I learned about these cookies: THEY TASTE MUCH BETTER THE SECOND DAY! Seriously, they do. Tuck them into an container or put them on a plate and cover them with foil or plastic wrap. The flavors blend and are more intense on Day 2, and they’re also softer. So now I guess what I’m telling you (I know…bossy, bossy, bossy) is that you not only have to plan on having plenty of time to make the cookies, you should plan ahead and make them a day before you need them.

Still worth it!

Pumpkin Pecan Pinwheels
Print
Author:
This recipe makes 18 large cookies, or 24 medium cookies. Make sure you have plenty of time for the chilling process, and remember that they taste even better the second day!
Ingredients
  • COOKIE DOUGH:
  • ¾ cup butter, softened
  • ¾ cup white sugar
  • ¼ cup brown sugar
  • 1 egg
  • 1 teaspoon vanilla
  • 3 cups all-purpose flour
  • ½ teaspoon salt
  • ½ teaspoon baking powder
  • ½ teaspoon baking soda
  • 1½ teaspoons cinnamon
  • ½ teaspoon ginger
  • ¼ teaspoon allspice
  • ⅛ teaspoon ground cloves
  • ½ cup solid-pack pumpkin
  • ¼ cup sour cream
  • PECAN FILLING:
  • 1 large egg and 2 egg whites
  • ½ cup sugar
  • ½ teaspoon vanilla
  • Pinch salt
  • 2 cups finely chopped, toasted pecans (Toast by stirring in a skillet over low heat for 5 minutes or in the microwave for 90 seconds, stirring several times.)
  • GLAZE (optional)
  • 1 cup powdered sugar
  • Water
Instructions
  1. COOKIE DOUGH:
  2. In a large bowl, thoroughly cream the butter, white sugar, and brown sugar.
  3. Add egg and vanilla and mix well.
  4. Sift the dry ingredients together.
  5. Stir the pumpkin and sour cream together.
  6. Beginning with the dry ingredients and ending with the wet, add alternately, scraping bowl each time.
  7. Dough will be very soft and sticky. Place in a small bowl, cover, and chill for at least 2 hours.
  8. PECAN FILLING:
  9. Beat egg and egg whites until frothy.
  10. Gradually add sugar, beating constantly. Beat for 3 minutes. (Important - don't skip this step!)
  11. Add vanilla, salt, and pecans and stir well.
  12. Cover and refrigerate for at least 2 hours.
  13. On generously floured parchment, roll dough into 10-inch by 13-inch rectangle.
  14. Stir pecan mixture and spread over the dough, almost to the edges.
  15. For large cookies, begin rolling from the short end. For smaller cookies, begin rolling from the long end, brushing excess flour from the roll as you proceed.
  16. Roll up in the parchment and place the roll on a baking sheet. Put in the freezer for 1 hour.
  17. Heat oven to 375 F.
  18. With a sharp knife, cut into slices approximately ¼-inch to ⅓-inch thick and place on parchment covered baking sheet. Gently coax any flat sides into a round shape!
  19. Bake for approximately 14 minutes, or until light golden brown.
  20. Cool on baking rack.
  21. When cool, combine enough water with the powdered sugar to make a thin glaze. Brush onto cookie with a pastry brush. Allow cookies to dry completely before sealing in container.

Make sure you toast the pecans; then chop them finely.

Make sure you toast the pecans; then chop them finely.

Spread the pecan mixture on the rolled dough.

Spread the pecan mixture on the rolled dough.

Roll, roll, roll!

Roll, roll, roll!

Baked to a delicate golden brown.

Baked to a delicate golden brown.

See? Not hard at all. I’m thinking they’d be wonderful dunked in hot cocoa; I may have to give that a try.
Happy Fall! Hang around, because I’ve had one of those middle of the night brainstorms that may come together soon. Hope so, because it involves apples. And pastry. And caramel. And, hint: it’s not a pie.

Lorinda

Pumpkin Pecan Raisin Cookies


pumpkin pecan raisin cookies watermark
I know it’s only August, and in a previous post I may have promised I wouldn’t bring out the pumpkin recipes until Fall.

I lied.

Our mornings already have a crisp feel to them, and the corn is almost ready to pick, so I hereby officially declare it…pumpkin everything season

I’ve made pumpkin cookies for years (they’re a big time favorite in my family) but made a few little changes to the recipe today and loved them even more, if that’s possible. The recipe for the icing is very generous, because – well – it “evaporates”. Or something. Let’s just say it disappears before your very eyes, and leave it at that, OK?

You know how I always give you photo after photo of preparation instructions? I’m taking a wild guess that you can beat ingredients together and scoop dough onto a cookie sheet without looking at pictures. If you’re new to this baking business and need help, check out some of my other cookies recipes…most of the steps are very similar.

In other words, I was in a hurry when I was making these, and forgot to take pictures. Sigh. I’ll be making them again in a couple of weeks for my guys to take hunting, but I don’t want you to have to wait that long!

Pumpkin Pecan Raisin Cookies
Print
Author:
Delightful, soft cookies that are soft and delicate, but rich and flavorful. Makes 3 dozen.
Ingredients
  • 1 cup (2 sticks) butter, room temperature
  • 1 cup sugar
  • 1 egg
  • 1 cup canned solid pack pumpkin
  • 2 cups flour
  • 1 teaspoon baking powder
  • 1 teaspoon baking soda
  • 1 teaspoon cinnamon
  • ¼ teaspoon ginger
  • ¼ teaspoon salt
  • ½ cup raisins
  • ½ cup toasted pecans, chopped (please toast them...it adds flavor!)
  • ICING:
  • 1½ cups brown sugar
  • ⅓ cup milk
  • 5 tablespoons butter
  • 1 teaspoon vanilla
  • 1¼ - 1½ cups powdered sugar
  • Pecan halves for decorating, if desired
Instructions
  1. Heat oven to 350 F.
  2. In a large bowl, beat the butter and sugar together until creamy.
  3. Mix in the egg and pumpkin and beat well. It may look a little curdled - that's normal.
  4. Add the flour, baking powder, baking soda, cinnamon, ginger, and salt. Beat until thoroughly combined.
  5. Stir in the raisins and toasted pecans.
  6. Using a cookie scoop (or a rounded tablespoon) scoop balls of dough about 1 inch apart on ungreased cookie sheet.
  7. Bake approximately 12 minutes. Cookies should be just showing a little brown around the bottom edges. Place baking sheet on cooling rack for a few minutes, and then transfer cookies to the rack to finish cooling.
  8. To make the icing:
  9. In a medium saucepan on medium heat, combine the brown sugar, milk, and butter. Bring to a boil and cook for 2 minutes. Remove from heat.
  10. Stir in the vanilla and 1¼ cups powdered sugar. Whisk vigorously until smooth. Add additional powdered sugar if necessary. Icing should be just thick enough to spread on the top of each cookie without dripping down the sides.
  11. Put a generous dollop of icing on each cookie and top with a pecan if desired. Be careful - icing is very hot! If the icing thickens too much to work with, reheat gently on low heat, adding a little milk if needed.
  12. Store cookies in an airtight container.


Boiling the icing

Boiling the icing

Whisk in the powdered sugar

Whisk in the powdered sugar

So it begins. My pumpkins are taking their sweet time this year, and I’m guessing they might not be ripe before the first freeze. Luckily, I have no problem using solid-pack pumpkin. I freeze any unused portion, so nothing goes to waste. I guess I’d better stock up, because it’s going to be nothing but pumpkin recipes on Facebook and Pinterest for the next 4 months!

Works for me!
Lorinda

Pumpkin Pecan Raisin Cookie, from The Rowdy Baker


Gooey Pumpkin Nut Cinnamon Rolls

MiscNov 021I promise this is my very last pumpkin-related recipe for the season. Honest! I wasn’t going to open another can of pumpkin until it was time to make pies for Thanksgiving, but the thought of a pumpkin filled cinnamon roll got into my head and wouldn’t leave…and I’m glad I paid attention, because these are so good!

Nothing compares to the fragrance of cinnamon rolls warm from the oven. Except, perhaps, cinnamon rolls with a spicy pumpkin-walnut filling. Add a vanilla glaze dripping down the side, and you have a pastry worthy of company―or an afternoon indulgence for a busy day.

They also freeze well and can be quickly microwaved for an impromptu snack. The recipe makes 20-24 rolls (depending on what kind of pan you plan to use) and just for the record I want you to know I had ONE of them. And then they were gone. So you got the two-thumbs-up seal of approval from my menfolk.

Here you go:


Gooey Pumpkin Nut Cinnamon Rolls
Print
Author:
Makes 20-24 rolls.
Ingredients
  • Dough
  • ⅓ cup warm water
  • 2 packages active dry yeast
  • ½ teaspoon sugar
  • 1½ cups buttermilk
  • ⅓ cup sugar
  • ½ cup butter, melted
  • 2 eggs
  • 1¼ teaspoon salt
  • 5 cups all-purpose flour
  • .............
  • Filling
  • ½ cup pumpkin puree
  • ½ cup brown sugar
  • ½ cup white sugar
  • 2 tablespoons soft butter
  • ¼ cup flour
  • 1 tablespoon cinnamon
  • 1 teaspoon ginger
  • ¼ teaspoon salt
  • 1 cup walnuts, finely chopped
  • .............
  • Glaze
  • 2 cups powdered sugar
  • ½ teaspoon vanilla
  • 1 tablespoon soft butter
  • Cream or milk for desired consistency
Instructions
  1. Lightly grease two or three round cake pans or one 12-inch by 18-inch rectangular pan. Feel free to improvise―rolls spaced closely together will rise higher, and rolls placed farther apart in a rectangular pan will be more uniform.
  2. In a large bowl combine water, yeast, and ½ teaspoon sugar. Let the mixture sit until bubbly – about 5 minutes.
  3. In a small bowl combine the buttermilk, ⅓ cup sugar, melted butter, eggs and salt. Whisk together.
  4. Add the buttermilk mixture to the yeast mixture and mix until combined.
  5. Add the flour slowly. (If using a stand mixer, use your dough hook.) Mix for one minute. If you will be kneading by hand, put dough on a floured surface and knead for 8 minutes. If you are using a stand mixer, it will take 5 minutes. The dough should come cleanly away from the bowl. If it doesn’t, add flour a little at a time. This should be soft, elastic dough, but should not be sticky.
  6. Place the dough in a large greased bowl and cover with a clean dish towel or plastic wrap. Allow to rise until double – about an hour.
  7. While the bread is rising, combine all of the filling ingredients in a small bowl and set aside.
  8. When the dough has doubled, punch it down. Working with half of the dough at a time, roll into a 10-inch by 14-inch rectangle, with the long edge facing you. Spread with half of the filling.
  9. Beginning at the long edge facing you, roll the dough, gently pulling towards you as you roll, to keep it snug. Slice into 12 pieces. (If using just two round cake pans, slice into 10 pieces) Repeat with the remaining dough.
  10. Place pieces in greased pan. If using 3 round pans, arrange 8 slices in each. If using 2 round pans, arrange 10 slices in each. For a large rectangular pan, space all 24 slices evenly. Cover and allow rolls to rise for about an hour.
  11. Heat oven to 400 F.
  12. Bake rolls for 17-20 minutes, or until lightly browned.
  13. Cool in the pans on a rack until they are slightly warm, and transfer to a serving platter.
  14. When the rolls are cool, combine all of the ingredients for the glaze, beginning with 1 tablespoon of cream or milk, and mix well. Add additional milk until it reaches the desired consistency. Pour or brush over the rolls.


Rolls are in the pan, ready to rise.

Rolls are in the pan, ready to rise.

Pretty! Poofy! Ready for the oven.

Pretty! Poofy! Ready for the oven.

And...done! Can you smell them?

And…done! Can you smell them?

MiscNov 023Now on to eggnog and peppermint and chocolate and caramel and rum and….well, you get the picture.  I hear those sleigh bells ringing!

ABUNDANCE


164 - Thanksgiving Group PostSchool is in session, the weather changes, kids don costumes and it’s dark before dinner; all signs that holiday time is right around the corner. Before we know it plans are made, preparations have begun, and Thanksgiving is just weeks away.

Thanksgiving is the perfect occasion for ushering in the holiday season; it’s a time for stories, projects, cooking and sharing. That’s exactly what this post is about. I’ve linked up with 5 other bloggers, each sharing a piece of what the season has to offer. We have humor, thought, family projects and food.

I hope you’ll click on all the links below to see what we’ve all put together for you:
Home on Deranged has a family post about the first and last Thanksgiving spent with mom.
Kiss My List is sharing a simple but meaningful family craft project that does double duty as Thanksgiving decor.
Writer B is Me will share a humorous story about what happens when someone is asked to make the mashed potatoes one too many times.
Pink When shares a project you can display for Thanksgiving dinner and guests.
And Baking in a Tornado (the genius behind this group post) will share a recipe for that leftover turkey.

Blog7 036And I, of course, bring you dessert!

It’s so hard to leave room for dessert when your table is groaning with rich Thanksgiving food! My family always had a fairly late dinner, so we’d manage to tuck in a tiny slice of pumpkin pie after the meal, but serious damage to the pies had to wait for breakfast the next day. And oh, it tasted good the next morning.

As much as I love pumpkin pie, sometimes it’s nice to change things up a bit. Here is the dessert I’ll be serving this year instead of pie – Pumpkin Cake Roll with Butterscotch Cream Cheese Filling.

Pumpkin Cake Roll with Butterscotch Cream Cheese Filling

Pumpkin Cake Roll with Butterscotch Cream Cheese Filling

Most people don’t frost cake rolls, but I wanted a whipped cream icing to lighten it up a bit. The leaves were made with white chocolate and a little food coloring. The Pumpkin Roll can be made ahead and frozen…just let it thaw for an hour and smother it with whipped cream before serving. If you don’t think it will be all be eaten right away, I would recommend that you use a non-dairy whipped topping or (my choice) stabilized whipped cream.

I believe this was the first cake I made from scratch. Had it not been foolproof, I probably would be using Duncan Hines mixes to this day – but it was so simple to make, I never looked back. My recipe is really old, and probably adapted from the original Libby Pumpkin Roll recipe. It calls for a 10-inch by 15-inch jelly roll pan. I don’t happen to have one, so I use a larger pan and spread mine a little thinner…and it works just fine!

Pumpkin Roll with Cream Cheese Filling
Print
Author:
Serves 8-10
Ingredients
  • 3 eggs
  • 1 cup sugar
  • ⅔ cup pumpkin
  • 1 teaspoon lemon juice
  • ¾ cup all-purpose flour
  • 1 teaspoon baking powder
  • 2 teaspoons cinnamon
  • 1 teaspoon ginger
  • ½ teaspoon nutmeg
  • ½ teaspoon salt
  • ......................
  • BUTTERSCOTCH CREAM CHEESE ICING
  • ¼ cup heavy cream
  • ¼ cup powdered instant butterscotch pudding mix
  • 8 ounces softened cream cheese
  • 4 tablespoons softened butter
  • 1 cup powdered sugar
  • ½ cup (or more) chopped, toasted pecans
Instructions
  1. Heat oven to 375 F.
  2. Prepare a 15"x10" jelly roll pan (or cookie sheet with sides) by lining the bottom with waxed paper or parchment. Grease and flour the paper, or spray with an oil/flour spray like Baker's Joy.
  3. Beat eggs on high for 5 minutes.
  4. Beating continually, gradually add sugar.
  5. Add the pumpkin and lemon juice and mix until well combined.
  6. Sift together the dry ingredients and fold into pumpkin mixture.
  7. Spread batter evenly in prepared pan, and bake 12-15 minutes, or until the top springs back when touched.
  8. Coat a cotton dish towel generously with powdered sugar and turn the cake out onto the dish towel. Peel off the waxed paper or parchment.
  9. Starting from the short end, slowly roll cake and towel together. Place in the refrigerator to cool completely, approximately one hour.
  10. While the cake is cooling, make the butterscotch filling:
  11. In a medium bowl, combine the cream and pudding mix. Add the cream cheese and butter and mix together at medium-high speed. Add the powdered sugar and mix well. Refrigerate until needed.
  12. Unroll the chilled cake carefully. Spread with filling and roll it back up (without the towel this time, of course.) Refrigerate at least one hour.
  13. Sprinkle with powdered sugar, or ice with sweetened whipped cream and serve.


Folding in the dry ingredients.

Folding together.

Spreading the batter.

Spreading the batter.

Roll up cake AND towel!

Roll up cake AND towel!

Add filling and pecans.

Add filling and pecans.


To make the white chocolate leaves, melt white baking chocolate (if you have candy melts, they’d probably be a lot easier to work with) in three bowls, with just a little bit of chocolate in two of them. Add green and orange Wilton candy coloring to the two small bowls. Note: chocolate does NOT like water, so regular coloring can make it seize up. Use powdered or oil based food coloring! Melt a small amount of dark chocolate in another small bowl if you wish. Put the melted white chocolate on a waxed paper covered baking sheet, drizzle it with the colored and dark chocolate, and spread it out thinly with a spatula, with as few strokes as possible.

Let it harden at room temperature and then cut leaf shapes with cookie cutters. Cut more leaves than you think you’ll need – a lot of them may break! Move the entire sheet to the refrigerator and let it harden completely. Separate each leaf carefully with a small spatula. If you want to shape the leaves, put each one on a square of waxed paper, melt in the microwave for 2-3 second intervals until the leaf is flexible, and shape by draping over scrunched up foil or a spoon handle, or by setting it in a small custard bowl. Chill again and place on cake.

Ready to melt

Ready to melt

Mixture of white chocolate colors.

Mixture of white chocolate colors.

Cutting out chocolate leaves

Cutting out chocolate leaves


Too much trouble for you? One word: SPRINKLES. Everyone loves sprinkles.

From my kitchen to yours, have a wonderful, blessed Thanksgiving!