“Apple Pie” Shortbread Cookies

Tender shortbread cookies filled with sweet apple pie filling may be a new fall tradition at your house. I’ve added these to my shortbread pie cookie collection, and I think this is (take a step back,“Chocolate Pie Shortbread Cookies”) now my very favorite variety.

Imagine biting into one of these and sinking your teeth into warm apple filling. It’s heavenly! Promise me you’ll try one before it’s cooled off entirely. Don’t get me wrong—they’re great the next day—but warm off the rack? Delightful.

Proper shortbread uses a lot of butter, so this is not an inexpensive or low- cal recipe, but when the cookie melts in your mouth you will forget cost, time, and calories. The cookies are that good. Oh, and speaking of time . . . these aren’t hard, but weaving the lattice tops takes a little patience. Plan on a few hours of baking bliss, or find a helper to make it go faster. Believe me, rushing through it just makes more work for you; the little strips of dough will sense your impatience and be less cooperative. Enjoy the process!

Hint: If you plan to make these for a special occasion like Thanksgiving, when you’ll be running around doing lots of last-minute things, make the cookies the week before and freeze them, assembled but unbaked. So easy that way, and if you’re serving right after the meal, they can go in when the rolls come out of the oven. (Make sure you set the timer; you know how crazy things get. Or is that just me?) They’ll still be warm when everyone is ready for dessert.

My husband, having a constant stream of goodies presented to him, has become a little hard to impress. His comment after eating one of these warm cookies? “This is so much more than a cookie!” We won’t discuss how many he ate.

I know this recipe looks daunting, but that’s because it’s hard to explain how to make the lattice tops. It’s just wordy. I’m sure you could figure it out (I’m embarrassed to tell you how long it took me to find the fastest method) but it’s all down in black and white for you!

Apples vary in juiciness, which is why I have you strain them so the amount of thickener is consistent. If you have leftover cooked juice, it’s wonderful in tea (or wine).

NOTE: Recipe was edited to change the size of the cookie cutters. (I need to learn to read a ruler correctly.) The large cutter was about 3 1/2 inches, and the small one was 3 inches. Even so, those are BIG cookies. Feel free to downsize.

"Apple Pie" Shortbread Cookies
Print
Author:
Makes 24 substantial cookies!
Ingredients
  • APPLE FILLING:
  • 4 cups chopped apple (about 3 large apples)
  • ¼ cup plus 3 tablespoons apple cider, divided
  • ½ cup sugar
  • ½ cup brown sugar
  • 2 teaspoons cinnamon
  • ½ teaspoon allspice
  • ¼ teaspoon salt
  • 3 tablespoons cornstarch
  • COOKIE DOUGH:
  • 2 cups butter (4 sticks), room temperature
  • 2 cups powdered sugar
  • 1 tablespoon apple cider (may use milk)
  • 2 eggs, separated
  • 4 cups all-purpose flour
  • ½ teaspoon salt
  • ½ teaspoon nutmeg (optional)
  • 1 cup cornstarch
  • ½ cup cinnamon sugar
Instructions
  1. FILLING: In a medium pan on medium heat, combine chopped apples, ¼ cup cider, sugar, brown sugar, cinnamon, allspice, and salt. Bring to a boil, stirring occasionally, then cook at a low boil (reduce heat if necessary) for 5 minutes. Remove from heat.
  2. Strain apples, reserving the liquid.
  3. In a small bowl or cup, combine 3 tablespoons cider with 3 tablespoons cornstarch. Stir well and set aside.
  4. Return apples to the pan, along with 1 cup of the reserved liquid. (add apple cider to reach 1 cup of liquid, if necessary.)
  5. Bring apple mixture back to a boil and stir in the cornstarch mixture. Cook and stir until thick - about 1 minute. Cool thoroughly.
  6. DOUGH: In a large bowl (this is a heavy dough, so a sturdy mixer and dough hook is recommended) combine softened butter and powdered sugar. Beat well.
  7. Add apple cider and egg yolks and beat until incorporated. (Reserve egg whites in small bowl.)
  8. Add flour, salt, and nutmeg. Beat just until combined. Add cornstarch and beat until thoroughly combined. Dough will be stiff.
  9. Heat oven to 350 F.
  10. Working with half of the dough at a time, roll out to ¼-inch thickness. (A little thinner is fine, but don't go thicker.) For best results, roll between lightly floured sheets of parchment. Choose two round cutters, one slightly smaller than the other. My large cutter was 3½ inches and my small one was 3 inches.Cut dough into strips the width of your big cutter, and then from the short side, cut those strips into smaller strips a little less than ½-inch thick. (Each small strip would be 4½-inches by about ½-inch.)
  11. Weave 6 pieces into lattice, leaving a little space between strips. (Lay one piece vertically, one horizontally, making a plus sign. Place two more vertical pieces, one on each side of vertical piece. Lift the top of the center piece and slide a strip under it horizontally, laying over the other two vertical pieces. Lift the bottom of the center piece and slide a strip under it horizontally, over the other two vertical pieces.)
  12. Press lattice firmly with the palm of your hand. Center the small cutter over the lattice and cut out a round. Hold it down firmly with one hand while you remove the scraps and place them in a pile. SCRAPS WILL BE USED TO MAKE THE COOKIE BOTTOMS LATER.
  13. With a thin spatula, move the cookie top to a piece of parchment or cutting board. Repeat until you have 24 lattice tops, using as much of the remaining dough in the bowl as necessary.
  14. Whisk together the reserved egg whites and 1 tablespoon water. Brush lightly over lattice tops and sprinkle with cinnamon sugar.
  15. Gather all of the scraps and any remaining dough and roll out to a little less than ¼-inch thickness. Cut rounds with large cutter. Press around the edge of each with your finger to thin and enlarge the rounds slightly. Brush with egg white wash.
  16. Heap 1 level tablespoon of apple mixture in the center of each round (a small scoop works well) and cover with one lattice top. Press the edge of the lattice top down firmly, then use your finger to flute the edge of the bottom round up, pressing firmly into the lattice layer. Place 1 inch apart on parchment covered baking sheet.
  17. Bake 12-14 minutes, or until edges are beginning to brown. Move to a rack to cool.


Cook the filling.

Strain the cooked apples. Don’t throw that juice away!

Add the cornstarch mixture to the boiling apples. Once thickened, let it cool completely.

Are you ready to rock?
(No pics of mixing dough. That’s pretty basic stuff!)

Roll out dough between sheets of floured parchment.

Cut strips the width of your large cutter; then cut those pieces into smaller strips

These strips are almost 1/2-inch wide. You can also make skinnier strips and use 8 pieces for a more dainty lattice.

Brush with egg wash and sprinkle generously with cinnamon sugar. Use a thin spatula to move each lattice onto filling.

Cut out bottom rounds. Press around edge to thin and enlarge slightly.

Brush bottom with egg wash. Heap a level tablespoon of filling in the center of each round. Add a lattice top and press firmly around the base

Use fingertip to flute edges . Press firmly against base of lattice top. (If you don’t press them together, the fluted edges may lay back down again as they bake!)

Going in the oven.

Enjoy!

Lorinda


Spiced Pumpkin Cupcakes

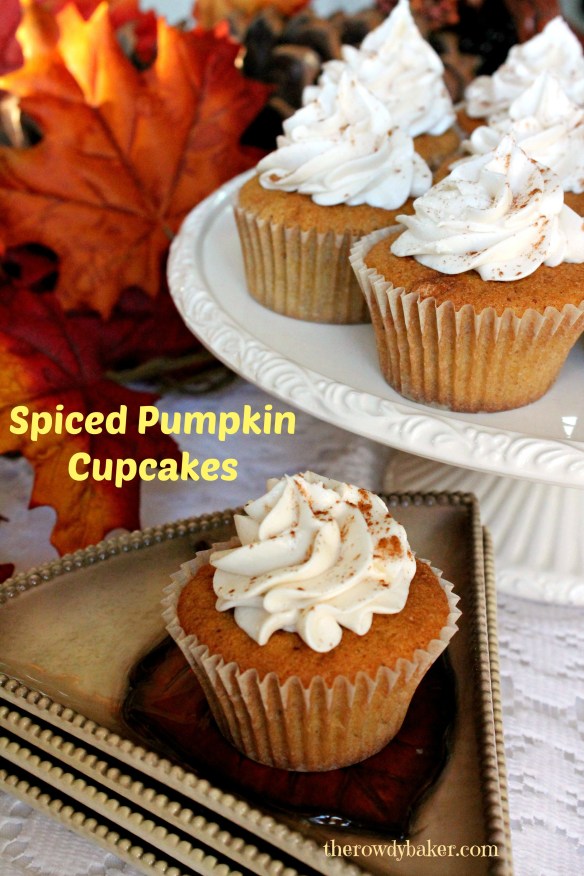
Seductively soft and spicy, impossibly light and fluffy, these elegant cupcakes will look beautiful on your Thanksgiving table this year. Whipped cream cheese buttercream icing is piled high and dusted with cinnamon. Irresistible!

Did you know that there are people who don’t like pie? Honest! (Shaking my head sadly.) Hard-to-please guests will enjoy the simplicity of this dessert and appreciate being given an alternative to traditional pies.

When I first created this recipe it was huge, making 48 cupcakes. I’ve cut it in half for you, but if you are expecting a big crowd (or just big eaters) you can easily double it. I’m all about making 48 at a time and freezing some as soon as they’re cool for later in the holiday season. You can ice them in holiday colors or even with stabilized whipped cream.

I’ve never been too tempted by cake batter . . . until now. (Cookie dough? I’m all over it.) This batter tastes just like pumpkin pie. I know, raw eggs and even raw flour can be risky; it’s a risk I’ll take for this guilty pleasure.

Velvety Spiced Pumpkin Cupcakes
Print
Author:
Makes approximately 24 cupcakes. Recipe can be doubled.
Ingredients
  • CAKE:
  • ¼ cup oil (canola or peanut oil are good)
  • ¼ cup butter, room temperature
  • ½ cup white sugar
  • ½ cup brown sugar
  • 3 eggs, separated, room temperature
  • ¼ cup solid-pack pumpkin
  • ½ teaspoon vanilla
  • 1¼ cups cake flour
  • ½ teaspoon baking soda
  • ½ teaspoon baking powder
  • ⅛ teaspoon salt (add another pinch if you're using unsalted butter)
  • 1½ teaspoons pumpkin pie spice
  • ½ cup buttermilk
  • ICING:
  • ½ cup butter, softened
  • 4 oz cream cheese, softened
  • ½ cup shortening
  • 1 teaspoon vanilla
  • 6 cups powdered sugar
  • a pinch of salt
  • ¼ teaspoon cinnamon (plus more for dusting over the top)
  • ⅓-1/2 cup heavy cream
Instructions
  1. Heat oven to 350 F. Prepare two cupcake pans by adding 24 paper liners.
  2. In a large bowl, beat together the oil, butter, white sugar, and brown sugar until light - at least 2 minutes.
  3. Add egg yolks one a time, mixing until well blended and scraping the sides of the bowl after each addition.
  4. Add pumpkin and vanilla. Beat until incorporated.
  5. Sift together the flour, baking soda, baking powder, salt, and pumpkin pie spice.
  6. Add dry ingredients and buttermilk alternately, one-third of each at a time, beginning with the flour mixture and ending with the buttermilk.
  7. In a separate bowl, beat the egg whites until stiff peaks form. Fold thoroughly into the batter. (It's fine if you see a few white fluffy spots.)
  8. Divide between the 24 liners, approximately ⅔ full.
  9. Bake 18-20 minutes, or until a toothpick comes out clean when inserted in the middle of a cupcake. Cool completely on a baking rack before icing.
  10. ICING:
  11. In a large bowl, combine the butter, cream cheese, shortening and vanilla. Beat well.
  12. Add salt and cinnamon. Gradually add powdered sugar, beating on medium speed. Add a little of the cream if mixture gets too thick.
  13. Begin with ⅓ cup cream. Add one tablespoon at a time until incorporated. Beat at high speed until light and fluffy; 1-2 minutes. If icing is too thick, drizzle in remaining cream a little at a time.
  14. Pipe onto cupcakes and dust lightly with cinnamon.

Sift the dry ingredients! This is a light, airy cake – you’ve got to jump through some hoops.

Cream the butter, oil, and sugars. Add yolks one at a time.

See how fluffy the batter is now? Time to add the pumpkin.

Fold in the stiffly-beaten egg whites.

Fill about 2/3 full.

Pipe on the icing and sprinkle with cinnamon

Caramel Rose Pecan Cupcakes

Celebrate fall with these luscious cupcakes filled with caramel, pecan, and cream cheese. Adding a drizzle of caramel and an elegant caramel rose will create a perfect dessert for the upcoming holidays.

The cupcakes are delicious, but let’s not pretend that they’re the focus here. It’s the rose. It’s all about the rose!

Believe it or not, the roses are very simple to make. All you’ll need is a bag of caramels, a sturdy rolling pin, a small round cutter, and parchment paper. I was blown away by how easy it was to work with caramels. They aren’t sticky, they don’t dry out when you’re playing with them, and they stretch and curl obligingly when you want them to. They stay pliable and . . . well . . . edible, unlike gum paste or candy clay.

And the cake itself is very basic. If your inclination is to reach for a boxed mix, I understand. But if you’d like to try your hand at making a cake from scratch, this would be the recipe to use. You’d have to add eggs, butter, and water to the mix; why not add just a few more ingredients, make the cake from scratch, and avoid the additives that are in packaged mixes?

Compare!

I think the hardest thing about this recipe is unwrapping the caramels, but if I can do it YOU can do it! Speaking of caramels, do you remember when Kraft had chocolate caramels, too? They’re back. Hard to find, but I just ordered some online. I’ll bet they’d make lovely roses too.

An 11-ounce bag will give you about 40 caramels. You’ll use 22 for the roses, and the remaining 18 for the filling. (Good grief, don’t sweat it if you’re short a caramel or two. You have to check to make sure they’re fresh, right?)

So, you’ll start out with the filling, then make the cake batter. You can create the roses while the cupcakes are baking, and make the frosting once they have cooled. And you know the drill: boxed cake, canned frosting, leave out the filling . . . anything goes. Simple chocolate cupcakes with fudge icing would look great with the roses too. Just make sure you make the roses!

First, the cupcake recipe:

Caramel Rose Pecan Cupcakes
Print
Author:
Makes approximately 18 cupcakes.
Ingredients
  • FILLING:
  • 18 unwrapped caramels
  • 2 tablespoons heavy cream
  • ½ cup cream cheese, softened
  • ¼ cup brown sugar
  • 1 egg yolk
  • ½ cup chopped pecans (toasted for the best flavor)
  • CAKE:
  • 6 tablespoons butter, softened
  • 1 cup white sugar
  • 1 teaspoon vanilla
  • 2 eggs, room temperature
  • 1½ cups cake flour (all-purpose flour may be substituted)
  • 1½ teaspoons baking powder
  • ¼ teaspoon salt
  • 1 cup milk
  • Buttercream icing (or icing of your choice)
Instructions
  1. In a small saucepan on low heat, melt the caramels and cream, stirring often. Set aside to cool.
  2. In a small bowl, beat the cream cheese and brown sugar thoroughly. Add egg yolk and beat well.
  3. Once the caramel is lukewarm but still fluid, add to cream cheese mixture. Beat well. Stir in chopped pecans. Set aside.
  4. Heat oven to 350 F. Place 18 paper liners in cupcake pans.
  5. In a large bowl, beat the butter and sugar until light and fluffy - at least 2 minutes.
  6. Mix in vanilla. Add eggs one at a time, mixing thoroughly and scraping the sides of the bowl between each egg.
  7. Sift together the flour, baking powder, and salt.
  8. Add half of the flour mixture the butter mixture. Beat well and scrape down the sides of the bowl. Add half of the milk. Beat well and scrape down the sides of the bowl. Repeat.
  9. Fill cupcake liners halfway. Don't add too much; you need to leave room for filling. If you have extra batter, make another cupcake or two.
  10. Using a tablespoon, place a scant spoonful of filling in each cup, using the spoon to make a small depression in the batter before scooping the filling into the center. The filling will still show on top, but this will help some of it to sink into the cupcake.
  11. Bake for approximately 24 minutes, until golden brown around the edges. Test with a toothpick, making sure to insert on the side of the cupcake, away from the gooey center.
  12. Cool thoroughly before icing and decorating.

Just follow the instructions; you can’t go wrong!

I’m going to cut right to the caramel rose directions.

  1. Use a large piping tip, or a cap from a bottle of water or a milk carton—whatever you can find that’s round and approximately 1 inch across—to cut out the caramel circles.
  2. I found that working with one caramel at a time is easiest. Place it between sheets of parchment and roll out thin. You should be able to cut 4 circles out of it with a reasonable amount of leftover scraps. (Pile them up and roll them out later.)
  3. In the picture below, the pieces of caramel in the background are round. That’s because I put each one in a tortilla press. It made it a little easier to roll out that way but isn’t necessary at all. And I’m still scratching my head about the fact that I put a square caramel in the press (between sheets of parchment) and it flattened the caramel into a perfect circle. WTH?
  4. Cut one circle at a time and pop it out of the cutter. If you let them stack up in there, they’re a real bear to separate. I know this for a fact! This would be a fun activity for kids to do and allow you to go right to the fun part of forming roses. It takes 9 rounds to make a rose.
  5. Set your finished roses on the counter (uncovered) or in a mini-tart pan for a little more support. If the rose flattens, just fluff it back out.

Cut out 1-inch circles. (The rounds in the background still need to be rolled out.)

Roll one circle to make the center. Overlap 3 petals around the center. Overlap 5 petals for the outside layer, pulling edges thin and curling down if desired. Petals can be shaped and enlarged before wrapping or after, whichever is easiest. (If you want to have enough caramel for a few leaves, you can cut some of that stem off and add it to the scraps.)

They’re your roses; make them 7 petals instead of 9 if you want. Play with the shapes of the petals. Make some big ones, some small. Play with your food! If you have any leftover caramel, a few leaves make the cupcake even prettier.

Use your favorite icing. I made a basic buttercream for this batch.

I had so much fun making these, and I’ll bet you will too. The roses would be perfect on individual brownies. Or chocolate cookies. Or . . . well, I’ll leave something to your imagination.

Lorinda


Chocolate Cupcakes with Grand Marnier Icing

I gussied these chocolate cupcakes up for Halloween, creating pumpkins with little spiders lurking on them, but without the spiders they would be perfect for Thanksgiving – a real crowd-pleaser. Grand Marnier makes these an adult indulgence, of course, but you can always replace the liqueur with orange juice if you are feeding them to littles.

I’ll go with the booze, thank you very much.

I love Grand Marnier and usually splurge on a bottle every year. Mostly for baking, though a little occasionally makes its way into a small brandy snifter. Who can resist that? What amazing flavor it imparts to buttercream icing! It doesn’t take much, so you could just buy one or two of those mini bottles at the liquor store if your budget is tight, or go with a knock-off version.

Chocolate Cupcakes with Grand Marnier Icing
Print
Author:
Makes about 30 cupcakes Decorating them like pumpkins uses a lot of icing! If you choose to simply frost the cupcakes, you can cut the icing recipe in half.
Ingredients
  • CAKE:
  • 2¼ cups all-purpose flour
  • 2 cups sugar
  • 1 teaspoon salt
  • 2 teaspoons baking powder
  • 1 teaspoon baking soda
  • 1 cup cocoa powder (I use a mixture of regular and extra dark)
  • ¾ cup buttermilk
  • 1 cup oil (I use peanut oil, but canola would be good too)
  • 1 teaspoon vanilla
  • 3 eggs
  • ½ cup hot coffee
  • Grand Marnier for drizzling over cupcakes before icing (optional)
  • ICING:
  • 1 cup butter
  • 4 tablespoons shortening
  • 9 cups powdered sugar
  • ¼ cup Grand Marnier liqueur
  • 2 tablespoons frozen orange juice concentrate
  • ¼ cup heavy cream
  • Orange food coloring (optional)
  • Chocolate slivers, green icing for decorating.
Instructions
  1. Heat oven to 350 F. Line cupcake pans with paper liners.
  2. In a large bowl, whisk together the flour, sugar, salt, baking powder, baking soda, and cocoa powder.
  3. Add buttermilk, oil, and vanilla. Beat well, scraping the bowl often.
  4. Add eggs, one at a time, beating well in between each addition.
  5. Stir in the coffee until mixture is smooth.
  6. Fill cupcake liners a little more than half full, but no more than ⅔ full.
  7. Bake 25-30 minutes, or until top springs back when touched and a toothpick inserted in the center of a cupcake comes out clean.
  8. Cool on a rack.
  9. Once cool, you may want to poke inch-deep holes in the cupcake tops and drizzle each cupcake with ½ teaspoon Grand Marnier, letting it soak in through the holes.
  10. ICING: beat together the butter, shortening, and 2 cups of the powdered sugar until creamy.
  11. Add Grand Marnier, frozen orange juice, and cream. Beat until well combined.
  12. Add the remaining powdered sugar, 1 cup at a time, beating well after each addition. Scrape the sides of the bowl often. Beat on high until fluffy, adjusting if necessary by adding more powdered sugar or cream to achieve a thick icing that will hold shape when piped.
  13. Add orange food coloring, if desired.
  14. With a pastry bag fitted with large round tip, pipe a mound in the middle of each cupcake. Starting at the base of the mound and working your way around the icing mound, pipe from bottom to top, releasing pressure on the pastry bag as you reach the top. Put a small sliver of chocolate in the center of the top for a stem and, if desired, use a small amount of green icing to add leaves.

Fill a little over halfway.

Poke holes with a skewer and drizzle with Grand Marnier.

Use large round tip to make a flat circle then center mound (like a witch’s hat). Or . . . just make a mound.

Pull icing up from the base of the circle to create a pumpkin.

Now just stick a little sliver of chocolate (or get creative: a pretzel stick, piece of Tootsie Roll, cacao nib, whatever) on top and, if you want, add a few leaves and curlicues with green icing and a tiny writing tip. I piped small spiders on mine with melted chocolate (because the crow requested them) but if you don’t want to get all crazy, you could just do this: 

Added bonus to taking this shortcut: you would only need half of the icing recipe for the pretty little floret. A drizzle of chocolate or a few sprinkles, and it’s a thing of beauty.

Enjoy!

Lorinda

Thanksgiving Treasures

Thanksgiving ideas from The Rowdy Baker

Thanksgiving ideas from The Rowdy Baker

When I was young, the anticipation of Thanksgiving was almost as exciting as that of Christmas. Thanksgiving was the beginning of the holiday season, but more than that, it was all about our family traditions and creating the warm memories that I still cherish today.

In elementary school I loved the songs we’d sing: “We Gather Together”,  “Come Ye Thankful People Come”, “Over the River and Through the Woods”,  “Now Thank We All Our God”. (We were allowed to sing hymns in public school way back then.) My mother would sometimes make us torture entertain our guests with our wobbly renditions of these songs before dinner.thanksgiving songs

(Um, yes, I may have “forgotten” to return this book in 6th grade. I believe the statute of limitations applies here!)

We always had company, often foreign exchange students from the nearby college, grandparents, or any strays that my folks could coax into coming. The more the merrier! When we were very young, we’d hear my mom in the kitchen before it was light, preparing for the feast. As we got older, we were right there beside her, chopping celery and onions, and reaching our small hands into the (eeeeuwww) turkey cavity to pull out the neck and giblets that would go into her stuffing and gravy.

Crisp white linens, the good china and crystal (well, except at the “kids’ table”), candles, and the gravy boat were all placed carefully on the table. My father usually carved and served, and the wait was agonizing.

Now it’s my turn. Although I have my own style, I still produce the standard dishes…and then some. Beginning the week before Thanksgiving my kitchen becomes a whirlwind of flour that doesn’t settle until Christmas Eve.

Autumn banner

I’ve collected a few of my favorite Thanksgiving recipes together in one spot, each with a short description, photo, and link. Since this is a baking blog, I’ll leave the green bean casseroles and turkey to someone else and stick with rolls and desserts. Some are easy, some are more challenging. I hope you’ll find that all are festive and delicious.

Acorn Rolls in an edible cornucopia

Acorn Rolls cascade abundantly out of an edible cornucopia. Here’s a centerpiece for your table that won’t drop leaves, get knocked over, or block your view of the person across from you. Make a simple version or turn it into your own personal creative masterpiece.

Autumn banner

pumpkin cream cheese dessert edited

Pumpkin Cream Cheese Dessert (aka: dump cake!) This dessert just may become a new tradition in your home. Warm, creamy, crunchy, and fragrant…this is seriously good. AND it has received more views on my blog than any other recipe. Ding-ding-ding…it’s a winner!

Autumn banner

pumpkin dinner rolls
Pumpkin Sandwich Bread makes beautiful dinner rolls, too. The pumpkin flavor is mild, making the rolls perfect for turkey sandwiches the next day.

Autumn banner


humble pie
Humble Pie is a pumpkin pie with pastry depictions of all the things you’re grateful for dancing around the top crust. This takes a bit of time, but you can always narrow it down to a few important choices if you’re short on time.

Autumn banner

caramel corn

Triple Trouble Caramel Corn, dumped in a pretty bowl, will keep the hungry hoards from sneaking into the kitchen to swipe olives, dinner rolls, and the bacon from the top of the turkey. (What? You don’t put bacon on top of your turkey? Oooh, you should try it. Just a few pieces draped over the top will baste your bird and add a little extra flavor.) This caramel corn can be made days ahead, which is always nice. It has bacon, maple, and pecans in it – perfect for Fall.

I have lots of cookie recipes that would be perfect for the occasion too, but I think I’ll save those for a separate post.

I guess this should have been named “Thanksgiving Carbs”, huh? Pfffft. Don’t think about that – just enjoy.

Lorinda


ABUNDANCE


164 - Thanksgiving Group PostSchool is in session, the weather changes, kids don costumes and it’s dark before dinner; all signs that holiday time is right around the corner. Before we know it plans are made, preparations have begun, and Thanksgiving is just weeks away.

Thanksgiving is the perfect occasion for ushering in the holiday season; it’s a time for stories, projects, cooking and sharing. That’s exactly what this post is about. I’ve linked up with 5 other bloggers, each sharing a piece of what the season has to offer. We have humor, thought, family projects and food.

I hope you’ll click on all the links below to see what we’ve all put together for you:
Home on Deranged has a family post about the first and last Thanksgiving spent with mom.
Kiss My List is sharing a simple but meaningful family craft project that does double duty as Thanksgiving decor.
Writer B is Me will share a humorous story about what happens when someone is asked to make the mashed potatoes one too many times.
Pink When shares a project you can display for Thanksgiving dinner and guests.
And Baking in a Tornado (the genius behind this group post) will share a recipe for that leftover turkey.

Blog7 036And I, of course, bring you dessert!

It’s so hard to leave room for dessert when your table is groaning with rich Thanksgiving food! My family always had a fairly late dinner, so we’d manage to tuck in a tiny slice of pumpkin pie after the meal, but serious damage to the pies had to wait for breakfast the next day. And oh, it tasted good the next morning.

As much as I love pumpkin pie, sometimes it’s nice to change things up a bit. Here is the dessert I’ll be serving this year instead of pie – Pumpkin Cake Roll with Butterscotch Cream Cheese Filling.

Pumpkin Cake Roll with Butterscotch Cream Cheese Filling

Pumpkin Cake Roll with Butterscotch Cream Cheese Filling

Most people don’t frost cake rolls, but I wanted a whipped cream icing to lighten it up a bit. The leaves were made with white chocolate and a little food coloring. The Pumpkin Roll can be made ahead and frozen…just let it thaw for an hour and smother it with whipped cream before serving. If you don’t think it will be all be eaten right away, I would recommend that you use a non-dairy whipped topping or (my choice) stabilized whipped cream.

I believe this was the first cake I made from scratch. Had it not been foolproof, I probably would be using Duncan Hines mixes to this day – but it was so simple to make, I never looked back. My recipe is really old, and probably adapted from the original Libby Pumpkin Roll recipe. It calls for a 10-inch by 15-inch jelly roll pan. I don’t happen to have one, so I use a larger pan and spread mine a little thinner…and it works just fine!

Pumpkin Roll with Cream Cheese Filling
Print
Author:
Serves 8-10
Ingredients
  • 3 eggs
  • 1 cup sugar
  • ⅔ cup pumpkin
  • 1 teaspoon lemon juice
  • ¾ cup all-purpose flour
  • 1 teaspoon baking powder
  • 2 teaspoons cinnamon
  • 1 teaspoon ginger
  • ½ teaspoon nutmeg
  • ½ teaspoon salt
  • ......................
  • BUTTERSCOTCH CREAM CHEESE ICING
  • ¼ cup heavy cream
  • ¼ cup powdered instant butterscotch pudding mix
  • 8 ounces softened cream cheese
  • 4 tablespoons softened butter
  • 1 cup powdered sugar
  • ½ cup (or more) chopped, toasted pecans
Instructions
  1. Heat oven to 375 F.
  2. Prepare a 15"x10" jelly roll pan (or cookie sheet with sides) by lining the bottom with waxed paper or parchment. Grease and flour the paper, or spray with an oil/flour spray like Baker's Joy.
  3. Beat eggs on high for 5 minutes.
  4. Beating continually, gradually add sugar.
  5. Add the pumpkin and lemon juice and mix until well combined.
  6. Sift together the dry ingredients and fold into pumpkin mixture.
  7. Spread batter evenly in prepared pan, and bake 12-15 minutes, or until the top springs back when touched.
  8. Coat a cotton dish towel generously with powdered sugar and turn the cake out onto the dish towel. Peel off the waxed paper or parchment.
  9. Starting from the short end, slowly roll cake and towel together. Place in the refrigerator to cool completely, approximately one hour.
  10. While the cake is cooling, make the butterscotch filling:
  11. In a medium bowl, combine the cream and pudding mix. Add the cream cheese and butter and mix together at medium-high speed. Add the powdered sugar and mix well. Refrigerate until needed.
  12. Unroll the chilled cake carefully. Spread with filling and roll it back up (without the towel this time, of course.) Refrigerate at least one hour.
  13. Sprinkle with powdered sugar, or ice with sweetened whipped cream and serve.


Folding in the dry ingredients.

Folding together.

Spreading the batter.

Spreading the batter.

Roll up cake AND towel!

Roll up cake AND towel!

Add filling and pecans.

Add filling and pecans.


To make the white chocolate leaves, melt white baking chocolate (if you have candy melts, they’d probably be a lot easier to work with) in three bowls, with just a little bit of chocolate in two of them. Add green and orange Wilton candy coloring to the two small bowls. Note: chocolate does NOT like water, so regular coloring can make it seize up. Use powdered or oil based food coloring! Melt a small amount of dark chocolate in another small bowl if you wish. Put the melted white chocolate on a waxed paper covered baking sheet, drizzle it with the colored and dark chocolate, and spread it out thinly with a spatula, with as few strokes as possible.

Let it harden at room temperature and then cut leaf shapes with cookie cutters. Cut more leaves than you think you’ll need – a lot of them may break! Move the entire sheet to the refrigerator and let it harden completely. Separate each leaf carefully with a small spatula. If you want to shape the leaves, put each one on a square of waxed paper, melt in the microwave for 2-3 second intervals until the leaf is flexible, and shape by draping over scrunched up foil or a spoon handle, or by setting it in a small custard bowl. Chill again and place on cake.

Ready to melt

Ready to melt

Mixture of white chocolate colors.

Mixture of white chocolate colors.

Cutting out chocolate leaves

Cutting out chocolate leaves


Too much trouble for you? One word: SPRINKLES. Everyone loves sprinkles.

From my kitchen to yours, have a wonderful, blessed Thanksgiving!