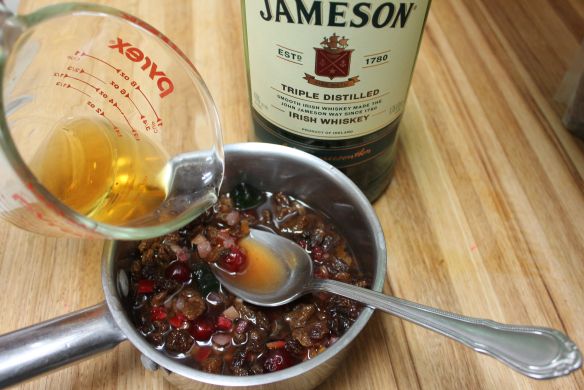
Barmbrack is a fruit-filled, slightly sweet bread that is traditionally served In Ireland on Halloween, but is also enjoyed on St. Patrick’s Day. Originally, it was leavened with the frothy foam produced by fermenting beer, but since I don’t make my own beer, I used good old active-dry yeast instead. In keeping with the “spirit” of the thing, though, I did soak the dried fruit in beer.
Guinness is lovely…dark and rich, with a hint of coffee and chocolate. You can, of course, use any beer. Or milk. Or brewed tea. It’s all up to you.
This isn’t a difficult recipe, but it is time consuming. The fruit needs to be soaked for at least 2 hours, then it needs to rise twice, and since the dough is rich, this can take anywhere from 1 to 2 hours each time. The good news is, the bread tastes even better the next day, so you can make it ahead of time.
And if you’re really rushed, I have an easier recipe for Tipsy Tea Brack that uses baking powder instead of yeast. It’s much faster, and aside from being just a little sweeter, the two breads are very similar. Both were a hit in my household, but I have a weakness for yeast breads, especially when toasted, and didn’t mind spending a day babysitting the dough. Mmmm.
1½ cups dried fruit (raisins, sultanas, fruitcake mix)
zest from 1 lemon
½ cup very warm water with a pinch of sugar added
1 packet (1/4 oz) active-dry yeast
¼ cup sugar
1 egg
1 teaspoon vanilla
1½ teaspoons pumpkin pie spice (or ½ teaspoon. cinnamon and ¼ teaspoon each: clove, ginger, allspice, nutmeg)
4 cups bread flour
1 teaspoon salt
2 tablespoons melted butter (if using unsalted butter, add an additional pinch of salt)
Instructions
In a small pan, heat liquid until steaming, but not boiling. Remove from heat.
Add dried fruit and lemon zest. Cover tightly and let fruit sit for at least 2 hours. Strain into a bowl,. Press firmly on fruit to remove excess liquid. Reserve 1 cup of liquid, discarding any remaining. If necessary, add water to bring the amount to a full cup.
In a small bowl or cup, combine the warm water and yeast. Let it sit until foamy - about 5 minutes.
In a large bowl (a sturdy stand mixer is recommended), combine the cup of reserved liquid, ¼ cup sugar, egg, vanilla, spices, yeast mixture, and 2 cups of the bread flour. Beat until well combined.
Switch to a dough hook and add remaining flour and salt. Knead by machine for 3 minutes, then drizzle in the butter and knead for an addition minute. Add fruit and mix until combined. (If kneading by hand, add the butter along with the last 2 cups of flour, then move dough to a floured surface and knead 6 minutes, working the fruit in at the end.)
Transfer dough into a large greased bowl, cover with plastic wrap, and allow dough to rise until doubled. This may take 1½ hours or more, depending on the warmth of your kitchen.
Grease a 9-inch round cake pan and line the bottom with a piece of parchment.
Turn dough out onto a lightly floured surface and knead a few times to distribute the fruit evenly. Form into a ball and place in prepared pan. Cover and let rise until almost doubled.
Heat oven to 375 F. Bake bread for approximately 50 minutes. The top should be dark brown. Turn the bread out onto a cooling rack. The bottom should sound hollow when tapped. (If in doubt, give it a few more minutes in the oven.) Allow the bread to cool completely before cutting.
Skip the soda bread on St. Patrick’s Day and try your hand at this delightful Irish treat! If you aren’t a fan of fruitcake (which I totally understand) you could skip the candied fruit and just use the sultanas and raisins for a milder taste. If you don’t care for dried fruit (even soaked in Jameson’s), it’s back to soda bread for you!
Tea Brack, which uses baking powder to rise, is a simpler version of Barmbrack, a yeast-leavened loaf. Both are very popular in Ireland. Though little charms are often baked in, I hate the thought of putting inedible things in my bread, so I was a party pooper and didn’t toss in the coin, the ring, the little piece of material.
There are a lot of recipes out there for both breads, each claiming to be “traditional”. I gave up trying to sort through them and did my own thing—as usual. If you’d like to try the yeast version, check out my recipe for Irish Barmbrack
My recipe has Irish whiskey in it, and a crusty top made with Irish Cream and brown sugar. If you prefer to leave out the alcohol, just use tea instead. Note: I used Earl Grey, but any black tea would be fine.
In a medium pan, warm tea until steaming but not boiling. Remove from heat.
Add fruit, lemon zest, and whiskey. Cover and let sit for 2-3 hours.
Line the bottom of a generously greased loaf pan with parchment. Heat oven to 350 F.
Sift the flour, baking powder, brown sugar, and spices into a medium bowl.
Stir the egg and vanilla into the fruit mixture and pour into the bowl with the dry ingredients. Gently stir just until the flour is incorporated, and spoon into prepared pan. Bake for 55 minutes, or until a toothpick inserted into the middle of the loaf comes out clean. If you are not adding the topping, let the loaf cool on a rack for 10 minutes, then turn it out to cool completely.
TOPPING: If you are adding the topping, mix the brown sugar and Irish Cream together well, then brush over the top of the hot loaf. Return to the oven for 5-10 minutes. Let the loaf sit in the pan on a cooling rack for at least 15 minutes, until topping feels firm to the touch. Turn out onto the rack to cool.
Add whiskey to hot tea and fruit. Let it sit until those raisins are plump (2-3 hours).
Sift the dry ingredients into a medium bowl.
Stir egg and vanilla into cool fruit mixture.
Gently stir, just until the flour is incorporated. (a few white wisps are fine)
Spoon batter into prepared pan and bake.
Whisk together the Irish Cream and brown sugar until smooth.
Brush the top of baked bread with the Irish Cream mixture. (For moister bread, poke holes with a toothpick first.) Pop it back in the oven for 5-10 minutes, or until topping is firm.
Just a few minutes in the oven turns the topping light and crunchy.
Anyone would do a jig for a slice of this Chocolate Chip Mint Pot o’ Gold Cake! Light green, with delicate mint flavor and dark chocolate speckles, it’s ideal for your St. Patrick’s Day celebration. Dark, fudgy chocolate frosting and a generous mound of chocolate gold coins will turn this sweet dessert into a leprechaun’s treasure. The first slice can be neatly plated, but when you cut the second slice, all of the coins and candy in the middle will come tumbling out. The kids will love this!
My recipe actually makes two Bundt cakes, which are later placed together to create a rounded “pot” shape. While one is baking, the remaining batter rests happily in the fridge (unless you happen to have TWO Bundt pans and can bake them together).
I chose a thick frosting to fill in the designs made by the Bundt pan. The frosting hardens fairly quickly, but can be encouraged to spread with a few drops of milk or coffee if necessary. Don’t worry about making it perfectly smooth; once the cake is iced you’ll be able to gently pat with your hands (yes, gloves are a good idea if you’re baking this for others) to remove rough spots.
By the way, I know most people would call this “mint chocolate chip”, but wouldn’t that mean that the chocolate chips were mint flavored? We always called the ice cream (my favorite, by the way) “chocolate chip mint”. I caved in and went with the majority when I posted my Mint Chocolate Chip Pie, but not this time. Nope. I take my chocolate chip mint seriously!
Hints:
Quality peppermint extract matters! Mine was old and smelled kind of funky, so I ordered some from Nielsen-Massey. What a difference! You know I don’t have advertising on this blog, so there’s nothing in this for me, but I was really impressed with the bright flavor.
Frequent scraping of the bowl while mixing is very important. Scrape the beaters once in a while too so there are no clumps of butter in your batter.
Try not to open the oven door while the cake is baking.
Let your eggs and butter come to room temperature before mixing. And don’t rush the process. Each egg needs to get thoroughly beaten into the batter.
Order the chocolate coins online. Buying the little bags would be awfully expensive! I got mine on Amazon for a reasonable price.
This makes a larger than usual amount of cake batter, since two cakes will be needed to create the "pot" shape. If you are making this cake for another occasion, the batter will be enough for one large Bundt pan and a standard loaf pan.
Ingredients
CAKE:
2 cups (4 sticks) salted butter, room temperature (If using unsalted, add ½ teaspoon salt to dry ingredients)
3 cups sugar
8 large eggs, room temperature
4½ cups cake flour
1 teaspoon baking powder
½ teaspoon baking soda
¼ teaspoon salt
1 cup sour cream
¾ cup whole milk
1 teaspoon vanilla
1 teaspoon peppermint extract (more if desired)
green food coloring
3.5 ounces dark chocolate, finely chopped
FROSTING:
1 cup salted butter
2 ounces unsweetened chocolate
1¼ cups dark cocoa (I used Hershey's Special Dark)
⅓ cup milk (a little more if needed to thin frosting as you work with it)
¼ cup strong coffee
1 teaspoon vanilla
6 cups powdered sugar
Instructions
CAKE: Heat oven to 325 F. with the rack in the middle of the oven. Use a flour/oil spray (like Baker's Joy) to coat the inside of a large Bundt pan. (Or grease and flour the inside, taking care to get in all the nooks and crannies.)
In a large bowl (a sturdy stand mixer is highly recommended) beat the butter until soft and creamy. Add the sugar and beat 3-4 minutes, until very light, scraping the bowl occasionally.
Add eggs one at a time, beating for 30 seconds between each egg. (Your patience will be rewarded!)
Sift together the cake flour, baking powder, baking soda, and salt two times. Set aside
In a small bowl, whisk together the sour cream, milk, vanilla, and peppermint extract.
Beginning with the dry ingredients and ending with the wet, alternately add ⅓ of each, mixing on low speed after each addition, just until incorporated.
By hand, gently fold in the chopped chocolate and enough green food color to get the color you want.
Spoon half of the mixture evenly into the prepared Bundt pan (about 5½ cups), refrigerating the other half. Smooth the top and bake for approximately 50 minutes, or until the top edge is browned and a toothpick or skewer comes out clean when inserted in the cake.
Cool for 5 minutes in the pan, then turn out onto a cooling rack.
Clean and prepare the pan and repeat with the remaining batter. Let both cakes cool completely.
FROSTING: In a small pan, melt butter and unsweetened chocolate on lowest heat—or use a microwave. Stir in cocoa and transfer to a large bowl. (Again, a stand mixer is very helpful.)
Combine the milk, coffee, and vanilla and add alternately with powdered sugar, about ⅓ of each at a time. Beat well.
ASSEMBLY: The frosting will thicken fairly quickly; be prepared to add a little more liquid (milk or coffee) if needed. Place one cake, with the large flat side up, on serving plate. Cover with frosting and place the second cake, large flat side down, on top to create a round shape.
Frost your way around the cake, leaving the cavity and the area around it unfrosted. (You can frost the whole top, but the coins will stick.) Make it as smooth as possible, Save enough frosting to make a "rim" around the top
Once the entire cake is frosted, press gently on an area with your finger. If it sticks to your finger, wait a little longer. Once the frosting has firmed up, use your warm hands (wear gloves if you wish) to press and smooth all around the cake.
Use a large round icing tip to pipe a rim around the top of the cake, then fill the center and top with gold coins.
I used green royal icing to add grass and clovers.
Cream the butter and sugar like you mean it! 3-4 minutes. It should be very fluffy.
Beat the eggs in, one by one. Take your time! See how yellow and light the batter is? Add about 1/3 of the dry ingredients . . .
Then add one third of the liquids. Repeat dry ingredients, liquids, dry ingredients, liquids. Don’t overstir – just until combined.
Gently fold in green food coloring and chopped chocolate.
Spoon half of the batter into prepared Bundt pan and smooth the top. Bake!
Once cakes are completely cool, start the frosting. Melt chocolate and butter on low heat (or use microwave).
Stir the cocoa into the butter mixture. It doesn’t have to be smooth – it just keeps you from getting a face-full of powdered cocoa when you start up the mixer.
Alternately add the powdered sugar and the liquids. Beat well.
Put the two flat sides together with frosting
I didn’t frost in the cavity or around it so the coins would cascade out when cut. And one pound of coins fell a little short, so I filled the void with a few chocolate mint candies.
These things, I warmly wish for you-
Someone to love, some work to do,
A bit of o’ sun, a bit o’ cheer.
And a guardian angel always near.
Okay, it’s not one of the healthiest meals around, but boy, is it rib-sticking. We love this easy hash, and tucking it in a flaky pie is a perfect way to use leftover corned beef. I wanted to make the pie for St. Patrick’s Day, not after, so I cooked up a corned beef just for this purpose. For a standard pie you’ll need about 3 cups of chopped corned beef.
Heavy cream mixed with food coloring made a simple, thick paint that held its color nicely while baking. I used an ice cube tray for a palette. As it turned out, this was an excessive amount of “paint”; most of it went down the drain once the pie was made. You may want to be a little more prudent than I if you try this.
Whipping cream and food coloring make wonderful pastry paint!
Have you ever attended one of those “Corks & Canvas” events where you all attempt to paint the same picture? If so, you may have seen me. I was that nutcase who painted with her fingers. It’s just a lot more natural for me than using brushes. (And yeah, it might have had something to do with the wine we were served.) I have to tell you, except for the tiny details, finger painting worked really well on the pie crust, too.
And I have the green fingertips to prove it.
The recipe below is enough for one standard pie. If you have a larger pan, or if you plan to layer (the rainbow, sheep, and a few of the hills were separate layers) you may want to make a bigger batch of crust and bump the filling up to four cups of potatoes and 4 cups of meat.
Amounts are for standard pie pan. If you are using a large, deep-dish pan, you may wish to make more filling and crust.
Ingredients
HASH FILLING:
2 tablespoons butter
2 tablespoons cooking oil
3 cups peeled, cubed (small cubes) potatoes
3 cups chopped, cooked corned beef
½ onion, chopped
2 cups broth (I used beef, but chicken works well, too)
¼ cup flour
CRUST:
2 cups all-purpose flour
1 teaspoon salt
1 cup cold shortening
¼ cup cold milk
1 tablespoon vodka (or vinegar)
OPTIONAL: heavy cream and food coloring for painting designs on the crust
Instructions
FILLING: In a large skillet on medium high heat, add butter and oil. When hot, add cubed potatoes. Stirring often, cook for 5 minutes. Turn heat down to medium low. Add corned beef and onions. Cook for 2-3 minutes, stirring occasionally.
In a small bowl, whisk together broth and flour. Add to potato and meat mixture. Stir until it thickens, then remove from heat. Allow the mixture to cool.
Heat oven to 350 F.
CRUST: In a medium bowl, combine flour and salt. Cut in the shortening, using a pastry cutter, until shortening is about the size of small peas.
Combine milk and vodka. Drizzle into flour mixture, tossing mixture with a fork or rubber spatula, until it is blended and begins to hold together.
On a generously floured surface, roll half of the dough out until you can cut a circle larger than the top width of your pie pan. (Aim for at least 1 inch larger, all the way around.) Cut out circle, gently roll up on your rolling pin, and ease into the pan. Trim edge, leaving a little hanging over the edge of the pan.
Roll the other piece out to the same size. If you are planning to paint the top crust, make sure the rolled crust has plenty of flour under it. Slide it onto a thin flexible cutting board or a floured baking sheet for ease in handling.
Mix your choice of food coloring into small amounts of heavy cream (an ice cube tray works well.)
Paint onto the crust, using soft paintbrushes. Try not to overwork the "paint" or the crust will get mushy. I found that my fingers worked better than brushes in large areas. Leave a 1-inch unpainted area around the outside of the circle; this will be the fluted edge.
This is a little tricky: carefully slide the crust off the floured base, positioning it evenly. Fold both crusts under together and flute.
(If you aren't painting the crust, fill the bottom crust with cooled hash, place the top crust over it, and, pressing the two crusts together, fold under, all the way around the pan. Flute the edges, brush the top with a little cream or an egg wash on the top if desired, and place pie on a baking sheet.)
Bake 45-50 minutes at 350 F, until golden brown around the edges.
May I give you one more boozy recipe for St. Patrick’s Day? My next post will be family-friendly, but I’m still on a Jameson whiskey roll and had a lot of fun creating these crunchy mint cookies. They have a layer of dark chocolate on the bottom and each cookie sports a Jameson-spiked ganache rose on top.
I vividly remember pounding out “My Wild Irish Rose” on the piano in the living room, singing along with neither grace nor talent. Fifty years later the song comes back to haunt me, as it does each March, along with other traditional Irish songs like “Danny Boy”, “That’s an Irish Lullaby”, “When Irish Eyes are Smiling”, and “I’ll Take You Home Again Kathleen”, though I read recently that this was actually written by a German composer. Oh, and that annoying unicorn song, but I am NOT getting that stuck in my head!
I love The Irish Tenors, and good old Bing crooned his way through some Irish ballads, but when I think of some of these songs it always takes me back to Joe Feeney on The Lawrence Welk Show. He wasn’t one of my favorites, but he sure had the perfect voice for Irish songs. (Grandma made me watch it, honest!)
Now, see? I gave you some nice ideas for tunes to hum while you’re making ganache roses.
The cookies are a slam-dunk. Very easy. If painting their little bottoms with dark chocolate and piping ganache roses makes you grind your teeth, you could take the easy way out and just pour a little bit of melted chocolate into the wells in the center. Or add mini chocolate chips to the dough. They wouldn’t be ROSE cookies, of course, but they’d still be tasty. And of course, you can make them without booze – just use cream instead.
Oh, and if you don’t (gasp!) have a shamrock cookie cutter, you can roll three balls of dough (a teaspoon each), add a stem, and press in the middle to create a shamrock. Flatten the petals down slightly. I learned the hard way that the cookies won’t get nice and crunchy if they’re too thick.
If you’re going for the gusto, here’s your recipe:
Makes approximately 18 large (3½-inch) shamrock cookies. These are baked at a low temperature so they don't brown, but get baked through for a nice crunch. If you prefer, you can use a total of ⅔ cup cream and skip the alcohol!
Ingredients
GANACHE:
8 ounces dark chocolate (chips are okay)
⅓ cup heavy whipping cream
⅓ cup whiskey (I used Jameson) You may skip the alcohol and substitute cream if desired.
........
COOKIES:
1 cup butter, room temperature
1 cup powdered sugar
1 egg
1 teaspoon peppermint extract
green food coloring
½ cup cornstarch
½ teaspoon salt
2 cups all-purpose flour
6 ounces dark chocolate (chips are okay)
Instructions
GANACHE: In a small saucepan on the lowest temperature, melt the chocolate, stirring often. Heat the cream until it's hot but not boiling, and add to the chocolate. Stir until combined. Remove from heat and gradually add the whiskey, stirring constantly until smooth. Cover lightly with a paper towel and set aside, stirring now and then, until the mixture is thick enough for piping. (This might take 2-3 hours, depending on the temperature of the room.) The ganache should resemble thick buttercream icing. Scoop up a spoon to test it; it shouldn't fall off the spoon when turned upside down.
Spoon into a pastry bag fitted with a rose tip. Put a little icing on a rose nail (or I've used a flat meat thermometer in a pinch) and put a small piece of waxed paper or parchment on the nail. Pipe the rose just as you would with icing. (If the ganache gets too soft, allow it to cool off BRIEFLY in the fridge.) There are lots of tutorials on the Internet if you have never done this. Don't make the roses too big! Leave the paper under each rose and place them on a baking sheet. Refrigerate or freeze.
COOKIES:
Heat oven to 325 F. Line two baking sheets with parchment.
In a large bowl (a stand mixer is recommended) beat the butter until creamy.
Add the powdered sugar and beat well.
Add the egg, peppermint extract, and food coloring (make it a little darker than you want because it will lighten when the flour is added) and beat until completely mixed.
Add cornstarch, salt, and flour. This is a stiff dough - you will want to use a dough hook if you have one, or be prepared to finish stirring by hand.
Roll dough out between lightly dusted sheets of parchment. It should be fairly thick - between ¼-inch and ⅓-inch. Cut with a shamrock cookie cutter and place on prepared baking sheets. With your thumb, press in the center of each cookie.
Bake for approximately 15-17 minutes, or until just the bottoms are lightly browned. Remove from oven and press the centers again, using your thumb (or a rounded measuring spoon, tart tamper, or the handle of your rolling pin) to redefine the well in the middle of the cookie. Move to a rack to cool completely.
Melt the 6 ounces of chocolate, either in a pan at lowest heat or in a bowl in the microwave at 15-second intervals. Stir well and, using a pastry brush, brush the bottom of each cookie and place chocolate-side-down on parchment, pressing gently to distribute the chocolate evenly. Refrigerate to quickly set the chocolate.
Place a dab of chocolate in each cavity and add a rose, pressing gently to secure it.
Make the dough, then roll out between pieces of parchment.
The dough should be nice and thick – between 1/4-inch and 1/3-inch.
Press firmly in the center of the cookie with your thumb, or . . .
Use your weapon of choice: thumb, measuring spoon, tart tampers, rolling pin handle.
Once baked, the holes will have mostly filled back in. Press down again while the cookies are hot. (The first time keeps the cookies from cracking around the cavity.)
Brush the bottoms with a thin layer of dark chocolate.
Use a dab of the melted chocolate to nestle each rose in its place. Dance a jig!
They’re as tasty as they are pretty; just the right amount of mint. And don’t forget, if you’d like to save a step, add some mini-chips to the batter and skip the chocolate bottoms. Or, hey, if you’re like me and there can never be enough chocolate, do both!
My wild Irish Rose, the sweetest flower that grows.
You may search everywhere, but none can compare with my wild Irish Rose.
My wild Irish Rose, the dearest flower that grows,
And some day for my sake, she may let me take the bloom from my wild Irish Rose.
Hearty and rustic, yet surprisingly light (thanks to the addition of a full bottle of Guinness Draught Stout), this bread will be the ideal accompaniment for your St. Patrick’s Day feast. Oats and whole wheat flour give the loaves a wonderful texture, molasses adds a slightly sweet back note, and the beer adds a rich, yeasty, complex flavor. I added chopped raisins to one loaf and loved the results, especially when the bread was toasted.
You can use any dark beer you want, of course. I just picked this because it screamed “St. Patrick’s Day” to me, and I was won over by the packaging that promised a hint of chocolate and coffee flavor. Sold!
I had to make a second batch to double-check my measurements. I always lose count when it comes to cups of flour and then I try to convince myself that I’m (pretty) sure it was three cups when it actually might have been four. But that would haunt me, so . . . I give in and make it again.
I hate to burst your bubble if you see me as some meticulous baker, but here is my actual plan of action for this recipe. Seriously, this is the way I work!
Obviously, I need someone to follow around after me, taking notes!
Anyhow, I’m glad I had to make another batch because I was inspired to make the dough balls into shamrocks, and . . . aren’t they nice? I also ran out of wheat flour (only had a cup) so used 1/2 cup of buckwheat flour, which made the dough a little darker and—according to my husband—even tastier. If you have some, you might want to try that!
1 bottle (11.2 fl oz) dark beer (I used Guinness Draught Stout)
4 tablespoons butter
⅓ cup molasses
½ cup very warm water
½ teaspoon sugar
1 package active-rise yeast
1 cup oats (old-fashioned or quick)
1½ cups whole wheat flour
1½ teaspoons salt
2½ - 3 cups white bread flour
½ cup chopped raisins - optional
cornmeal - optional
Instructions
In a small pan, combine the beer, butter, and molasses. Cook over low heat until the mixture is lukewarm and the butter is mostly melted.
In a small bowl, combine the warm water, sugar, and yeast. Allow it to get bubbly - about 5 minutes.
In a large bowl (a sturdy stand mixer with a dough hook is recommended) combine the beer mixture, yeast mixture, oats, wheat flour, and salt.
Slowly add 2 cups of bread flour and mix well. Add as much remaining flour is needed until the dough comes cleanly away from the side of the bowl. Continue to knead by machine for 6 minutes (or drop onto a floured surface and knead by hand for 8 minutes), then place in a greased bowl. Cover with a towel or plastic wrap and allow the dough to rise until doubled - about 1 hour.
Move dough to a lightly floured surface and divide into 2 pieces. Form into balls and place on a large baking sheet. If you are adding chopped raisins, knead into the dough before forming the balls. (Optional: sprinkle the baking sheet with cornmeal for a crunchy bottom crust.)
Cover and allow to rise until double - about 1 hour.
Heat oven to 375 F.
Cut a large "X" in the top of each loaf and bake for approximately 30 minutes, or until the bread is a rich brown and the bottom sounds hollow when tapped. Move to a rack to cool. You can brush the top of each loaf with butter if you want them to have a sheen, and to soften the crust slightly.
TO MAKE SHAMROCKS: Once the balls of dough are shaped, cut four 1½ - 2" slices at (picturing a clock) approximately 10:00, 2:00, 4:00, and 8:00. Make sure to leave the center intact. This creates three petals and a stem. Pull firmly down on the stem to stretch it out into the desired shape. Use your fingers to shape the petals and cut a shallow slice down the center of each to add shape. Bake as directed above.
Place dough in a greased bowl, cover, and let rise until doubled.
Divide dough into two pieces. Add chopped raisins if desired. (Totally optional.)
Place on a baking sheet. I like to dust mine with cornmeal for a crunchy bottom crust. (One is plain, one with raisins.) Let ’em rise until doubled, about 1 hour.
After loaves have doubled, cut a large ‘X’ on each and bake.
Baked. Brush the hot loaves with butter if you want them shiny, or prefer a softer crust.
IF YOU WANT TO CREATE SHAMROCKS:
Form the dough into two balls.
Cut 4 slits. (My cuts were a little wonky. Aim for 4:00 and 8:00 on the bottom and then stretch out the stem.)
Mold and shape the petals. Make a cut down the center of each to add shape.
Place on baking sheet and allow to rise until almost doubled, then bake!
FAQs:
Q: Does the house smell amazing while the bread bakes?
A: The house smells like a brewery! A fragrant brewery, but . . . pretty heady.
Q: I don’t like beer. Can I use wine instead?
A: Are you crazy? No! Go home.
Q: Can you give me a gluten-free, vegan, sugar-free version of this recipe?
A: Um. You haven’t been hanging out here very long, have you? I’m a Paula Deen type of baker. This is actually a healthy recipe for me; molasses instead of white sugar, less than a pound of butter, and some oats and wheat flour thrown in to impress you. You’re welcome!
Anyone else? No? Good.
I have a very elaborate recipe in the works. This was easy; the next one will be a lot more challenging. Bwa ha ha. Check back in a few days!
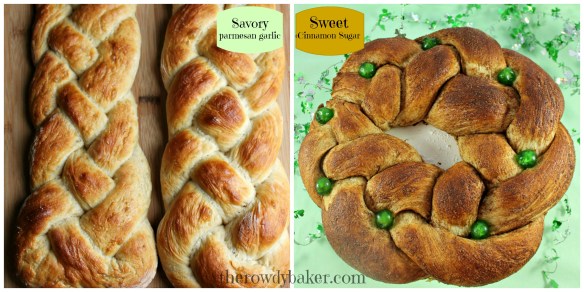
I went all Irish on you with this bread. It has both Guinness Stout beer AND potato in the dough. You won’t even taste the beer, but what a pillowy-soft dough it helped create. I made a savory Celtic braid by adding some Parmesan and garlic to the dough, and turned another batch into a braided cinnamon and sugar ring.
Both were light – surprisingly light – and tender. I will say, however, that this is a bread that is best eaten the day it’s made. On day two it was just a tiny bit chewy, though if it had been heated a little, I probably wouldn’t have noticed. This almost made me wish I hadn’t deep-sixed the microwave. (A pat of butter and a few seconds in a microwave will revive any cinnamon roll . . . or braid.)
Makes two Celtic braids or one braided cinnamon ring.
Ingredients
1¼ cups very warm water
3½ teaspoons sugar, divided
1 package active dry yeast
½ cup Guinness Extra Stout beer
1 tablespoon butter
½ cup dry instant potatoes
1 teaspoon salt (3/4 teaspoon if your instant potatoes contain salt)
3½ cups all-purpose flour
VARIATIONS:
For Celtic Braid: ½ cup freshly grated Parmesan cheese and ¼ teaspoon garlic powder, if desired. 1 egg and 1 tablespoon water combined for egg wash.
For Cinnamon Ring: 2 tablespoons butter, 1 tablespoon cinnamon, ⅓ cup sugar, green candied cherries. Icing if desired.
Instructions
In a large bowl, combine warm water and ½ teaspoon sugar. Add yeast and allow mixture to sit for at least 5 minutes, or until foamy.
In a small saucepan on low heat, heat the beer and 1 tablespoon butter until beer is lukewarm. (It’s okay if the butter hasn’t melted completely.)
To the yeast mixture, add warm beer mixture, instant potatoes, salt, flour, and 3 teaspoons sugar. (IF MAKING SAVORY BREAD, ADD PARMESAN AND GARLIC.) Mix well. If using a heavy stand mixer, let the mixer knead the dough for 5 minutes. (If kneading by hand, knead on generously floured surface for 7-8 minutes.) Dough will be very soft, slightly sticky, and may stick to the sides of the bowl a little. Cover the bowl with a towel and allow to rise until doubled, about 1 hour.
FOR CELTIC BRAID: Cover large baking sheet with parchment. Punch down dough and divide dough into 4 pieces. (If dough is too sticky to work with, knead it a few times on a generously floured surface.) Working with 2 pieces at a time, roll each piece into a rope about 2 feet long. Follow photo instructions in post for making braid (or find a template online). Repeat with remaining 2 pieces. Place braids on prepared baking sheet and brush with egg wash. Cover loosely with towel, and allow to rise until doubled - about 1 hour.
Heat oven to 375 F. Bake for about 25 minutes, or until rich golden brown. Cool on rack.
FOR CINNAMON RING: Prepare two large baking sheets by covering with parchment. (One will be used to coat the bread ropes in butter and cinnamon, and the other will be used to bake the braid.)
Punch down dough and divide into 3 equal pieces. Roll into ropes, each approximately 24 inches long.
Melt butter and pour onto one of the prepared baking sheets. Combine cinnamon and ⅓ cup sugar in a small bowl.
Roll ropes of dough in the melted butter and sprinkle with the cinnamon sugar mixture, rolling until completely coated.
Pinch the three ropes together at the top. Lift onto clean baking sheet and braid. Tuck the ends under and pinch together where the ends meet.
Cover braid loosely with clean towel and allow it to rise until almost doubled, about 1 hour. Decorate with green candied cherries, if desired.
Heat oven to 375 F. and bake for 30 minutes, or until golden brown. Place baking sheet on cooling rack for 5 minutes, then slide braid and parchment onto rack to cool completely.
Drizzle with icing if desired. To make a simple icing, combine ½ cup powdered sugar, 1-2 drops green food coloring, and 1 tablespoon milk or water.
Dough will be sticky. Don’t add extra flour yet – you can always work in a little more once it’s risen if necessary.
Rises like a champ! Wait ’til you feel this dough – it’s billowy and soft as a baby’s cheek.
Roll dough around in the flour. If it’s really sticky, knead it a few times to add a bit more flour and make it manageable.
Start by crossing the two ropes at the middle, like an “X”.
And then do this . . .
. . . then this.
It should finally look something like this.
Brush the braid with egg wash and bake!
If you’re making the cinnamon ring, it’s a little easier – just a simple braid:
For the cinnamon braid, begin with three long dough ropes.
Roll them in melted butter, then coat them with cinnamon and sugar.
Braid the sticky ropes on a clean piece of parchment. Tuck the ends under and pinch together to make a ring.
Risen and ready for the oven.
Warm and fragrant.
Oh, and if you want to go with the whole green thing, drizzle this puppy with some green icing.
Serving it was kind of interesting. You can cut it in slices (the least messy option) or you can do what we did and just rip and tear. Licking your fingers is half the fun – no fork and knife for this gal.
St. Patrick’s Day is one of my favorite baking holidays, and I happily challenge myself each year to come up with something different. When my children were young, their lunches consisted of green everything. Everything!
As fun as it is to make green bread, rolls, and pastries, there are many other fascinating options out there – some Irish, some not so much. Booze plays a prominent roll in my brainstorming sessions, of course, which adds to the festivity.
Yes, yes…of course they’re French (or Italian, depending on who you believe). Whatever. They sure aren’t Irish, but the idea of green macarons with an Irish coffee filling was just irresistible, and perfect for St. Patrick’s Day.
Dark chocolate, cream, butter, Irish Whiskey, Irish Cream, and coffee combine to make a silky truffle-like filling. If you have any left over, you may want to try this; it was amazing!
Heat leftover filling gently and use as a sauce for ice cream
A month ago I’d never even eaten a macaron, so baking them has been a real challenge for me. After scouring the Internet, I was determined that Italian macarons were the way to go. A little more work, since you have to boil the syrup to a certain temperature before pouring over the stiff egg whites, but more predictable.
Huh.
Five batches and five different results later (and that almond flour isn’t cheap) I caved in and tried the French method…which is my favorite by far. I measured everything to the gram, and tried several recipes, tweaking measurements to find one that works well. I’m still searching for perfect, but…this is good.
I even tried adding some grated chocolate to the batter just before piping, which made a cool chocolate chip mint shell. They seemed a tiny bit flatter though, so I omitted that step in the next few batches. They’re great with a chocolate mint filling – maybe worth sacrificing loft?
I reduced the sugar a little in the recipe I’m posting, but they’re still sweet – very, very sweet., and any less sugar would compromise the structure of the meringue. The coffee filling helps balance the sweetness out, but if you don’t care for sugary desserts, macarons may not be for you.
As usual, I immerse myself in new projects, refusing to move along until I’m satisfied, so you’ll probably be seeing macarons in many different forms for a while. I’m sure we’ll all survive this current obsession – and that 3 pound bag of almond flour can’t last forever!
I painted a few macarons, using gel color or petal dust thinned with vodka. I used a gold petal dust too, just for fun. I’m no artist, and I’m sure you can do better than I, so please shoot me a picture if you attempt this!
I resisted one step in making macarons, simply because many bakers said it wasn’t necessary, and I wanted to take the path of least resistance. But…after many, many attempts, I have to admit that it’s better if you age your egg whites. I don’t do it for days, because the thought of leaving egg out at room temperature gives me the willies, but even 18-24 hours seems to help stabilize the mixture. This is just my opinion; you might not notice a difference.
Tips:
Start with squeaky clean utensils. Egg whites do not like grease!
If you don’t want to age your egg whites, at least make sure they’re at room temperature.
For best results, weigh your ingredients, but if you don’t have a scale, my measurements work pretty well.
The almond flour really makes a difference. Make sure it says “flour”, and look for blanched almond flour; it makes a prettier macaron. I used Bob’s Red Mill until I found the 3 pound bag of Honeyville brand at Costco. It’s a super fine grind at a great price. (And no, I don’t get kickbacks from any companies!)
To avoid having your batter drip out of the tip as you fill your pastry bag, place the tip in the bag firmly and give the bag a little twist right above the tip – then tuck the twist right into the tip. Once the bag is filled, just pull the tip down before piping. I use a pitcher to hold my pastry bag while I’m filling it.
Silpat – especially the kind for macarons, with circles – works great for macarons, I think the bottoms are prettier and they release better, but parchment is preferred by some bakers, so it’s your choice.
Circles are your friend. If you’re not using macaron silpats, draw 2-inch circles on parchment (flip it over before using, of course) or make one good, dark, cardboard template that you can see through the parchment and just slide it out from under each sheet to use on the next. Pipe in the center of each circle to about 1/4″ from the edge. When you tap the pan the macarons will spread out a bit to fill the circle.
I don’t pipe all the way to the circle edge. If you want to do that, you may want to make your circles 1-1/2″ instead of 2″
Unless you happen to have 4 sturdy baking sheets, pipe directly on a piece of parchment on the counter (put a little batter under each corner or weigh each corner down to hold it steady) and slide a cooled cookie sheet underneath when it’s time for that batch to go in the oven.
To avoid pointy tops, test a spoonful of batter on a plate to make sure it’s thin enough. If you tap the plate on the counter a few times and the batter doesn’t smooth out, give it a few more stirs.
Don’t be shy about dropping each pan of piped macarons on the counter. Do it several times. Air in the batter = hollow shells, and you don’t want that!
210 grams (2½ cups) almond flour (use the lightest, finest flour you can find)
380 grams (3½ cups) powdered sugar
200 grams (6 whites) egg whites, room temperature or - better yet - aged *
pinch of cream of tartar
90 grams (1/2 cup) superfine sugar
green food coloring (gel or powdered)
*******
FILLING:
8 ounces dark chocolate, chopped coarsely
2 tablespoons butter
¾ cup (divided) heavy whipping cream
1 teaspoon espresso powder, or dark instant coffee powder
2 tablespoons whiskey
2 tablespoons Irish Cream Liqueur
1 cup powdered sugar
* To age egg whites, cover lightly with a towel and leave on the counter for 24 hours before using.
Instructions
Prepare heavy baking sheets by covering with parchment or using silpat sheets. (Before piping macarons on parchment, put a little batter under each corner to hold it down.) If you don't have 4 baking sheets, you can cool and slide sheets under each batch before putting in the oven.
Weigh or measure the almond flour and powdered sugar. Sift together twice, discarding any large bits that won't go through your sifter, and set aside.
In a large bowl, beat egg whites until foamy. Sprinkle a pinch of cream of tartar over the top and beat until soft peaks form.
While beating, slowly add the superfine sugar. Continue to beat until meringue forms stiff peaks.
Add food coloring and stir just until it is incorporated.
Add the dry ingredients and carefully fold in, just until it is thick but will pour slowly from your spoon or spatula. It won't look smooth - it has almonds in it - but shouldn't be "gloppy". Drop a spoonful on a plate and tap the plate against the counter. The batter should smooth out. If there is still a peak on the top, stir a few more times.
This is important: *The more you stir, the thinner it will get (not good), so don't over-stir!*
Spoon into a large pastry bag equipped with a large round tip.
Squeeze bag to pipe uniform "patties" (about 1½") on prepared pans, about an inch apart. Drop the pan several times onto the counter to flatten out any tip left from piping and remove air bubbles. Pop any air bubbles that come to the surface with a toothpick right away.
Let the pans of macarons sit and dry for about 30 minutes. Meanwhile, preheat the oven to 300 F.
Place one sheet of macarons in the oven at a time, on the middle rack. Bake for 13 minutes. Check to see if they are done by touching one gently on the side. If it moves at all, give the macarons another minute or two.
Slide parchment or silpat onto a cooling rack. Let them cool completely before removing.
Repeat with remaining baking sheets.
If your macarons aren't all uniform, match up pairs of equal sizes before piping on the filling.
FILLING:
In a large pan on low heat, combine chocolate, butter, ½ cup of the whipping cream, and coffee powder, Stir frequently until mixture is melted and smooth.
Remove from heat and add whiskey and liqueur. Stir until blended and let pan cool 15-20 minutes, or until cool to the touch. If you have a thermometer, wait until the mixture drops under 80 degrees. (You can put the pan in a bowl of cold tap water, stirring frequently, to hurry it up.)
With a hand mixer, beat until mixture lightens in color and begins to thicken.
Add powdered sugar and beat well.
Slowly trickle in the remaining ¼ cup cream, beating continuously until the filling is fluffy and mousse-like, When you scrape a rubber spatula down the middle of the pan, the filling should not fill the space back in. MIXTURE WILL BE SOFT, but firms up quickly as you work with it.
Using a pastry bag and large round tip, pipe onto one macaron shell. Gently cover with second shell. It's best to pipe filling close to the edge to avoid having to press down too hard. Don't be tempted to pipe them all at once, or the filling may be too firm to set the top macaron.
Refrigerate macarons for 24 hours before serving (or up to 3 days) to give the filling time to blend into the shells a bit.
Here’s the colored meringue. See the peak? It’s ready to go!
Fold in the dry ingredients carefully. Don’t stir! It’s hard to believe that this will turn into……
This! It needs to flow, but not be runny.
There are different methods of piping – from the top (my method), from the side, and from the top, pulling off to the side. Though I forgot to take a picture of myself piping this batch, here’s a photo showing the chocolate chip macarons being piped onto a silpat. I dropped the pan on the counter a few times and got rid of those pesky peaks.
Piping mint chocolate chip macarons
Drop the pan on the counter several times, then use a toothpick to pop any stubborn air bubbles.
Baked. Yeah, I got a little generous with the size on this batch. Smaller is better; they’re SWEET!
Slowly melt chocolate, cream, butter, and coffee powder
Beat in the powdered sugar – right there in the pan.
Trickle in remaining cream and beat until mousse-like
Filling will be soft, but shouldn’t flow back into a track made with a spatula.
.
…but wait, that’s not all!
BONUS! This recipe is part of a group post.
To welcome Spring, I joined three of my favorite blogger/bakers to bring you some new recipes to usher in the season. The photos and links to their creations are below. Hope you’ll take a moment to visit them and check out their posts! – Lorinda
Amy, of Crumbs in My Mustachio, has paired juicy strawberries with chocolate in this mouth-watering Chocolate Strawberry Tart
Lysska, of Cooking from a Stay at Home Mom, made a giant peanut butter cup, inspired by Reese’s Peanut Butter Eggs. (Be still, my heart.) Here’s her recipe for Easy Reeses Peanut Butter Cup Pie


 Okay, it’s not one of the healthiest meals around, but boy, is it rib-sticking. We love this easy hash, and tucking it in a flaky pie is a perfect way to use leftover corned beef. I wanted to make the pie for St. Patrick’s Day, not after, so I cooked up a corned beef just for this purpose. For a standard pie you’ll need about 3 cups of chopped corned beef.


 May I give you one more boozy recipe for St. Patrick’s Day? My next post will be family-friendly, but I’m still on a Jameson whiskey roll and had a lot of fun creating these crunchy mint cookies. They have a layer of dark chocolate on the bottom and each cookie sports a Jameson-spiked ganache rose on top.


 They’re as tasty as they are pretty; just the right amount of mint. And don’t forget, if you’d like to save a step, add some mini-chips to the batter and skip the chocolate bottoms. Or, hey, if you’re like me and there can never be enough chocolate, do both!
 Hearty and rustic, yet surprisingly light (thanks to the addition of a full bottle of Guinness Draught Stout), this bread will be the ideal accompaniment for your St. Patrick’s Day feast. Oats and whole wheat flour give the loaves a wonderful texture, molasses adds a slightly sweet back note, and the beer adds a rich, yeasty, complex flavor. I added chopped raisins to one loaf and loved the results, especially when the bread was toasted.


 I went all Irish on you with this bread. It has both Guinness Stout beer AND potato in the dough. You won’t even taste the beer, but what a pillowy-soft dough it helped create. I made a savory Celtic braid by adding some Parmesan and garlic to the dough, and turned another batch into a braided cinnamon and sugar ring.


 St. Patrick’s Day is one of my favorite baking holidays, and I happily challenge myself each year to come up with something different. When my children were young, their lunches consisted of green everything. Everything!
 Nothing says “Irish” like macarons, right?


 Cydnee, of Tampa Cake Girl, takes meringue to the limit with her luscious
