Skip the soda bread on St. Patrick’s Day and try your hand at this delightful Irish treat! If you aren’t a fan of fruitcake (which I totally understand) you could skip the candied fruit and just use the sultanas and raisins for a milder taste. If you don’t care for dried fruit (even soaked in Jameson’s), it’s back to soda bread for you!
Tea Brack, which uses baking powder to rise, is a simpler version of Barmbrack, a yeast-leavened loaf. Both are very popular in Ireland. Though little charms are often baked in, I hate the thought of putting inedible things in my bread, so I was a party pooper and didn’t toss in the coin, the ring, the little piece of material.
There are a lot of recipes out there for both breads, each claiming to be “traditional”. I gave up trying to sort through them and did my own thing—as usual. If you’d like to try the yeast version, check out my recipe for Irish Barmbrack
My recipe has Irish whiskey in it, and a crusty top made with Irish Cream and brown sugar. If you prefer to leave out the alcohol, just use tea instead. Note: I used Earl Grey, but any black tea would be fine.
In a medium pan, warm tea until steaming but not boiling. Remove from heat.
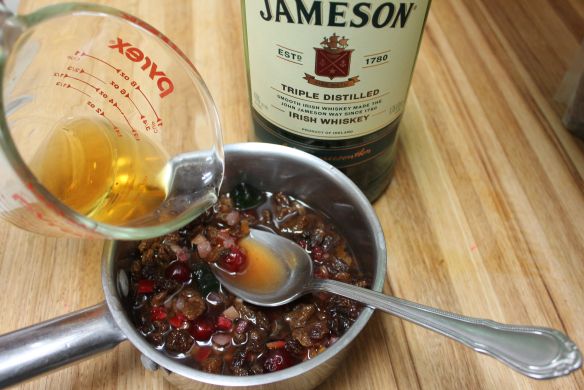
Add fruit, lemon zest, and whiskey. Cover and let sit for 2-3 hours.
Line the bottom of a generously greased loaf pan with parchment. Heat oven to 350 F.
Sift the flour, baking powder, brown sugar, and spices into a medium bowl.
Stir the egg and vanilla into the fruit mixture and pour into the bowl with the dry ingredients. Gently stir just until the flour is incorporated, and spoon into prepared pan. Bake for 55 minutes, or until a toothpick inserted into the middle of the loaf comes out clean. If you are not adding the topping, let the loaf cool on a rack for 10 minutes, then turn it out to cool completely.
TOPPING: If you are adding the topping, mix the brown sugar and Irish Cream together well, then brush over the top of the hot loaf. Return to the oven for 5-10 minutes. Let the loaf sit in the pan on a cooling rack for at least 15 minutes, until topping feels firm to the touch. Turn out onto the rack to cool.
Add whiskey to hot tea and fruit. Let it sit until those raisins are plump (2-3 hours).
Sift the dry ingredients into a medium bowl.
Stir egg and vanilla into cool fruit mixture.
Gently stir, just until the flour is incorporated. (a few white wisps are fine)
Spoon batter into prepared pan and bake.
Whisk together the Irish Cream and brown sugar until smooth.
Brush the top of baked bread with the Irish Cream mixture. (For moister bread, poke holes with a toothpick first.) Pop it back in the oven for 5-10 minutes, or until topping is firm.
Just a few minutes in the oven turns the topping light and crunchy.
Yes, yes…of course they’re French (or Italian, depending on who you believe). Whatever. They sure aren’t Irish, but the idea of green macarons with an Irish coffee filling was just irresistible, and perfect for St. Patrick’s Day.
Dark chocolate, cream, butter, Irish Whiskey, Irish Cream, and coffee combine to make a silky truffle-like filling. If you have any left over, you may want to try this; it was amazing!
Heat leftover filling gently and use as a sauce for ice cream
A month ago I’d never even eaten a macaron, so baking them has been a real challenge for me. After scouring the Internet, I was determined that Italian macarons were the way to go. A little more work, since you have to boil the syrup to a certain temperature before pouring over the stiff egg whites, but more predictable.
Huh.
Five batches and five different results later (and that almond flour isn’t cheap) I caved in and tried the French method…which is my favorite by far. I measured everything to the gram, and tried several recipes, tweaking measurements to find one that works well. I’m still searching for perfect, but…this is good.
I even tried adding some grated chocolate to the batter just before piping, which made a cool chocolate chip mint shell. They seemed a tiny bit flatter though, so I omitted that step in the next few batches. They’re great with a chocolate mint filling – maybe worth sacrificing loft?
I reduced the sugar a little in the recipe I’m posting, but they’re still sweet – very, very sweet., and any less sugar would compromise the structure of the meringue. The coffee filling helps balance the sweetness out, but if you don’t care for sugary desserts, macarons may not be for you.
As usual, I immerse myself in new projects, refusing to move along until I’m satisfied, so you’ll probably be seeing macarons in many different forms for a while. I’m sure we’ll all survive this current obsession – and that 3 pound bag of almond flour can’t last forever!
I painted a few macarons, using gel color or petal dust thinned with vodka. I used a gold petal dust too, just for fun. I’m no artist, and I’m sure you can do better than I, so please shoot me a picture if you attempt this!
I resisted one step in making macarons, simply because many bakers said it wasn’t necessary, and I wanted to take the path of least resistance. But…after many, many attempts, I have to admit that it’s better if you age your egg whites. I don’t do it for days, because the thought of leaving egg out at room temperature gives me the willies, but even 18-24 hours seems to help stabilize the mixture. This is just my opinion; you might not notice a difference.
Tips:
Start with squeaky clean utensils. Egg whites do not like grease!
If you don’t want to age your egg whites, at least make sure they’re at room temperature.
For best results, weigh your ingredients, but if you don’t have a scale, my measurements work pretty well.
The almond flour really makes a difference. Make sure it says “flour”, and look for blanched almond flour; it makes a prettier macaron. I used Bob’s Red Mill until I found the 3 pound bag of Honeyville brand at Costco. It’s a super fine grind at a great price. (And no, I don’t get kickbacks from any companies!)
To avoid having your batter drip out of the tip as you fill your pastry bag, place the tip in the bag firmly and give the bag a little twist right above the tip – then tuck the twist right into the tip. Once the bag is filled, just pull the tip down before piping. I use a pitcher to hold my pastry bag while I’m filling it.
Silpat – especially the kind for macarons, with circles – works great for macarons, I think the bottoms are prettier and they release better, but parchment is preferred by some bakers, so it’s your choice.
Circles are your friend. If you’re not using macaron silpats, draw 2-inch circles on parchment (flip it over before using, of course) or make one good, dark, cardboard template that you can see through the parchment and just slide it out from under each sheet to use on the next. Pipe in the center of each circle to about 1/4″ from the edge. When you tap the pan the macarons will spread out a bit to fill the circle.
I don’t pipe all the way to the circle edge. If you want to do that, you may want to make your circles 1-1/2″ instead of 2″
Unless you happen to have 4 sturdy baking sheets, pipe directly on a piece of parchment on the counter (put a little batter under each corner or weigh each corner down to hold it steady) and slide a cooled cookie sheet underneath when it’s time for that batch to go in the oven.
To avoid pointy tops, test a spoonful of batter on a plate to make sure it’s thin enough. If you tap the plate on the counter a few times and the batter doesn’t smooth out, give it a few more stirs.
Don’t be shy about dropping each pan of piped macarons on the counter. Do it several times. Air in the batter = hollow shells, and you don’t want that!
210 grams (2½ cups) almond flour (use the lightest, finest flour you can find)
380 grams (3½ cups) powdered sugar
200 grams (6 whites) egg whites, room temperature or - better yet - aged *
pinch of cream of tartar
90 grams (1/2 cup) superfine sugar
green food coloring (gel or powdered)
*******
FILLING:
8 ounces dark chocolate, chopped coarsely
2 tablespoons butter
¾ cup (divided) heavy whipping cream
1 teaspoon espresso powder, or dark instant coffee powder
2 tablespoons whiskey
2 tablespoons Irish Cream Liqueur
1 cup powdered sugar
* To age egg whites, cover lightly with a towel and leave on the counter for 24 hours before using.
Instructions
Prepare heavy baking sheets by covering with parchment or using silpat sheets. (Before piping macarons on parchment, put a little batter under each corner to hold it down.) If you don't have 4 baking sheets, you can cool and slide sheets under each batch before putting in the oven.
Weigh or measure the almond flour and powdered sugar. Sift together twice, discarding any large bits that won't go through your sifter, and set aside.
In a large bowl, beat egg whites until foamy. Sprinkle a pinch of cream of tartar over the top and beat until soft peaks form.
While beating, slowly add the superfine sugar. Continue to beat until meringue forms stiff peaks.
Add food coloring and stir just until it is incorporated.
Add the dry ingredients and carefully fold in, just until it is thick but will pour slowly from your spoon or spatula. It won't look smooth - it has almonds in it - but shouldn't be "gloppy". Drop a spoonful on a plate and tap the plate against the counter. The batter should smooth out. If there is still a peak on the top, stir a few more times.
This is important: *The more you stir, the thinner it will get (not good), so don't over-stir!*
Spoon into a large pastry bag equipped with a large round tip.
Squeeze bag to pipe uniform "patties" (about 1½") on prepared pans, about an inch apart. Drop the pan several times onto the counter to flatten out any tip left from piping and remove air bubbles. Pop any air bubbles that come to the surface with a toothpick right away.
Let the pans of macarons sit and dry for about 30 minutes. Meanwhile, preheat the oven to 300 F.
Place one sheet of macarons in the oven at a time, on the middle rack. Bake for 13 minutes. Check to see if they are done by touching one gently on the side. If it moves at all, give the macarons another minute or two.
Slide parchment or silpat onto a cooling rack. Let them cool completely before removing.
Repeat with remaining baking sheets.
If your macarons aren't all uniform, match up pairs of equal sizes before piping on the filling.
FILLING:
In a large pan on low heat, combine chocolate, butter, ½ cup of the whipping cream, and coffee powder, Stir frequently until mixture is melted and smooth.
Remove from heat and add whiskey and liqueur. Stir until blended and let pan cool 15-20 minutes, or until cool to the touch. If you have a thermometer, wait until the mixture drops under 80 degrees. (You can put the pan in a bowl of cold tap water, stirring frequently, to hurry it up.)
With a hand mixer, beat until mixture lightens in color and begins to thicken.
Add powdered sugar and beat well.
Slowly trickle in the remaining ¼ cup cream, beating continuously until the filling is fluffy and mousse-like, When you scrape a rubber spatula down the middle of the pan, the filling should not fill the space back in. MIXTURE WILL BE SOFT, but firms up quickly as you work with it.
Using a pastry bag and large round tip, pipe onto one macaron shell. Gently cover with second shell. It's best to pipe filling close to the edge to avoid having to press down too hard. Don't be tempted to pipe them all at once, or the filling may be too firm to set the top macaron.
Refrigerate macarons for 24 hours before serving (or up to 3 days) to give the filling time to blend into the shells a bit.
Here’s the colored meringue. See the peak? It’s ready to go!
Fold in the dry ingredients carefully. Don’t stir! It’s hard to believe that this will turn into……
This! It needs to flow, but not be runny.
There are different methods of piping – from the top (my method), from the side, and from the top, pulling off to the side. Though I forgot to take a picture of myself piping this batch, here’s a photo showing the chocolate chip macarons being piped onto a silpat. I dropped the pan on the counter a few times and got rid of those pesky peaks.
Piping mint chocolate chip macarons
Drop the pan on the counter several times, then use a toothpick to pop any stubborn air bubbles.
Baked. Yeah, I got a little generous with the size on this batch. Smaller is better; they’re SWEET!
Slowly melt chocolate, cream, butter, and coffee powder
Beat in the powdered sugar – right there in the pan.
Trickle in remaining cream and beat until mousse-like
Filling will be soft, but shouldn’t flow back into a track made with a spatula.
.
…but wait, that’s not all!
BONUS! This recipe is part of a group post.
To welcome Spring, I joined three of my favorite blogger/bakers to bring you some new recipes to usher in the season. The photos and links to their creations are below. Hope you’ll take a moment to visit them and check out their posts! – Lorinda
Amy, of Crumbs in My Mustachio, has paired juicy strawberries with chocolate in this mouth-watering Chocolate Strawberry Tart
Lysska, of Cooking from a Stay at Home Mom, made a giant peanut butter cup, inspired by Reese’s Peanut Butter Eggs. (Be still, my heart.) Here’s her recipe for Easy Reeses Peanut Butter Cup Pie
Do you remember my Brownie Bombe from last December? I thought I’d try a mint version for St. Patrick’s Day, and it turned out yuuuuuuuuumy!
An ice cream bombe is always an impressive dessert, and yet it’s really very simple to make. The trick is to start early – at least a day before you plan to serve it. The bombe must be frozen between layers, then frozen overnight for best results. To make it even simpler you could use boxed brownie mix, jarred hot fudge sauce, and a large tub of non-dairy topping, but making these things from scratch is really easy, I promise.
This mint bombe was made with two ice creams: Mint Brownie and Vanilla. I only used two ice creams this time because I added a core of mint fudge. Feel free to use any ice cream flavor you like; you can’t go wrong with this dessert!
A core of mint fudge sauce, surrounded by ice cream, surrounded by brownies, surrounded by whipping cream. Mmmm.
Ingredients
One batch of brownies (recipe below)
Two cartons (1.5 quarts each) ice cream
Mint Fudge Sauce (recipe below)
1 cup heavy whipping cream
1 tablespoon powdered sugar
2-3 teaspoons creme de menthe (or 2 drops of green food coloring)
Instructions
Prepare a 2-quart bowl by lining with foil. Lightly oil the foil.
Press pieces of brownie against the foil, making a thin brownie shell. Make sure all of the foil is covered, but leave approximately ½ –inch of foil showing at the top of the bowl. Reserve the remaining brownies; these will be used at the end.
Remove your first flavor of ice cream from the freezer to let it soften for 10-15 minutes. Put the brownie-lined bowl in the freezer while the ice cream is softening.
With a spoon or rubber spatula, press a layer of ice cream over the brownie layer. You will use the entire carton of ice cream. Bring it all the way to the top of the brownie, keeping the layer as uniformly thick as possible.
Return to the freezer for at least 2 hours, or until firm.
Remove the second container of ice cream from the freezer and let it soften for 10-15 minutes.
Fill the center with softened ice cream, almost to the top. With a wooden spoon handle, make a hole in the center for the fudge sauce. This should make the layers of ice cream the same height. If not, add a little more of the second flavor to make the top even.
Fill the hole with mint fudge sauce.
Return to the freezer for at least 2 hours, or until firm.
Remove from freezer and crumble the remaining brownies over the top, pressing firmly.
Cover the bombe with foil or plastic wrap and freeze overnight.
Lift the bombe out of the bowl using the foil. Turn flat side down on serving platter and remove the foil.
Whip the cream until soft peaks form. Add the powdered sugar and whip until stiff peaks form. Add in the crème de menthe or food coloring if you are using it, and “frost” the bombe.
Decorate with sprinkles or candy shamrocks. For best results, freeze again until the whipping cream is firm (but it can be cut right away if you’re ready to serve.)
Brownies:
1 cup powdered cocoa
3 cups sugar
1 3/4 cups flour
1/2 teaspoon salt
2 teaspoons baking powder
4 eggs
1/2 cup melted butter
1/2 cup oil
1 tablespoon vanilla
1. Heat oven to 350 F.
2. Grease and flour a 10×10” (or 8×12 or 9×12) pan.
3. In a large bowl, combine the cocoa, sugar, flour, salt, and baking powder.
4. In a small bowl, beat the eggs lightly. Add the melted butter, oil, and vanilla.
5. Pour the wet ingredients into the dry ingredients and stir just until combined.
6. Spoon into prepared pan and level with a spatula.
7. Bake for approximately 35 minutes. Don’t overbake.
Mint Fudge Sauce:
1/2 cup sugar
1/2 cup cocoa
4 tablespoons butter
1/2 cup mint chocolate chips (or use semi-sweet chocolate and add a few drops of peppermint extract)
1/2 cup cream
Combine all ingredients in a small pan over medium-low heat. Cook, stirring frequently until chips are melted and the sauce is completely smooth. Pour into a small bowl to cool and thicken.
Press brownies into the foil-lined bowl.
Add a layer of mint ice cream. Freeze until firm.
Add vanilla ice cream, make a hole, and pour in mint fudge sauce!
Add a brownie top (which will actually be the bottom…)
“Frost” it with whipped cream.
Freeze, slice, and serve!
St. Patrick’s Day is Monday, so start one of these this weekend! Seriously, if the bombe in-progress sits in the freezer for 4 or 5 hours between steps, that’s perfectly fine. Work it around your schedule! Even if you don’t serve it for a few days, as long as it’s covered up in the freezer, it will come out perfect.
A sweet little Irish wish for you:
Sláinte chuig na fir, agus go mairfidh na mná go deo! (Health to the men and may the women live forever)
Okay, maybe a little nicer: May your home always be too small to hold all of your friends.
By now you may have realized that my cohorts (my mental health support group…my partners in crime) and I are on a roll! We had so much fun with our December group post featuring cakes that we decided to create a new series of recipes each month. We brought you dips in January. February was “Love and Food”. Now we are “Celebrating Green and Welcoming Spring” with recipes that include a naturally green ingredient. This was a little challenging for me since I love to make EVERYTHING green on St. Patrick’s Day, using copious quantities of green food coloring…which was not an option.
Zucchini was my “green” of choice, and I added a little spirulina (you can buy a small amount of it in bulk at most natural food stores) to deepen the color of a chocolate swirl zucchini bread. I originally used Irish Cream in the recipe, but even with the spirulina it just wasn’t green enough, and though it was tasty, I really wanted a little more flavor. Chocolate mint is a combination I love, so I swapped out Creme de Menthe for the Irish Cream and was very, very satisfied. Not a natural green source, of course, but I figure the zucchini and spirulina bought me a little leeway.
Either way is good, so I’m leaving the choice up to you. Or, if you really don’t want to use booze, you can always substitute milk and add teaspoon of peppermint extract for flavor.
½ cup buttermilk (or regular milk and a teaspoon of lemon juice)
¼ cup strong coffee, cooled
2 ounces unsweetened chocolate, melted
⅓ cup creme de menthe
¼ teaspoon spirulina (optional)
Instructions
Heat oven to 350 F.
Prepare two loaf pans by greasing and flouring, or using an oil/flour spray (like Baker's Joy)
In a large bowl, combine the flour, sugar, baking powder, baking soda, salt, and walnuts. Add the grated zucchini and toss to coat.
In medium bowl, whisk the eggs well. Add the oil and buttermilk and whisk until combined.
Add the liquid ingredients to the dry ingredients (don't put the medium bowl in the sink - you'll use it in a minute) and stir just until most of the flour is incorporated. Put half of the mixture back in the medium bowl.
To one bowl add the coffee and melted chocolate, and stir until it is combined. Don't overstir!
To the other bowl add the creme de menthe and spirulina. Stir until just combined.
Divide the chocolate mixture evenly between the two loaf pans. Pour the green mixture over the chocolate mixture and swirl a little with a rubber spatula or table knife.
Bake for approximately 1 hour and 10 minutes, or until a toothpick comes out clean when inserted in the middle. Cooking time will depend on the size of your loaf pans. When I used slightly smaller pans the bread took a few more minutes to bake.
Remove pans to a rack and allow them to cool for 10 minutes before turning the bread out. Allow bread to cool completely before cutting.
Here are links to the other recipes this month. Please visit the ones that have already been posted – there are some impressive ideas from some very talented gals – and then check back because I’ll add the new recipe links as they’re presented.


 Nothing says “Irish” like macarons, right?


 Cydnee, of Tampa Cake Girl, takes meringue to the limit with her luscious


