Pumpkin Sourdough Bread

pumpkin-sourdough-bread-the-rowdy-baker
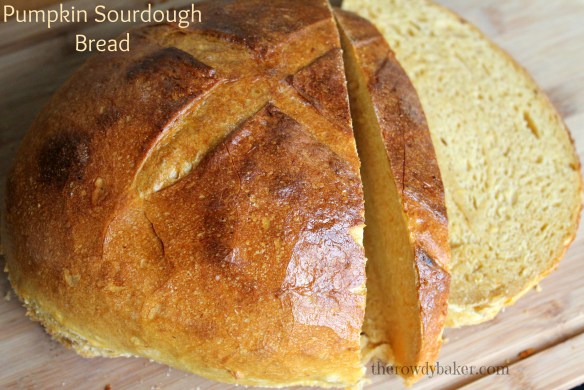
Tangy sourdough combines with rich pumpkin puree to flavor this bread to perfection. The fragrant loaves are a reminder that there’s a chill in the air and comfort food is beckoning…a harbinger of the coming holidays.

A turkey and cranberry sauce sandwich on sourdough pumpkin bread? French toast with pure maple syrup? Crackly, chewy rolls with soft interiors? Yes, PLEASE!

Sourdough starter is always hanging out in my refrigerator…unless I’ve killed it. Sourdough and houseplants are at risk in my household. I either smother them with attention or forget about them until it’s too late to rectify the situation.

Which is why I keep dried sourdough in my freezer; it’s a backup plan that has come in very handy.

If you don’t have sourdough starter, there are several options:

    • Start your own. I had a tough time with this in the past, but the method I used this time was easier than I expected. Maybe I just got lucky and caught the right yeast, but it was pretty painless.
    • Beg some off of a friend. I’ve done this too, but if I kill the starter I feel really guilty (sorry, Laurie!) so I tend to muddle through by myself.
    • Send away for some that is a strain from the 1800s…absolutely free. You just need to send a self-addressed stamped envelope (and I encourage a small donation). I love the idea of having starter with a pedigree! Go here for more information: Carl’s Friends.

At least once a week I remove some of my starter (replacing it with flour and water, of course) and mix up a “sponge” – a batter that sits all night and is ready for action the next morning. I use 1/4 teaspoon of instant yeast in the sponge, but if you’re a purist you can skip the yeast entirely. Just be aware that you will be at the whim of your dough; it will rise when it damn well pleases! I get a little insurance by using that tiny bit of added yeast.

Since you won’t know exactly how long your bread will take to rise, I strongly recommend starting your sponge the night before and mixing your dough the next day.

Sourdough sponge - it's ALIVE!

Sourdough sponge – it’s ALIVE!

It’s usually just a matter of adding some water, salt, and flour to get a lovely, crusty loaf of dough – but for this recipe I also added 15-ounces of canned pumpkin puree. (Be careful, don’t use the kind that’s premixed for pies. Grab the solid-pack pumpkin.) I also added a little less water and a little more flour to offset the moisture in the pumpkin.

Note: For a milder flavor, decrease the pumpkin to 1 cup and increase the warm water to 1 cup in the bread recipe.

Pumpkin Sourdough Bread
Print
Author:
Makes two loaves
Ingredients
  • SPONGE:
  • 1 cup sourdough starter
  • 2½ cups unbleached flour
  • 1½ cups water, room temperature
  • ¼ teaspoon instant yeast (optional)
  • ****
  • BREAD
  • The bubbly sponge
  • 15 ounces canned pumpkin
  • ¾ cup warm water
  • 1½ tablespoons salt
  • 6 - 6½ cups bread flour
Instructions
  1. Night before: Create the sponge by combining all of the sponge ingredients and beating well with a wooden spoon. Cover and allow the sponge to sit at room temperature overnight.
  2. Bread: in a large bowl (a stand mixer and dough hook is recommended) combine the bubbly sponge, pumpkin, water, salt, and 6 cups of bread flour. Knead by machine for 5 minutes, or by hand on floured surface for 7-8 minutes. Dough should come cleanly away from the sides of the bowl and be just slightly tacky. If dough is too soft, add additional flour a little at a time.
  3. Cover bowl and allow dough to rise until doubled. If you used a little yeast in the sponge, this will take between 1 - 2 hours. If you skipped the yeast, it could take much longer. Be patient and let the bread do its thing. The longer it takes to rise, the more flavorful the bread will be.
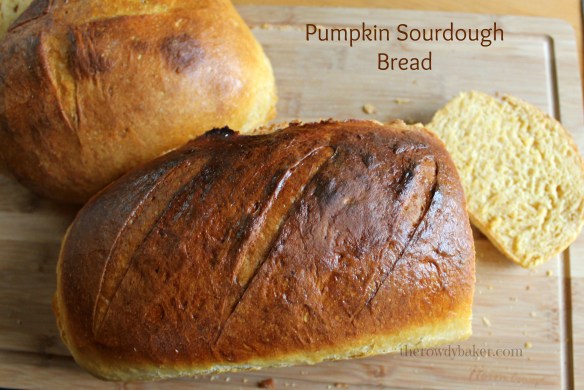
  4. When dough has doubled, punch it down on a lightly floured surface and shape it into loaves. Place in lightly greased loaf pans or form into balls and place on baking sheets with a little cornmeal sprinkled on them. Cover with a towel and allow dough to rise until doubled. With a sharp knife or razor, cut several shallow diagonal slashes in the loaves (or an "X" on round loaves).
  5. Heat oven to 425 F. For the crispiest crust, place a pan of water on the bottom of the rack while the oven is heating. Be very careful when you open the door - there will be lots of steam. Alternatively, you can use a spray bottle to spray the loaves and the inside of the oven when you put the pans in to bake.
  6. Bake for approximately 25 minutes, or until loaves are rich golden brown. For a shiny crust, brush hot loaves with butter. Cool on racks.


Ready to punch down and shape into loaves

Ready to punch down and shape into loaves

Make those loaves whatever shape you want!

Make those loaves whatever shape you want! Let ’em rise, and bake. For crispy, crackly crusts, use steam!

pumpkin-sourdough-bread-from-the-rowdy-baker

I’m a sourdough fiend. Can’t resist a piece (or two) of toasted sourdough with a little peanut butter.toast-with-pb

Once you have an active starter, making sourdough bread is a cinch! My goal is to make as little mess as possible, so I mix my sponge right in the mixer bowl, then just dump the remaining ingredients in the next day. I don’t turn it out into a greased bowl to rise – just cover the mixing bowl. It seriously takes 15 minutes of effort to make a couple of loaves. You just have to time it for when you’ll be hanging around the house.

My guess is, with the scent of sourdough wafting through the air, everyone will be hanging around the house. Get the butter ready!

Lorinda


Spicy Spider Bites

spicy-spider-bites-from-the-rowdy-bakerThese spicy molasses cookies are slightly crisp on the outside and soft on the inside, just like a spider! Bwa ha ha.  I try to put aside my hatred of spiders when I decorate and eat these delightful, flavorful cookies, because at Halloween it’s kind of fun to enjoy the food, yet be grossed out at the presentation—sort of a “love to hate it” situation.

The dough is very soft and must be chilled before rolling and baking, so planning ahead is a good idea. If you wrap it well, you can actually make this dough several days ahead…if you’re the efficient, organized type. (I salute you!)

I made several batches of these a few years ago for a holiday bazaar, and they sold like crazy. It’s a horrible picture, but you can see how huge they were.spider-cookiesBut…not everyone wants a whole handful of cookie, so I improvised and made these cute little two-inch bites for this post.spicy-spider-bites-from-the-rowdy-baker

The dough is very quick to make; just leave yourself plenty of time to chill it properly. It also helps to roll it out between two sheets of lightly floured parchment. And even though I really don’t like using shortening, it’s important in this recipe. All butter will make the cookies spread more, and you don’t want that!

Spicy Spider Bites
Print
Author:
Makes about 8 dozen small (2-inch) cookies. You can make them larger or just lightly frost the rest when you get tired of making spiders!
Ingredients
  • ½ cup butter, slightly softened
  • ½ cup shortening
  • 1 cup brown sugar
  • ½ cup white sugar
  • 2 eggs
  • 5½ cups all purpose flour
  • 2 tablespoons ground cinnamon
  • 1 teaspoon ground cloves
  • 1½ teaspoons ground ginger
  • ½ teaspoon salt
  • 1 teaspoon baking powder
  • 1 cup molasses
  • ½ cup sour cream
  • 1 teaspoon baking soda
  • *****
  • Royal Icing - use your favorite recipe OR try mine:
  • 2 cups powdered sugar
  • 2 tablespoons meringue powder (I use Wiltons brand, available in the cake decorating section)
  • ¼ cup water
  • ******
  • Dark icing, melted chocolate, dark brown coated candy...whatever you want to use for the spider.
Instructions
  1. In a large bowl (a stand mixer is helpful) beat together the butter, shortening, brown sugar, and white sugar until well combined.
  2. Add eggs and beat until incorporated.
  3. In a medium bowl, combine flour, cinnamon, cloves, ginger, salt, and baking powder.
  4. In a small bowl combine the molasses and sour cream. Whisk in the baking soda. It will foam up and lighten in color.
  5. At low speed, add ⅓ of the flour mixture to the butter mixture. When most of the flour is mixed in, add ⅓ of the molasses mixture. Repeat twice, scraping the sides of the bowl often. Do not overbeat!
  6. Chill dough for at least 2 hours. Overnight is better.
  7. Heat oven to 375.
  8. Roll out ¼ of the dough at a time, leaving the rest in the refrigerator. Dough should be about ¼-inch thick. Cut into circles and place on parchment covered baking sheet, 1 inch apart.
  9. Bake small circles for 8-9 minutes, larger circles for 9-10 minutes. Touch the top of one cookie gently. If your finger leaves a mark, give them another minute. For crispy cookies, add an extra minute or two.
  10. Cool on a rack.
  11. To make royal icing: Combine powdered sugar, meringue powder, and water. Beat with an electric mixer for 2-3 minutes, until thick and fluffy.
  12. Using a pastry bag and small tip (or a heavy zipper bag with the tip cut off) pipe spider webbing onto cool cookies: make a straight line from top to bottom, then side to side. Then two more lines diagonally, like cutting a pie into 8 pieces. Pipe near the outer edge of the cookie, swooping from one line to the next. Do it again closer to the center. That's it!
  13. Hint: You can also coat the entire cookie in a thin layer of icing, let it dry, and then draw the web on with a food color pen like Wilton's FoodWriter.
  14. You can make the spider out of dark chocolate frosting (this is one of those times I'd encourage buying a can of frosting for simplicity), ganache, or by piping melted chocolate for the legs and head, and using a dark brown M&M for the body.

Beat butter and sugar, then add eggs. Mixture should be light and fluffy.

Beat butter and sugar, then add eggs. Mixture should be light and fluffy.

In separate bowl, combine dry ingredients

In separate bowl, combine dry ingredients

In a small bowl, whisk baking soda into molasses and sour cream.

In a small bowl, whisk baking soda into molasses and sour cream. It foams!

Alternate molasses and dry ingredients. Dry first, then wet. Repeat twice.

Alternate molasses and dry ingredients. Dry first, then wet. Repeat twice.

Cover dough and chill thoroughly.

Cover dough and chill thoroughly.

Cut circles and bake on parchment. Size is up to you!

Cut circles and bake on parchment. Size is up to you!

There are two decorating options I like:

draw-web-on-white-icing-with-food-color-pen

Wait for the icing to dry (see the center? I didn’t wait long enough) and draw the web onto cookie with a food marker. OR pipe it with black icing or melted chocolate.

or pipe royal icing webs on plain cookies.

or pipe royal icing webs on plain cookies. I think the spiders show up a little better this way.

To make the spiders, simply pipe on legs and a small head, using black icing or melted chocolate (I stir a tiny bit of corn syrup into the warm chocolate, just until it thickens a little) and top it with a dark brown M&M. You can find lots of different spider shapes on Google.

I had intended to go all out with these—make brown recluse and black widow spiders—but it creeped me out so badly I just couldn’t do it. If you are tougher than I am, go for it. Making these cookies was bad enough for this arachnophobe!spicy-spider-bite

This recipe makes a whopping 8 dozen small (2-inch) cookies. If you get tired of drawing webs and making spiders, you can always make them larger OR just lightly ice some of them with the crispy royal icing.

Happy Halloween!

Lorinda

Crispy Cornucopia Cookies

crispy-cornucopia-cookiesThese crisp vanilla cornucopias are filled with dark chocolate and sweet little fruits and vegetables—as delightful to look at as they are to eat!

If you don’t have cream horn molds, you’ll want to pick some up at your local kitchen store, or buy a dozen online for less than $10.00. You won’t be sorry!

You can fill these babies however you please. Marzipan fruits, little chocolate leaves…go where your imagination takes you! For those of you who are sissies reluctant to create your own little decorations, I’ll give you options ranging from “easy-peasy” to “seriously???” so you can pick your method. You know which one I prefer, of course…but then, I can’t resist playing with my food.

This is a basic sugar cookie recipe with just a little brown sugar to add color, and an extra egg white to add to the crisp factor. Think of the cornucopia as “sugar cone meets fortune cookie” and you will know what to expect. The chocolate coating just puts this cookie over the top!

Honestly? I loved the crunchy cookie and chocolate without any decorations at all. You’ll have a few that don’t come out pretty, so I’m sure you’ll be able to munch on one or two. Or three.

I’ll give you the cookie recipe and instructions first, then tell you how I made the decorations.

Crispy Cornucopia Cookies
Print
Author:
Makes 3½ - 4 dozen cookies. Dough must be chilled for at least 2 hours before rolling.
Ingredients
  • ½ cup brown sugar
  • ½ cup white sugar
  • ½ cup butter (softened)
  • 1 egg plus 1 egg white
  • 1 teaspoon vanilla
  • 2 tablespoons milk
  • 2⅔ cups all purpose flour
  • 1 teaspoon baking powder
  • ¼ teaspoon salt
  • 8 ounces dark chocolate, chopped
  • Decorations, if desired: fruit shaped candy or fruit snacks, chocolate leaves, M&Ms, marzipan fruit, fruit and leaves made from candy clay, leaves made from fruit roll-ups or rolled candy corn.
Instructions
  1. In a large bowl (a stand mixer is very helpful - this is a stiff dough!) combine brown sugar, white sugar, and butter. Beat well until creamy.
  2. Add egg and egg white, vanilla, and milk. Beat well.
  3. Gradually add flour, baking powder, and salt. Mixture will look dry and crumbly, but will eventually come together into a stiff dough. If it doesn't, add a little milk or water, 1 teaspoon at a time.
  4. Cover dough and chill for at least 2 hours - overnight is fine.
  5. Create a template by cutting a piece of cardstock (or the middle of a paper plate) to fit exactly around a cream corn mold, leaving at least 1 inch of the large end of the mold uncovered. This helps to remove the mold after baking and keeps the cookies from being too large. My template was approximately 3-1/2" by 3-1/2".
  6. VERY lightly coat the molds with butter. You shouldn't be able to see the butter!
  7. Heat oven to 350F. Cover baking sheets with parchment.
  8. Remove about ¼ of the dough from the refrigerator at a time. Roll out on generously floured surface to approximately ⅛-inch thickness.
  9. Using template, cut out shapes. With fork tines, press vertical and then horizontal lines to resemble basket weave.
  10. Lift each piece of dough with a flat spatula and lay over the mold with the mold seam to the back. There should be a small gap at the seam. Gently ease the dough together over the seam. Don't overlap, and make sure the dough is snug on the mold to avoid sagging as the cornucopias bake.
  11. Bake for 11-12 minutes, until golden brown. Remove pan from oven and move to cooling rack until cookies are cool enough to handle. Holding a cookie in one hand, gently squeeze the metal mold to loosen, and firmly pull cookie off of mold. Allow all cookies to cool before proceeding with chocolate.
  12. Repeat with remaining dough. When finished, melt the chocolate: in the microwave, at 15-second increments, stirring each time, or in a small pan on the stove using the lowest heat, stirring often. With either method, heat JUST until most of the chunks are melted. Remove from heat and stir until completely smooth.
  13. Lightly coat the inside of each cone with chocolate. I found it easiest to do by dipping a (clean!) finger in the warm chocolate, but you can use a paintbrush or pastry bag. Keep the coating fairly light so it doesn't seep through the cookie shell. Dip the opening in chocolate and place on waxed paper.
  14. Chocolate will remain soft for quite a while, so this is a good time to add any decorations you are using.

Make a template. Use card stock or the center of a paper plate. Leave an inch uncovered at the big end, and a small gap at the seam.

Make a template. Use card stock or the center of a paper plate. Leave an inch uncovered at the big end, and a small gap at the seam.

roll-out-on-generously-floured-surface

Roll out small portion of chilled dough on generously floured surface.

Cut out shape by cutting around template with sharp knife. Press fork tines in one direction...

Cut out shape by cutting around template with sharp knife. Press fork tines in one direction…

and then the other direction, creating a basket weave design.

and then the other direction, creating a basket weave design.

Lay dough over mold, leaving gap on the underside by the metal seam.

Lay dough over mold, leaving gap on the underside by the metal seam.

Then, gently ease it together. Dough should fit snugly on the mold. If it's loose, it will sag as it bakes.

Then, gently ease it together. Dough should fit snugly on the mold. If it’s loose, it will sag as it bakes.

Ready for the oven!

Ready for the oven! I like to stretch and curl the tips a bit.

Lightly coat the inside of the cones with melted chocolate, then dip the outer opening.

Lightly coat the inside of the cones with melted chocolate, then dip the outer opening. If your decorations are ready, place them while the chocolate is still soft, so they’ll stick well.

Note here: I’ll admit, after using a teaspoon to pour chocolate in each cone and trying to swirl it around, I found that the easiest way was to just use my finger. Dip it in the chocolate and then swirl it in the cone. Hey…that finger was CLEAN! You can use a glove if you’d like, or maybe try a paintbrush or even a pastry bag.

TO MAKE THE FALL DECORATIONS:

sugar-cookie-cornucopias

This was before I decided to dip the opening in the chocolate too. Either way works!

I really like the flavor of candy clay (or molding chocolate) for the little fruits and vegetables. It doesn’t clash with the flavor of the cookie the way taffy, fruit leather, or hard candy does.But if time is of the essence, take the easy route and use store bought goodies; they’ll look cute either way.

Here is a link with instructions for making it out of candy melts: Wiltons Candy Clay.  I made a batch of clay using white candy melts, immediately split it up into small bowls and added food coloring before putting the pieces in sandwich bags to set until firm.

The corn in the picture above was made with yellow candy clay, wrapped with very thin green clay. The pumpkin was made with orange clay. The stem was a little piece of brown candy corn. Cocoa nibs look great too, if you have them. Bananas, grapes, oranges, apples…all from clay, molded individually. The grapes were kind of fun. Park yourself in front of the TV with purple candy clay, and start rolling tiny balls. Lots and lots of tiny purple (or green!) balls. Clump a group of them together, pressing just until they hold together.grapes

Some other options come already shaped, like hard candy fruits (Runts), fruit shaped fruit-snacks, marzipan, or fondant. You can also shape your own without the fuss of making the candy clay by using sturdy taffy (like Starburst) which molds very well. Red sixlets with little leaves on top would be perfect for apples.

Here are visuals of the various options.l-to-r-is-hardest-to-easiest


A comparison of different mediums - fruit rolls, candy corn (Harvest mix) and candy clay.

A comparison of different mediums – fruit rolls, candy corn (Harvest mix) and candy clay.

When making leaves, use:

  • fruit rolls for vibrant color and simplicity
  • thinly rolled candy corn for rich fall color. Relatively easy.
  • Candy clay. You create the colors – these are more subdued, but thin and realistic. And definitely more effort because you have to mix the clay ahead of time.

You could also use marzipan or fondant, or you could pipe leaves using melted chocolate or candy melts. I don’t recommend gum paste – you want these to be tasty!

Small leaf cutters are wonderful. I used one that came in a kit for gum paste. I used a small x-acto blade to cut out maple and oak leaves. You’ll notice there are a lot less of those! I didn’t think about this option until after I was finished and ready to post the recipe, but if you have small chocolate molds, you could MOLD the leaves instead of cutting them. They won’t be as thin, but the shape would be right and it would be very easy.

A WORD OF ADVICE:

Since this was fussy work, and pretty time-consuming, I’d recommend spreading your efforts over a couple of days so you don’t burn out. Make the little fruits, vegetables, and leaves one day (store them covered, at room temperature) and the cookies the next day. Maybe you can find some little helpers to help fashion some of the decorations.crispy-cornucopia-cookies-the-rowdy-baker

I’d love to see what you come up with. If you make these, post a picture on my Facebook page so I can enjoy your creativity!

Happy fall,

Lorinda