Irish Coffee Macarons

Irish Coffee Macarons from The Rowdy BakerNothing says “Irish” like macarons, right?

Yes, yes…of course they’re French (or Italian, depending on who you believe). Whatever. They sure aren’t Irish, but the idea of green macarons with an Irish coffee filling was just irresistible, and perfect for St. Patrick’s Day.

Dark chocolate, cream, butter, Irish Whiskey, Irish Cream, and coffee combine to make a silky truffle-like filling. If you have any left over, you may want to try this; it was amazing!

ganache on ice cream

Heat leftover filling gently and use as a sauce for ice cream


A month ago I’d never even eaten a macaron, so baking them has been a real challenge for me. After scouring the Internet, I was determined that Italian macarons were the way to go. A little more work, since you have to boil the syrup to a certain temperature before pouring over the stiff egg whites, but more predictable.

Huh.

Five batches and five different results later (and that almond flour isn’t cheap) I caved in and tried the French method…which is my favorite by far. I measured everything to the gram, and tried several recipes, tweaking measurements to find one that works well. I’m still searching for perfect, but…this is good.

I even tried adding some grated chocolate to the batter just before piping, which made a cool chocolate chip mint shell. They seemed a tiny bit flatter though, so I omitted that step in the next few batches. They’re great with a chocolate mint filling – maybe worth sacrificing loft?choc chip mint macarons

I reduced the sugar a little in the recipe I’m posting, but they’re still sweet – very, very sweet., and any less sugar would compromise the structure of the meringue. The coffee filling helps balance the sweetness out, but if you don’t care for sugary desserts, macarons may not be for you.

As usual, I immerse myself in new projects, refusing to move along until I’m satisfied, so you’ll probably be seeing macarons in many different forms for a while. I’m sure we’ll all survive this current obsession – and that 3 pound bag of almond flour can’t last forever!

I painted a few macarons, using gel color or petal dust thinned with vodka. I used a gold petal dust too, just for fun. I’m no artist, and I’m sure you can do better than I, so please shoot me a picture if you attempt this!Irish Coffee Macarons from The Rowdy Baker

I resisted one step in making macarons, simply because many bakers said it wasn’t necessary, and I wanted to take the path of least resistance. But…after many, many attempts, I have to admit that it’s better if you age your egg whites. I don’t do it for days, because the thought of leaving egg out at room temperature gives me the willies, but even 18-24 hours seems to help stabilize the mixture. This is just my opinion; you might not notice a difference.

Tips:

  • Start with squeaky clean utensils. Egg whites do not like grease!
  • If you don’t want to age your egg whites, at least make sure they’re at room temperature.
  • For best results, weigh your ingredients, but if you don’t have a scale, my measurements work pretty well.
  • The almond flour really makes a difference. Make sure it says “flour”, and look for blanched almond flour; it makes a prettier macaron. I used Bob’s Red Mill until I found the 3 pound bag of Honeyville brand at Costco. It’s a super fine grind at a great price. (And no, I don’t get kickbacks from any companies!)
  • To avoid having your batter drip out of the tip as you fill your pastry bag, place the tip in the bag firmly and give the bag a little twist right above the tip – then tuck the twist right into the tip. Once the bag is filled, just pull the tip down before piping. I use a pitcher to hold my pastry bag while I’m filling it.
  • Silpat – especially the kind for macarons, with circles – works great for macarons, I think the bottoms are prettier and they release better, but parchment is preferred by some bakers, so it’s your choice.
  • Circles are your friend. If you’re not using macaron silpats, draw 2-inch circles on parchment (flip it over before using, of course) or make one good, dark, cardboard template that you can see through the parchment and just slide it out from under each sheet to use on the next. Pipe in the center of each circle to about 1/4″ from the edge. When you tap the pan the macarons will spread out a bit to fill the circle.

    I don't pipe all the way to the circle edge. If you want to do that, you may want to make your circles 1-1/2" instead of 2"

    I don’t pipe all the way to the circle edge. If you want to do that, you may want to make your circles 1-1/2″ instead of 2″

  • Unless you happen to have 4 sturdy baking sheets, pipe directly on a piece of parchment on the counter (put a little batter under each corner or weigh each corner down to hold it steady) and slide a cooled cookie sheet underneath when it’s time for that batch to go in the oven.
  • To avoid pointy tops, test a spoonful of batter on a plate to make sure it’s thin enough. If you tap the plate on the counter a few times and the batter doesn’t smooth out, give it a few more stirs.
  • Don’t be shy about dropping each pan of piped macarons on the counter. Do it several times. Air in the batter = hollow shells, and you don’t want that!
  • Only use gel or powdered colors.
Irish Coffee Macarons
Print
Author:
Makes 24 2-inch macarons (48 shells)
Ingredients
  • MACARONS:
  • 210 grams (2½ cups) almond flour (use the lightest, finest flour you can find)
  • 380 grams (3½ cups) powdered sugar
  • 200 grams (6 whites) egg whites, room temperature or - better yet - aged *
  • pinch of cream of tartar
  • 90 grams (1/2 cup) superfine sugar
  • green food coloring (gel or powdered)
  • *******
  • FILLING:
  • 8 ounces dark chocolate, chopped coarsely
  • 2 tablespoons butter
  • ¾ cup (divided) heavy whipping cream
  • 1 teaspoon espresso powder, or dark instant coffee powder
  • 2 tablespoons whiskey
  • 2 tablespoons Irish Cream Liqueur
  • 1 cup powdered sugar
  • * To age egg whites, cover lightly with a towel and leave on the counter for 24 hours before using.
Instructions
  1. Prepare heavy baking sheets by covering with parchment or using silpat sheets. (Before piping macarons on parchment, put a little batter under each corner to hold it down.) If you don't have 4 baking sheets, you can cool and slide sheets under each batch before putting in the oven.
  2. Weigh or measure the almond flour and powdered sugar. Sift together twice, discarding any large bits that won't go through your sifter, and set aside.
  3. In a large bowl, beat egg whites until foamy. Sprinkle a pinch of cream of tartar over the top and beat until soft peaks form.
  4. While beating, slowly add the superfine sugar. Continue to beat until meringue forms stiff peaks.
  5. Add food coloring and stir just until it is incorporated.
  6. Add the dry ingredients and carefully fold in, just until it is thick but will pour slowly from your spoon or spatula. It won't look smooth - it has almonds in it - but shouldn't be "gloppy". Drop a spoonful on a plate and tap the plate against the counter. The batter should smooth out. If there is still a peak on the top, stir a few more times.
  7. This is important: *The more you stir, the thinner it will get (not good), so don't over-stir!*
  8. Spoon into a large pastry bag equipped with a large round tip.
  9. Squeeze bag to pipe uniform "patties" (about 1½") on prepared pans, about an inch apart. Drop the pan several times onto the counter to flatten out any tip left from piping and remove air bubbles. Pop any air bubbles that come to the surface with a toothpick right away.
  10. Let the pans of macarons sit and dry for about 30 minutes. Meanwhile, preheat the oven to 300 F.
  11. Place one sheet of macarons in the oven at a time, on the middle rack. Bake for 13 minutes. Check to see if they are done by touching one gently on the side. If it moves at all, give the macarons another minute or two.
  12. Slide parchment or silpat onto a cooling rack. Let them cool completely before removing.
  13. Repeat with remaining baking sheets.
  14. If your macarons aren't all uniform, match up pairs of equal sizes before piping on the filling.
  15. FILLING:
  16. In a large pan on low heat, combine chocolate, butter, ½ cup of the whipping cream, and coffee powder, Stir frequently until mixture is melted and smooth.
  17. Remove from heat and add whiskey and liqueur. Stir until blended and let pan cool 15-20 minutes, or until cool to the touch. If you have a thermometer, wait until the mixture drops under 80 degrees. (You can put the pan in a bowl of cold tap water, stirring frequently, to hurry it up.)
  18. With a hand mixer, beat until mixture lightens in color and begins to thicken.
  19. Add powdered sugar and beat well.
  20. Slowly trickle in the remaining ¼ cup cream, beating continuously until the filling is fluffy and mousse-like, When you scrape a rubber spatula down the middle of the pan, the filling should not fill the space back in. MIXTURE WILL BE SOFT, but firms up quickly as you work with it.
  21. Using a pastry bag and large round tip, pipe onto one macaron shell. Gently cover with second shell. It's best to pipe filling close to the edge to avoid having to press down too hard. Don't be tempted to pipe them all at once, or the filling may be too firm to set the top macaron.
  22. Refrigerate macarons for 24 hours before serving (or up to 3 days) to give the filling time to blend into the shells a bit.
Macaron shell ingredients

Macaron shell ingredients

Here's the colored meringue. See the peak? It's ready to go!

Here’s the colored meringue. See the peak? It’s ready to go!

Fold in the dry ingredients carefully. Don't stir! It's hard to believe that this will turn into......

Fold in the dry ingredients carefully. Don’t stir! It’s hard to believe that this will turn into……

This! It needs to flow, but not be runny.

This! It needs to flow, but not be runny.

There are different methods of piping – from the top (my method), from the side, and from the top, pulling off to the side. Though I forgot to take a picture of myself piping this batch, here’s a photo showing the chocolate chip macarons being piped onto a silpat. I dropped the pan on the counter a few times and got rid of those pesky peaks.

Piping mint chocolate chip macarons

Piping mint chocolate chip macarons

Drop the pan several times to release air bubbles. You can use a toothpick to pop any stubborn ones.

Drop the pan on the counter several times, then use a toothpick to pop any stubborn air bubbles.

Baked. Yeah, I got a little generous with the size on this batch. Smaller is better; they're SWEET!

Baked. Yeah, I got a little generous with the size on this batch. Smaller is better; they’re SWEET!

Slowly melt chocolate, cream, butter, and coffee powder

Slowly melt chocolate, cream, butter, and coffee powder

Beat in the powdered sugar - right there in the pan.

Beat in the powdered sugar – right there in the pan.

Trickle in remaining cream and beat until mousse-like

Trickle in remaining cream and beat until mousse-like

Filling will be soft, but shouldn't flow back into a track made with a spatula.

Filling will be soft, but shouldn’t flow back into a track made with a spatula.

.Irish Coffee Macarons and rainbows

…but wait, that’s not all!

BONUS! This recipe is part of a group post.

To welcome Spring, I joined three of my favorite blogger/bakers to bring you some new recipes to usher in the season. The photos and links to their creations are below. Hope you’ll take a moment to visit them and check out their posts! – Lorinda

Amy, of Crumbs in My Mustachio, has paired juicy strawberries with chocolate in this mouth-watering Chocolate Strawberry Tart

Amys spring recipeCydnee, of Tampa Cake Girl, takes meringue to the limit with her luscious Mile High Lemon Meringue Pie
Cydnees mile high lemon meringue pie

Lysska, of Cooking from a Stay at Home Mom, made a giant peanut butter cup, inspired by Reese’s Peanut Butter Eggs. (Be still, my heart.) Here’s her recipe for Easy Reeses Peanut Butter Cup Pie

lysskas spring dessert


Tropical Strawberry Tortecake!

Tropical Strawberry Tortecake from The Rowdy Baker


Here is a recipe that is definitely a labor of love, an artistic adventure, and a culinary explosion of flavors and textures.

The recipe looks long because…well, because it is! Let’s go with “involved”, but not difficult. You will be making pie crust, pastry cream, thickened pineapple puree, and coconut whipped cream. You’ll also be melting chocolate, slicing and sugaring strawberries, and thickening strawberry juice for a pretty drizzle. If you choose to, you will make a few chocolate curls or toast a little coconut.

Oh, and you’ll also be washing lots of bowls, pans, and equipment.

and it is…

ABSOLUTELY WORTH IT!

Tropical Strawberry Tortecake - The Rowdy Baker


If you’re shaking your head, saying “Oh, hell no!”, remember this: Most of this can be made ahead so the assembly can be done quickly when you’re ready. There are also short cuts, should you choose to use them, such as vanilla pudding instead of pastry cream, crushed pineapple instead of the lovely, light puree, and whipping cream from a can for the top. You could even (this hurts to say it) use packaged pie crusts.

This took me about 2 hours, start to finish. I think I could do it more quickly now, since part of that time was spent searching for my blender and doing a little bit of cleaning up as I went.

Hope you like stirring! During the process of making this, you will need to remember to occasionally stir the strawberries, the pastry cream, and the pineapple puree.

Tropical Strawberry Torte Cake
Print
Author:
Makes four generous, luscious desserts. Six, if you make thinner layers of pie crust.
Ingredients
  • FRUIT:
  • 2 cups, packed, thinly sliced strawberries
  • ½ cup sugar
  • 2 cups fresh pineapple, in small chunks
  • ¾ (approximately) teaspoon agar-agar, divided (I buy this in bulk at my local health food store.)
  • ****
  • PASTRY CRUST:
  • ¼ cup milk
  • 1 tablespoon vodka (you can use the cheap stuff! Or if you prefer, you can use white vinegar.
  • 2 cups all-purpose flour
  • 1¼ teaspoons salt
  • 1 cup shortening, very cold
  • Coarse sugar (I use sparkling sugar)
  • 1 ounce of melted dark chocolate
  • ½ teaspoon coconut oil
  • ****
  • PASTRY CREAM:
  • 4 tablespoons cornstarch
  • ⅓ cup sugar
  • ⅓ cup water
  • 3 egg yolks
  • 1 cup whole milk (you can substitute half & half if you want a richer cream)
  • 1 teaspoon vanilla
  • ****
  • FOR DECORATING (optional)
  • Whipped coconut milk (using can of chilled coconut milk)* or lightly sweetened whipping cream
  • Chocolate curls
  • Toasted coconut
Instructions
  1. Place sliced strawberries in a small bowl and add ½ cup sugar. Stir well and set aside. (Stir now and then, when you think about it.)
  2. Heat oven to 400 F.
  3. MAKE PASTRY:
  4. In a small cup, combine the milk and vodka. Set aside.
  5. In a large bowl, combine the flour and salt. With your fingers (or a pastry blender), blend the cold shortening into the flour mixture until well combined. Use a light hand; it's fine if there are small lumps of shortening visible.
  6. Add milk and vodka all at once. Stir gently, using fingers or fork, until you can gather it into a rough ball.
  7. Flatten dough onto a lightly floured piece of parchment. Sprinkle with flour and cover with parchment. Roll out about ¼-inch thick.
  8. Remove top sheet of parchment and lightly sprinkle with coarse sugar. Pat gently with your hand. Place the top piece of parchment back on dough and, grabbing one edge (make sure you have both pieces of parchment AND a little of the dough in your hands), flip it quickly over.
  9. Peel off top, sprinkle that side with sugar and pat. Cut with 3-inch square cookie cutter. You should easily get 12 squares, with a little dough left over. (bake and eat the scraps!)
  10. Using flat spatula, move squares to ungreased baking sheet. Prick all over with a fork and bake for about 10-12 minutes, or until just beginning to get brown around the edges. Move to a cooling rack.
  11. Melt chocolate and coconut oil in a small pan on low, or in the microwave. Melt it slowly, stirring often. Drizzle over cooled pastry squares. (I like to use a small zipper bag with one corner snipped off.)
  12. MAKE PASTRY CREAM:
  13. In a medium bowl, whisk together the cornstarch, sugar, water, and egg yolks until frothy.
  14. In a medium pan over medium heat, bring milk almost to the boiling point. You should see bubbles all around the edges, and bubbles just beginning to come up in the middle.
  15. Pour half of the hot mixture into the egg yolk mixture, whisking thoroughly. Return the mixture to the pan and whisk over medium-low heat until it thickens...1 -2 minutes. Remove from heat and add vanilla. Whisk well to avoid lumps. Cover lightly and whisk every 5 minutes or so until it cools completely.
  16. MAKE PINEAPPLE PUREE:
  17. Place pineapple in blender and blend until smooth. Measure out 1½ cups of puree. If you don't have quite enough, add some of the sugar-juice from the strawberries.
  18. Place puree in a small pan over medium heat. Sprinkle with ½ teaspoon agar-agar. Whisk until mixture comes to a boil. Lower heat if necessary to keep mixture at a low simmer for 3-4 minutes. Remove from heat and set aside, stirring occasionally until room temperature.
  19. Add one-third of the cooled pastry cream to the pineapple mixture and stir well.
  20. Drain strawberries, reserving the liquid.
  21. Place one pastry square on each dessert plate.
  22. Place a spoonful of pastry cream on each square, spreading cream slightly.
  23. Place a spoonful of pineapple puree on the pastry cream, spreading slightly.
  24. Divide half of the strawberries between the four squares, and top with another pastry square.
  25. Repeat, ending with pastry square.
  26. In a small pan, combine ½ cup reserved strawberry juice and a pinch of agar-agar. Stir on medium high until thickened. Drizzle over desserts.
  27. Top with whipped coconut milk or whipping cream. Garnish with chocolate curl, a strawberry slice, or toasted coconut.
  28. Serve proudly!
  29. *To whip coconut milk, open chilled can of coconut milk and carefully scoop out the solid cream at the top. Discard (or use elsewhere) liquid at the bottom. Beat in a cold bowl, just as you would whipping cream. Sweeten to taste after cream forms peaks.

I took photos – lots and lots of photos, but will try to just hit the highlights. Here we go!

Stir sugar into strawberries. Set aside but stir occasionally.

Stir sugar into strawberries. Set aside but stir occasionally.

I use vodka in my pie crust. You can use vinegar if you'd prefer.

I use vodka in my pie crust. You can use vinegar if you’d prefer.

Add liquids to flour and stir gently with fingers or fork.

Add liquids to flour and stir gently with fingers or fork.

Flip the dough over, parchment and all, and pull off top piece of parchment.

Flip the dough over, parchment and all, and pull off top piece of parchment.

Sprinkle dough with coarse sugar. (I like sparkling sugar!)

Sprinkle dough with coarse sugar. (I like sparkling sugar!)

I'm generous with this stuff because I love CRUNCH!

I’m generous with this stuff because I love CRUNCH!

Cut out 12 squares

Cut out 12 squares

Place on baking sheet and prick all over with a fork

Place on baking sheet and prick all over with a fork

Bake until they just start turning golden brown at the edges. (They kinda look like saltines!)

Bake until they just start turning golden brown at the edges

Sprinkle agar-agar on pineapple puree and simmer

Sprinkle agar-agar on pineapple puree and simmer

The pastry cream - nice and thick

The pastry cream – nice and thick

Assemble! Add some pastry cream. (You can be a little more generous than this.)

Assemble! Add some pastry cream. (You can be a little more generous than this.)

Add the pineapple puree

Add the pineapple puree

Then some berries, and...repeat!

Then some berries, and…repeat!

Find a FORK!

Find a FORK!

More desserts, coming up. But first, I’d better hit that stationary bike in the back bedroom…

Lorinda


Sour Cream Apple Muffins

Sour Cream Apple Muffins - The Rowdy BakerI baked a Sour Cream Apple Pie for dessert last week and it reminded me of a muffin my son and I created a long, long time ago. Of course, that recipe has long since disappeared, but I think I’ve managed to come close to our original concept.

There were some changes made to my basic muffin recipe, since I wanted them to be rich (butter instead of oil), yet light and fluffy (cake flour instead of all-purpose). I also used tulip muffin liners because it gives you more room to PILE ON the streusel topping.

Pile on the streusel!

Pile on the streusel!

There is cinnamon in the streusel, and a little in the muffins, but the important flavor – the flavor that makes these taste just like my favorite pie – is nutmeg. I was pretty generous with it, so if you’re not as fond of nutmeg as I, you may want to cut the amount in half.

The fragrance is out of this world, and they’re good either hot out of the oven or room temperature.Sour Cream Apple Muffins from The Rowdy Baker

You’ll get 12 tall muffins from this recipe if you use tulip liners. If you want to use regular muffin liners, fill them 2/3 full and then add streusel to the top. You should get approximately 16-18 muffins that way. There will also be some muffin-top action happening, so grease the top of the pan lightly so the streusel won’t stick.

Sour Cream Apple Muffins
Print
Author:
Makes 12 muffins (using tulip muffin liners) or 16-18 muffins using regular liners.
Ingredients
  • STREUSEL TOPPING:
  • 1 cup white sugar
  • 1 cup flour (all-purpose is best, but cake flour works too.)
  • 2 teaspoons cinnamon
  • ¼ teaspoon salt
  • 7 tablespoons melted butter (1 stick, minus one tablespoon)
  • MUFFINS:
  • 2 cups cake flour
  • 1 cup sugar
  • 1 teaspoon baking powder
  • 1 teaspoon baking soda
  • ½ teaspoon salt
  • ½ teaspoon nutmeg (more or less to taste)
  • 1 tart apple, peeled, cored, and chopped into small pieces (I use Granny Smith)
  • 1 teaspoon cinnamon
  • 1 tablespoon sugar
  • 6 tablespoons melted butter
  • 2 eggs
  • 1 cup sour cream
  • 2 tablespoons milk
  • 1 teaspoon vanilla
Instructions
  1. Heat oven to 375 F. Place 12 paper tulip-shaped liners in muffin pans. (If you are using regular liners, you will need two pans, as there will be 15-18 muffins.)
  2. In a small bowl, combine all of the streusel ingredients. Stir with a fork until combined, and set aside.
  3. In a large bowl, sift together twice: flour, 1 cup sugar, baking powder, soda, salt, and nutmeg.
  4. In a small bowl, toss the chopped apple with 1 cinnamon and 1 tablespoon sugar. Add to dry ingredients, folding in carefully. Don't put that bowl in the sink...use for the next step!
  5. Whisk together melted butter, eggs, sour cream, milk, and vanilla. Fold gently into the dry ingredients, being very careful not to stir, just until most of the flour is incorporated - you should be able to see a few wisps of flour.
  6. Divide between 12 tulip liners. (If you are using regular liners, fill approximately ⅔ full.)
  7. Break the streusel up with a fork and sprinkle over muffin batter. Use it up! Trust me - there's no such thing as too much streusel!
  8. Bake for approximately 22 minutes, or until a toothpick inserted into the middle of one of the muffins comes out clean.
  9. Cool on a rack for 5 minutes, then remove cupcakes from pan to cool completely.

Here's what you'll need.

Here’s what you’ll need.

Sift together the dry ingredients...twice!

Sift together the dry ingredients…twice!

Coat the chopped apples in cinnamon sugar

Coat the chopped apples in cinnamon sugar.

Gently toss apples in flour mixture.

Gently toss apples in flour mixture.

Add the liquids, and very gently fold in. A few wisps of flour showing is just fine!

Add the liquids, and very gently fold in. A few wisps of flour showing is just fine!

Spoon batter into liners and cover with streusel.

Spoon batter into liners and cover with streusel. More streusel than this!!!

Smother the muffin batter with streusel!

Smother the muffin batter with streusel!

Sour Cream Apple Muffins - From The Rowdy Baker

  • A soft, light texture
  • Al dente, tangy apple chunks
  • Crisp, sweet, crumbly topping

Breakfast just doesn’t get any better than this!

And believe it or not, even though there are quite a few ingredients, I can have these ready for the oven in 20 minutes; you can too!

Lorinda

Chocolate Cherry Tea Cookies

Leave it plain for a pretty hanging cookie.

Leave it plain for a pretty hanging cookie.

These tender little sugar cookies with bits of chocolate and maraschino cherries will delight anyone with a sweet tooth. Surprise co-workers, friends, and loved ones with homemade Valentine treats!

(Also, at the bottom of the blog you’ll find links to three more recipes from my amazing blogger friends – and you do not want to miss those, so read on!)

They’re versatile! Decorate with chocolate, use a special heart-shaped “cup hanger” cutter, make little two-bite hearts with chocolate centers or write names on larger hearts.Add color for a hot pink Valentine effect, or let the cherries give them just a hint of peachy pink.

Drizzle or dip - chocolate is always a good choice!

Drizzle or dip – chocolate is always a good choice!

Make a dainty hot pink cookie to go with a cup of tea.

Make a dainty hot pink cookie to go with a cup of tea.

I often use a variation on my basic shortbread cookie because I love the texture – and because the recipe is EASY!  They are a little fragile though, so make sure they’re cooked long enough (too soft and they’ll break, but bake them too long and the pink will turn an unattractive color) and handle and transport them with care.

This makes a lot of cookes – 6 dozen. The baked cookies freeze well, or you can always freeze the cut out shapes between layers of parchment in a zipper bag. Or you can just eat them with abandon!


Chocolate Cherry Tea Cookies
Print
Author:
Ingredients
  • 2 cups powdered sugar
  • 2 cups butter, softened (if using unsalted butter, increase salt by ¼ teaspoon)
  • 1 teaspoon cherry flavoring
  • A few drops of pink or red food coloring, if desired
  • 2 egg yolks
  • 1 cup mini chocolate chips
  • 24 (to taste) maraschino cherries, finely chopped and lightly blotted with paper towels
  • 4 cups flour
  • ½ teaspoon salt
  • 1 cup cornstarch
Instructions
  1. Heat the oven to 350 F.
  2. In a large bowl, combine powdered sugar and butter. Beat until light and fluffy.
  3. Add flavoring, food coloring if using, and egg yolks, and blend well. (If using a stand mixer, you may want to switch to the dough hook at this point!)
  4. Add the chocolate chips, cherries, flour, salt and cornstarch. Stir just until the mixture forms a smooth dough. Dough will be stiff! If you have a sturdy dough hook, let it do the work. If not, you might have to knead it together by hand.
  5. Roll out the dough to about ¼ inch thick between sheets of lightly floured parchment. Cut with cookie cutters of your choice.
  6. Place 1 inch apart on ungreased cookie sheet and bake 11-12 minutes, The bottom edges should just be turning golden brown. Watch the cookies carefully - if they get too dark the pink will turn an unattractive orange color!
  7. Move cookie sheet to a rack to cool for 1 to 2 minutes, then slide cookies onto rack to cool completely.

Your choice: natural or hot pink!

Your choice: natural or hot pink!

Chop and lightly blot cherries.

Chop and lightly blot cherries.

Beat the butter and powdered sugar until fluffy.

Beat the butter and powdered sugar until fluffy.

Add chips, cherries, and dry ingredients. Use a dough hook or lots of muscle!

Add chips, cherries, and dry ingredients. Use a dough hook or lots of muscle!

Roll and cut into your favorite shapes.

Roll and cut into your favorite shapes.

Another option.

Another option.

Chocolate Cherry Tea Cookies with chocolate hearts The Rowdy Baker

Well, this is officially my last Valentine’s post of the year. I still have half a gallon of cherries – which means I either need to freeze them or eat them. Hmmmm……freeze or eat? Freeze or eat?

Well, that was a no-brainer, wasn’t it?

Here are those wonderful recipes I told you about. Crumbs in My Mustachio created a “Tiramisu Cheesecake”, Moore or Less Cooking Blog brought “Fudgy Cherry Cheesecake Brownie Bars”, and Tampa Cake Girl baked an “I Love Chocolate Cake”. Hope you’ll stop by and visit their blogs!

broads valentine collage

Happy Valentine’s Day to all of my Rowdy friends!   Lorinda


Cherry Marshmallows – Dipped in Chocolate!

Chocolate Cherry Marshmallow HeartsI adore chocolate covered marshmallows. Plain, flavored, dark chocolate, milk chocolate – I love them all. Well…except for the cheap kind (not even individually wrapped) you get in an egg carton at Easter. Those suck. Patooey!

Anyhow, since I’m working my way through a gallon jug of maraschino cherries, it only makes sense that they found their way into gooey chocolate covered marshmallows. Making marshmallows is really very easy, and they taste so much better than the ones from the store.

Dipping things in chocolate isn’t my favorite thing to do; for some reason I don’t have any problem getting flour and powdered sugar everywhere, and can dig my hands into a big pile of dough, but I really don’t like getting chocolate on my hands.

I pull up my big girl panties and do it, though – because the results are always, always good.

These marshmallows are mild tasting, with little bursts of cherry flavor. I think it complements milk chocolate coating very well.  If you want a more distinct cherry taste, or are using a strong dark chocolate for dipping, just add a little cherry flavoring in place of some of the vanilla. You can also add a dash of coloring if you choose.Chocolate Cherry Marshmallow Hearts up close

Cherry Marshmallows - Dipped in Chocolate
Print
Author:
This recipe will make about 15 large chocolate hearts.
Ingredients
  • 24 maraschino cherries (more or less, to taste)
  • ½ cup cold water
  • 3 packages of powdered gelatin (like Knox)
  • 2 cups granulated sugar
  • ¼ cup water
  • ⅔ cup light corn syrup
  • ¼ teaspoon salt
  • 1 teaspoon vanilla (or ½ teaspoons vanilla, ½ teaspoon cherry flavoring)
  • 1 cup powdered sugar
  • ¼ cup cornstarch
  • 1 tablespoon shortening or coconut oil
  • 12 ounces chocolate, chopped - or you can use good-quality chocolate chips
Instructions
  1. Finely chop the maraschino cherries. Roll in paper towels, pressing firmly to remove as much juice as possible. Set aside.
  2. Line a 9x13" (quarter sheet) pan with plastic. I find it's easiest to do this if I oil the pan lightly first to hold the plastic in place. Lightly oil the plastic.
  3. Put ½ cup cold water in a large mixing bowl (a sturdy stand mixer works best) and sprinkle the gelatin over the water. Let the mixture sit for about 10 minutes to soften the gelatin. You don't need to stir it..
  4. In a medium pan on medium heat, bring sugar, ¼ cup water, and corn syrup to a boil, stirring constantly. Once the mixture boils, stop stirring and let it boil for 2 minutes.
  5. Pour hot syrup slowly over gelatin mixture, mixing on low speed until well combined.
  6. Add salt and beat on high until very thick. It doesn't have to hold a stiff peak, but when a beater or spoon is lifted, it should hold shape and not immediately return into the bowl. This could take anywhere from 5 minutes to 15 minutes, depending on your mixer.
  7. Add vanilla, flavoring if you're using it, and chopped cherries.
  8. Spread evenly in pan. Allow the marshmallow to set for at least 3 hours. The top should not feel sticky!
  9. in a small bowl, combine the powdered sugar and cornstarch.
  10. Lift the plastic wrap and marshmallow out of the pan and set on a level surface. Cut with a lightly greased cookie cutter, dredging each heart in the powdered sugar, cornstarch mix. Flip the marshmallow from hand to hand to dust off excess sugar.
  11. Melt shortening or coconut oil and chocolate together slowly, using a pan on lowest heat or a microwave at 50% power in 30 second increments. Stir often! Chocolate should be smooth and barely warm. If it is too thick, add a little more oil. Stir, stir, stir!
  12. Cover a baking sheet with parchment.
  13. Dip each marshmallow in the chocolate, covering completely. The marshmallows are pretty sturdy - they won't melt. A large serving fork works well for this. Tap against the edge of the bowl or pan to remove excess chocolate. Use a knife or spatula to slide heart onto parchment.
  14. Chill in refrigerator until chocolate is firm. Decorate if desired, using drizzled chocolate, sprinkles, or edible glitter. Or write names on the hearts with royal icing.


Squeeze out all the juice from the chopped cherries.

Squeeze out all the juice from the chopped cherries.

Sprinkle gelatin over old water.

Sprinkle gelatin over old water.

Boil sugar, water, and corn syrup.

Boil sugar, water, and corn syrup.

Slowly add hot syrup to gelatin mixture.

Slowly add hot syrup to gelatin mixture.

Beat until VERY thick. It looks like it's falling off the beater, but it's just hanging there.

Beat until VERY thick. It looks like it’s falling off the beater, but it’s just hanging there.

Add flavor and cherries and spread into prepared pan.

Add flavor and cherries and spread into prepared pan.

When firm, cut out shapes using greased cutter.

When firm, cut out shapes using greased cutter.

Dredge hearts in powdered sugar and cornstarch.

Dredge hearts in powdered sugar and cornstarch.

Dip!

Dip!

Chocolate Cherry Marshmallow Hearts dipped


We’ve still got some cold weather here, and I’m thinking I’ll try one of these plopped into a big mug of hot cocoa tonight.

Enjoy!

Lorinda

Chewy Chocolate Cherry Cookies

Chewy Chocolate Cherry Cookies The Rowdy BakerWith a soft, chewy texture that lies somewhere between a cookie and a brownie, this explosion of dark chocolate and maraschino cherry will satisfy you right down to your toes. And yes, I get a little bit passionate about cherries!


The Rowdy Baker loves her some cherries!

The Rowdy Baker loves her some cherries!

This recipe is a little fussier than a normal cookie recipe – more ingredients, a few extra steps – but it’s well worth the effort, especially for a holiday like Valentine’s Day.

Chewy Chocolate Cherry Cookies
Print
Author:
Makes 4-5 dozen These cookies get softer and more flavorful after 24 hours!
Ingredients
  • 1 cup (2 sticks) butter
  • 6 ounces unsweetened chocolate
  • 1½ cup white sugar
  • 1 cup brown sugar, firmly packed
  • 1 tablespoon vanilla
  • ¼ cup buttermilk
  • 4 eggs, room temperature
  • 3½ cups all purpose flour
  • 1 teaspoon baking powder
  • ¼ teaspoon baking soda
  • ½ teaspoon salt
  • ½ cup mini chocolate chips (or finely chopped chocolate)
  • ½ cup chopped walnuts - more if desired
  • 1 10-oz jar maraschino cherries
  • ICING:
  • ⅓ cup heavy cream
  • 2 ounces unsweetened chocolate
  • 2 tablespoons maraschino cherry juice or ¼ teaspoon cherry flavoring (optional)
  • 1 cup powdered sugar
  • decorate with maraschino cherries, sprinkles, chopped nuts
Instructions
  1. Heat oven to 350 F. Lightly grease two baking sheets (or cover with parchment)
  2. Drain cherries, reserving 2 tablespoons for icing, if desired. Chop cherries into small pieces and set aside. (Don't press or dry the chopped cherries...a little juice is fine.)
  3. In a medium pan, melt butter and unsweetened chocolate together on low heat. Stir frequently. When chocolate is completely melted, remove from heat and stir.
  4. Add white sugar and brown sugar to the butter mixture and stir well.
  5. Add vanilla and buttermilk, stirring until combined.
  6. Put mixture into a large bowl. Add eggs and beat on medium speed for 1 minute.
  7. Add flour, baking powder, baking soda, and salt, and mix just until dry ingredients are incorporated.
  8. Add chocolate chips, walnuts, and chopped cherries.
  9. With cookie scoop or by rounded tablespoon, drop dough at least 1 inch apart on prepared baking sheet. (Don't chill this dough. Bake the cookies right away, or scoop onto baking sheets and freeze for later.)3-4 minutes before moving to the rack to cool completely. Ice and decorate cookies.
  10. ICING:
  11. In a medium pan, heat the cream, chocolate, and cherry juice on low, stirring frequently until chocolate is melted. Remove from heat and stir well, until completely smooth. Gradually add the powdered sugar and beat until smooth and creamy. Let icing sit, stirring occasionally, until thick enough to spread without dripping...about 1 hour. (This will vary, depending on the temperature of your house.)

Note: Bake these right away. If you let the dough sit too long or put it in the fridge, it will set up like soft fudge!  If you don’t want to bake them all, I suggest scooping the dough onto baking sheets and freezing for later.

Chop those cherries!

Chop those cherries!

Melt the butter and chocolate.

Melt the butter and chocolate.

Add the sugars and stir like crazy!

Add the sugars and stir like crazy!

Stirring in the chocolate chips, nuts, and cherries.

Stirring in the chocolate chips, nuts, and cherries.

Scoop onto prepared sheet - parchment for this batch.

Scoop onto prepared baking sheet – parchment for this batch.

Baked. Aren't they pretty?

Baked. Aren’t they pretty?

And now, for the icing!

Gently melt the chocolate and cream (and maybe a little cherry juice) for the icing.

Gently melt the chocolate and cream (and maybe a little cherry juice) for the icing.

Whisk in the powdered sugar until it's velvety smooth.

Whisk in the powdered sugar until it’s velvety smooth.

Dollop (best for cherries) or spread (best for sprinkles) the icing.

Dollop (best for cherries) or spread (best for sprinkles) the icing.

Admire your creations before they disappear!

Admire your creations before they disappear!

Here’s another idea: Buy some glass candle holders from the dollar store and serve individual cookies at each place setting. Pretty classy, huh?Chewy Chocolate Cherry Cookies individually served The Rowdy Baker

So many cherries, so little time. I’m not sure why I bought a gallon of the things…guess I forgot the advice to “never shop hungry”!

Lorinda

Play Review – Winning Super Bowl Dishes!


Game Day Collage 2016

I put my four favorite football party recipes together into this quick post with links to all of the recipes. Enjoy!

An easy cheese ball and some delicious, crispy rye crackers are perfect for a crowd. You’ll find the recipe for both here: Football Rye Crackers and Cheese Ball

football rye crackers and cheeseball watermarked


Salmon dip in a crusty football-shaped bread bowl is a lot more fun and imaginative than little smokies or chips and salsa! It uses one of my easiest bread recipes, and the salmon dip is a snap to throw together. Find it here: Succulent Salmon Dip (in a crunchy football bowl!)

salmon dip bowl from The Rowdy Baker


Little soft pretzels stuffed with ham and cheese will make everyone cheer! Get the recipe here: Ham and Cheese Pretzel Bombs


ham and cheese pretzel bombs

And my favorite of all, a football shaped meatloaf made with ground pork and ham, and coated with a tangy glaze…a true “pigskin” for those chest-beating guys. Come and get it: Game Day Glazed Meatloaf

Game Day Glazed Meatloaf from The Rowdy Baker


PARTY ON!

Lorinda

Ice Cream Cupcake Surprise

Ice Cream Cupcake Surprise The Rowdy Baker
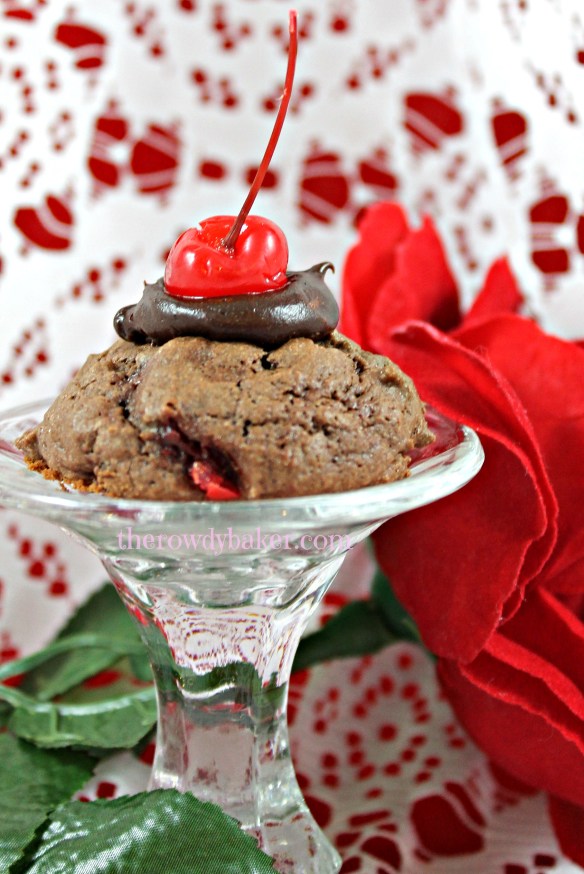
If this dessert doesn’t make your Valentine worship you, nothing will! Inside the chocolate coating is a serving of rich chocolate cake, cherry vanilla ice cream, and…(surprise) a chocolate covered cherry.

To make this extra-easy, by all means, use a cake mix and store bought chocolate shell! You could even (*gasp!*) buy a dozen cupcakes and scrape the icing off. But you know me; I have to play with my food…so I’ll give you my recipe for rich chocolate cake and homemade chocolate shell, just in case you choose to go all out and create these desserts from scratch.

You’ll need:

  • One 1.5 quart container of ice cream. (Don’t get me started on the shrinking ice-cream container conspiracy.) I used Cherry Vanilla. Yum!
  • 12 chocolate covered cherries
  • 12 chocolate cupcakes
  • 2 bottles (7.25 ounces each) of chocolate shell (or Magic Shell), usually found in the ice cream aisle. OR you can make your own – I’ll give you the recipe below.
  • sprinkles, if desired


It’s important not to overfill the cupcake liners, because a high dome won’t hold the ice cream well. Fill them just a tiny bit over half full. But if they dome too much, you can always level them later…and eat the scraps, of course.

Start with chocolate cupcakes. (And yes...the cake on the right has too much of a dome.) I shall have to operate!

Start with chocolate cupcakes. (And yes…the cake on the right has too much of a dome.) I shall have to operate!

This chocolate cake recipe makes 12 cupcakes. You may have a tiny bit of batter left, but not much.

Rich Chocolate Cupcakes
Print
Author:
This is a small recipe, making approximately 12 cupcakes. You can easily double it. If you do, use 3 eggs.
Ingredients
  • 1¼ cups cake flour
  • ½ cup unsweetened cocoa
  • ¾ cup sugar
  • ½ teaspoon salt
  • 1 teaspoon baking soda
  • ¼ teaspoon baking powder
  • ½ cup oil (I use avocado or peanut oil)
  • ½ cup strong coffee
  • ½ cup buttermilk (I prefer a thick, Bulgarian buttermilk for this)
  • 1 egg
Instructions
  1. Heat oven to 350 F. Place liners in cupcake pan.
  2. In a large bowl, combine the cake flour, cocoa, sugar, salt, baking soda, and baking powder.
  3. In a small bowl, combine the oil, coffee, and buttermilk.
  4. Gradually beat the liquids into the dry ingredients. Beat for 1 minute.
  5. Add the egg and beat just until it is completely incorporated.
  6. Fill cupcake liners just a little more than half full.
  7. Bake for approximately 18 minutes, or until a toothpick comes out clean when inserted into the middle of one cupcake.
  8. Allow cupcakes to cool on a rack for 10 minutes, and then lift them out onto the rack to finish cooling.


Cake ingredients

Cake ingredients

Fill liners just a little more than half full.

Fill liners just a little more than half full.

Remember, we're going for a subtle dome!

Remember, we’re going for a subtle dome!

Now – to assemble the cupcakes:

Slice a thin piece off the top of each cupcake, to level it.

Let your ice cream soften a bit, and then press a chocolate covered cherry round side down into a scoop of softened ice cream. If the ice cream is too firm, you can use a spoon to make a hole for the candy.

Sink a cherry into softened ice cream, round side down.

Sink a cherry into softened ice cream, round side down.

Drop scoops of ice cream (and embedded cherry) onto frozen cupcakes and smooth with a table knife.

Drop ice cream onto cupcake and smooth with a knife.

Drop ice cream onto cupcake and smooth with a knife.

Place cupcakes in the freezer for at least 3 hours.

You saw that, right? Don’t skip that step, or your ice cream will fall off into the coating!

Shake one bottle of chocolate shell thoroughly and pour contents into a small bowl. One by one, dip the cupcakes into the chocolate, all the way to the wrapper. Allow excess to drip off, place on a tray or baking sheet, and decorate with sprinkles.

You’ll need one whole bottle and part of the second. Or…if you want to make your own shell:

HOMEMADE CHOCOLATE SHELL:
10 ounces of good quality dark chocolate
2 level tablespoons coconut oil (I use expeller pressed so it doesn’t taste like coconut.)

Break chocolate into small pieces. In a cup or small bowl in the microwave (or in small pan on the stove) slowly melt chocolate and coconut oil together. It’s important to melt it very slowly at low heat. Stir well.

Dip frozen cupcakes and ice cream into chocolate shell mixture.

Dip frozen cupcakes and ice cream into chocolate shell mixture.


frozen goodness!

Once the coating has hardened, pop the cupcakes back into the freezer until ready to serve. If you will be keeping them in the freezer for more than a few hours, cover them with foil.

Ice Cream Cupcake Surprise The Rowdy Baker

This would be such an easy recipe to adapt for other holidays. Exchange the cherry for a mint truffle and mint ice cream for St. Patrick’s Day, or a peppermint truffle and peppermint ice cream for Christmas. I’d suggest a small Cadbury Cream Egg for Easter, but….euwwww. Anyhow, you get the idea.

Everyone loves ice cream cakes, but they’re awfully messy to cut and serve. Individual cakes are the way to go!

Lorinda


Braw Scottish Oatmeal Bread

Braw Scottish Oatmeal Bread The Rowdy BakerWe love our morning porridge, and have switched from 7-grain rolled cereal to our new favorite – Scottish Oatmeal. Scottish oatmeal is ground, and the flavor and texture is incredible. Of course, once I dump a little bit of brown sugar, a handful of toasted pecans and an ocean of milk on it, it’s maybe a wee bit less healthy…but so satisfying!

I finally broke down and bought a 25 pound bag of the stuff, and then felt obligated to use it in a recipe. Cookies turned out kind of “meh”. I’ll have to work on that idea. But the bread? It’s wonderful, with a hearty, dense, flavorful. Best of all, it doesn’t crumble when you slice it. And toasted? Mmmmm.

And did I mention it is EASY??? It really is!

Braw Scottish Oatmeal Bread and tea The Rowdy Baker

Braw Scottish Oatmeal Bread
Print
Author:
Makes 2 loaves
Ingredients
  • 2½ cup very warm water, divided
  • big pinch of sugar
  • 2 packages active dry yeast
  • 2 cups Scottish oatmeal (this is a ground oatmeal, not rolled)
  • 2 cups whole wheat flour
  • 3 cups white bread flour
  • ½ cup honey
  • 2 tablespoons cooking oil (I use avocado or peanut oil)
  • 1 tablespoon salt
Instructions
  1. In a small bowl, combine ½ cup warm water with pinch of sugar. Sprinkle yeast over the top and let mixture sit for approximately 5 minutes (or until bubbly and foamy).
  2. In a large bowl (a stand mixer with dough hook works best) combine the oatmeal, wheat flour, and bread flour.
  3. With the mixer on low, add the remaining 2 cups warm water, yeast mixture, honey, oil, and salt.
  4. Continue to knead using the dough hook for 4-5 minutes. If kneading by hand, place the dough on a lightly floured surface and knead for 6-7 minutes.
  5. Place dough in a large greased bowl. Cover with a towel and allow dough to rise until doubled, about 1 hour.
  6. Prepare two bread pans by spraying with a flour and oil mixture (like Baker's Joy) or greasing pans with shortening.
  7. Punch down dough and separate into 2 equal pieces. Form into loaves and place in pans. Cover and allow dough to rise until doubled, about 1 hour.
  8. Heat oven to 375F.
  9. Bake for 35-40 minutes. Bread should be a rich brown color, and when tipped out of the pan onto a cooling rack, the bottom of the loaves should be light brown and sound hollow when tapped.
  10. Brush the top of the loaves with butter, if desired.
  11. Allow loaves to cool before slicing....if you have that kind of willpower!


You'll need this...and a pinch of sugar!

You’ll need this…and a pinch of sugar!

Yeast mixture should be bubbly.

Yeast mixture should be bubbly.

Whole wheat flour (left) and Scottish oats (right)

Whole wheat flour (left) and Scottish oats (right)

Dough should come cleanly away from the side of the bowl

Dough should come cleanly away from the side of the bowl

Place dough in a greased bowl to rise

Place dough in a greased bowl to rise

Doubled! Ready to form into loaves and place in pans.

Doubled! Ready to form into loaves and place in pans.

Tried one standard loaf pan and one slightly larger. Small pan yielded a taller loaf, as expected.

Tried one standard loaf pan and one slightly larger. Small pan yielded a taller loaf, as expected.

Looking good. Time to preheat the oven.

Looking good. Time to preheat the oven.

Perfect! The bottom of the loaf should be lightly browned and hollow sounding when tapped

Perfect! The bottom of the loaf should be lightly browned and hollow sounding when tapped

"Allow bread to cool before slicing" Hah! We fight over the warm heels in this house.

“Allow bread to cool before slicing” Hah! We fight over the warm heels in this house.

Okay, this was my nod to “almost healthy”. Now…on to Valentine’s Day and all things chocolate!

Lorinda

Game Day Glazed Meatloaf

Game Day Glazed Meatloaf from The Rowdy BakerThis beautiful glazed football really is a meatloaf; just not the kind you’re used to.

Instead of using beef, I combined ground ham and pork and held it together with ground oatmeal instead of bread crumbs, for a scrumptious, gluten-free entree.

You won’t be tossing this pigskin around – you’ll be dipping chunks into glaze or slapping a slice of it on a crusty piece of bread and chowing down!Game Day Glazed Football sandwich

The idea for this meatloaf came from an old Taste of Home recipe for Brown Sugar Glazed Ham Balls, which my family loves. I made a lot of changes, so it’s a loose adaption, but credit definitely has to go to them for the idea!Glazed Game Day Meatloaf The Rowdy Baker

My first attempt was prettier. The football was baby-butt smooth and flawless. But after I took photos and we ate half of it, I realized I’d forgotten to add the cheese “laces”. I also decided that I wanted less filler. I am not a fan of frozen meatballs; they always seem spongy to me. My first meatloaf had excellent flavor, but was kind of spongy…reminiscent of (dare I use this word in my blog?) Spam. I wanted meaty!

So I cut the ground oats and egg in half, and we absolutely loved the second recipe. It had a little bit more flavor, and much better texture, though it wasn’t quite as pretty. Don’t get me wrong – the first meatloaf was very, very tasty – but if I have to choose, I’ll go with substance over beauty any day!

Here’s how smooth the first one was – just in case you LIKE a smoother texture, and/or want it to look perfect:pigskin ready to cut

I ground a pork shoulder roast and a nice butt portion ham for my meatloaf. You don’t have to do this (see TIPS, below), but I wanted to play with my new grinder. ham and pork

No grinder? Find ground pork at the grocery store, and grind the ham in a food processor.

No grinder? Find ground pork at the grocery store, and grind the ham in a food processor.

Serve your meatloaf with dark rye bread or crusty French bread for hearty sandwiches, or just dip chunks of the meat in small bowls of the glaze. Delish!Game Day Glazed Meatloaf, dipped in glaze TRB

I’ve been pouting all week because the Seattle Seahawks didn’t make it to the Superbowl, and in a fit of petulance I almost decided to hold out and wait to post this blog until next year – when they will certainly be going all the way. But I love you guys, and respect your right to root for an obviously inferior the team of your choice. I’ll be a good sport and post the recipe now.

TIPS:

  • If you don’t have a meat grinder, you should be able to buy ground pork (NOT sausage!) at the grocery store. You may even be able to coax a butcher into grinding a ham for you, but if you have a food processor, I recommend you do it yourself. A butcher is not going to take the time to cut all the tough skin off the ham, and you really don’t want that in your meat mixture.
  • When the football is cooked and the meat thermometer is removed, let your meatloaf sit for 10 minutes before adding the cheese, because meat juice will probably bubble out of the hole for a few minutes, so the cheese wouldn’t stick.
  • I use an old coffee grinder for grinding my oatmeal. A food processor or blender will work too. Grind it fairly fine, but not into flour!
  • If you plan to provide glaze for dipping or drizzling, you might want to increase the glaze recipe. You’ll have a good cup of glaze left over, but…it’s so good! (I like a little meat with my glaze.)
  • If your glaze gets too thick, reheat it gently on low. It will turn liquid again.
  • Use good brown sugar – pure cane. It can make the difference between smooth glaze and grainy glaze!


Game Day Glazed Meatloaf
Print
Author:
Ingredients
  • MEATLOAF:
  • 1½ pounds ground pork
  • 1½ pounds ground ham (Easy to do in a food processor!)
  • 1 egg
  • 1 tablespoon Worcestershire sauce
  • 1 tablespoon prepared yellow mustard
  • ½ cup grated onion (or you can chop VERY finely)
  • 3 cloves garlic, minced
  • 1 cup finely ground quick oats (Grind in food processor, blender, or coffee/spice grinder.)
  • GLAZE:
  • 1 cup brown sugar
  • ¼ cup apple cider vinegar
  • 1 tablespoon prepared yellow mustard
  • ¼ cup pure maple syrup
  • ½ teaspoon maple flavoring (like Mapleine) - OPTIONAL
Instructions
  1. Heat oven to 350 F.
  2. Combine all of the meatloaf ingredients together well. (A stand mixer and dough hook is the easiest way to go.)
  3. Press into a ball and place in a medium size casserole dish. With damp hands, mold into a football shape. Take your time and make it as smooth as possible. This meatloaf is very lean and won't shrink much, so what you see is what you will get!
  4. Insert meat thermometer and place in oven. Bake for 40 minutes.
  5. When the 40 minutes are almost up, make your glaze:
  6. Combine all glaze ingredients in a medium saucepan. Stir well.
  7. Cook over medium-high heat, stirring constantly. Once mixture comes to a boil, reduce to medium and cook for 2 minutes. Remove from heat and add maple flavoring if desired.
  8. Remove meat from oven. Brush generously with glaze.
  9. Return to oven for 20 minutes.
  10. Remove and glaze meat again.
  11. Return to oven for 20 minutes, or until meat thermometer says 165.
  12. Remove from oven. Brush lightly with glaze and place on serving platter.
  13. Allow meatloaf to sit for 10 minutes, then place thin strips of mozzarella cheese on top to look like laces.
  14. Serve with sauce for dipping or drizzling.

Meatloaf ingredients

Meatloaf ingredients

I coarse-grated the onion for a smoother texture.

I coarse-grated the onion for a smoother texture. I used the finer side to grate the garlic too.

Adding ground oats.

Adding ground oats.

Smooth meatloaf with dampened hands.

Smooth meatloaf with dampened hands.

This is the second glazing.

This is the second glazing.

Slice and serve!

Slice and serve!

Whether you’ll be screaming your heart out or just watching the commercials, this succulent meatloaf will be the real winner on Game Day!

Lorinda