Caramel Rose Pecan Cupcakes

Celebrate fall with these luscious cupcakes filled with caramel, pecan, and cream cheese. Adding a drizzle of caramel and an elegant caramel rose will create a perfect dessert for the upcoming holidays.

The cupcakes are delicious, but let’s not pretend that they’re the focus here. It’s the rose. It’s all about the rose!

Believe it or not, the roses are very simple to make. All you’ll need is a bag of caramels, a sturdy rolling pin, a small round cutter, and parchment paper. I was blown away by how easy it was to work with caramels. They aren’t sticky, they don’t dry out when you’re playing with them, and they stretch and curl obligingly when you want them to. They stay pliable and . . . well . . . edible, unlike gum paste or candy clay.

And the cake itself is very basic. If your inclination is to reach for a boxed mix, I understand. But if you’d like to try your hand at making a cake from scratch, this would be the recipe to use. You’d have to add eggs, butter, and water to the mix; why not add just a few more ingredients, make the cake from scratch, and avoid the additives that are in packaged mixes?

Compare!

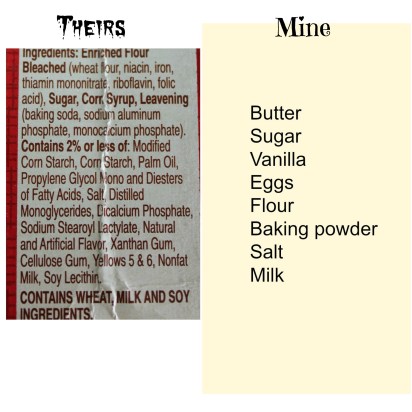
I think the hardest thing about this recipe is unwrapping the caramels, but if I can do it YOU can do it! Speaking of caramels, do you remember when Kraft had chocolate caramels, too? They’re back. Hard to find, but I just ordered some online. I’ll bet they’d make lovely roses too.

An 11-ounce bag will give you about 40 caramels. You’ll use 22 for the roses, and the remaining 18 for the filling. (Good grief, don’t sweat it if you’re short a caramel or two. You have to check to make sure they’re fresh, right?)

So, you’ll start out with the filling, then make the cake batter. You can create the roses while the cupcakes are baking, and make the frosting once they have cooled. And you know the drill: boxed cake, canned frosting, leave out the filling . . . anything goes. Simple chocolate cupcakes with fudge icing would look great with the roses too. Just make sure you make the roses!

First, the cupcake recipe:

Caramel Rose Pecan Cupcakes
Print
Author:
Makes approximately 18 cupcakes.
Ingredients
  • FILLING:
  • 18 unwrapped caramels
  • 2 tablespoons heavy cream
  • ½ cup cream cheese, softened
  • ¼ cup brown sugar
  • 1 egg yolk
  • ½ cup chopped pecans (toasted for the best flavor)
  • CAKE:
  • 6 tablespoons butter, softened
  • 1 cup white sugar
  • 1 teaspoon vanilla
  • 2 eggs, room temperature
  • 1½ cups cake flour (all-purpose flour may be substituted)
  • 1½ teaspoons baking powder
  • ¼ teaspoon salt
  • 1 cup milk
  • Buttercream icing (or icing of your choice)
Instructions
  1. In a small saucepan on low heat, melt the caramels and cream, stirring often. Set aside to cool.
  2. In a small bowl, beat the cream cheese and brown sugar thoroughly. Add egg yolk and beat well.
  3. Once the caramel is lukewarm but still fluid, add to cream cheese mixture. Beat well. Stir in chopped pecans. Set aside.
  4. Heat oven to 350 F. Place 18 paper liners in cupcake pans.
  5. In a large bowl, beat the butter and sugar until light and fluffy - at least 2 minutes.
  6. Mix in vanilla. Add eggs one at a time, mixing thoroughly and scraping the sides of the bowl between each egg.
  7. Sift together the flour, baking powder, and salt.
  8. Add half of the flour mixture the butter mixture. Beat well and scrape down the sides of the bowl. Add half of the milk. Beat well and scrape down the sides of the bowl. Repeat.
  9. Fill cupcake liners halfway. Don't add too much; you need to leave room for filling. If you have extra batter, make another cupcake or two.
  10. Using a tablespoon, place a scant spoonful of filling in each cup, using the spoon to make a small depression in the batter before scooping the filling into the center. The filling will still show on top, but this will help some of it to sink into the cupcake.
  11. Bake for approximately 24 minutes, until golden brown around the edges. Test with a toothpick, making sure to insert on the side of the cupcake, away from the gooey center.
  12. Cool thoroughly before icing and decorating.

Just follow the instructions; you can’t go wrong!

I’m going to cut right to the caramel rose directions.

  1. Use a large piping tip, or a cap from a bottle of water or a milk carton—whatever you can find that’s round and approximately 1 inch across—to cut out the caramel circles.
  2. I found that working with one caramel at a time is easiest. Place it between sheets of parchment and roll out thin. You should be able to cut 4 circles out of it with a reasonable amount of leftover scraps. (Pile them up and roll them out later.)
  3. In the picture below, the pieces of caramel in the background are round. That’s because I put each one in a tortilla press. It made it a little easier to roll out that way but isn’t necessary at all. And I’m still scratching my head about the fact that I put a square caramel in the press (between sheets of parchment) and it flattened the caramel into a perfect circle. WTH?
  4. Cut one circle at a time and pop it out of the cutter. If you let them stack up in there, they’re a real bear to separate. I know this for a fact! This would be a fun activity for kids to do and allow you to go right to the fun part of forming roses. It takes 9 rounds to make a rose.
  5. Set your finished roses on the counter (uncovered) or in a mini-tart pan for a little more support. If the rose flattens, just fluff it back out.

Cut out 1-inch circles. (The rounds in the background still need to be rolled out.)

Roll one circle to make the center. Overlap 3 petals around the center. Overlap 5 petals for the outside layer, pulling edges thin and curling down if desired. Petals can be shaped and enlarged before wrapping or after, whichever is easiest. (If you want to have enough caramel for a few leaves, you can cut some of that stem off and add it to the scraps.)

They’re your roses; make them 7 petals instead of 9 if you want. Play with the shapes of the petals. Make some big ones, some small. Play with your food! If you have any leftover caramel, a few leaves make the cupcake even prettier.

Use your favorite icing. I made a basic buttercream for this batch.

I had so much fun making these, and I’ll bet you will too. The roses would be perfect on individual brownies. Or chocolate cookies. Or . . . well, I’ll leave something to your imagination.

Lorinda


Camo Cake for “Deer Old Dad”

If you want a little bang for your buck this Father’s Day, make the man in your life a camouflage cake. (If he’s not the outdoors type, use his favorite team colors instead.) I covered my cake with a fudgy coating topped with crushed chocolate cookies, chocolate deer, and candy trees. (My man’s happy place is in the woods.)

I’d like to call this a pound cake, but technically it isn’t. I used leavening (just a little) and my egg, sugar, flour, and butter ratio isn’t exactly the same. Still, if it looks like a pound cake, and tastes like a pound cake, well . . . it’s delicious.

I used thick, fudge-like icing on my cake. If you prefer a traditional drizzle, I recommend making a ganache. It’s easy and you can use it right away as a glaze or let it sit and thicken for a few hours, then spread it like soft frosting. To make the ganache, use equal amounts of a good dark chocolate and heavy cream. For a drizzle, 4 ounces of chocolate and 1/2 cup of cream should do it. (Double this if you plan to spread it on the whole cake.). Chop the chocolate into tiny pieces and put in a bowl. Heat the cream to a simmer and pour it over the chocolate. Stir gently. Let it sit on the counter, stirring occasionally until it’s the consistency you want.

Here’s the recipe. I’ll give you decorating ideas below.

Camo Cake for "Deer Old Dad"
Print
Author:
Ingredients
  • CAKE:
  • 2½ cups sugar
  • 1½ cups (3 sticks) butter, softened
  • 4 large eggs, at room temperature
  • ¾ cup buttermilk
  • ¼ cup strong coffee (mostly for color - you can just use buttermilk if preferred)
  • 1 tablespoon vanilla
  • 2½ cups all-purpose flour
  • ¼ teaspoon baking soda
  • ¼ teaspoon baking powder
  • ⅛ teaspoon salt
  • 2 teaspoons unsweetened cocoa
  • 1 tablespoon "Special Dark" cocoa (or use regular cocoa and a little black food coloring)
  • Green food coloring
  • FUDGE COATING:
  • ¼ cup water
  • 2 tablespoons corn syrup
  • 2 cups powdered sugar
  • 6 ounces chocolate (chocolate chips are okay)
  • DECORATIONS (optional)
  • Crushed chocolate cookies (remove filling first if using sandwich cookies)
  • Green candy melts to make trees
  • Plastic or chocolate deer, ducks, hunters, etc.
Instructions
  1. Heat oven to 350 F. Line a large loaf pan with parchment. Spray any uncovered surface with baking spray (or grease and flour the exposed area). This recipe was made with a 10"x5" loaf pan. If your pan is smaller, don't fill more than ⅔ full. Make a few cupcakes if you have leftover batter.
  2. In a large bowl beat butter and sugar together for 3-4 minutes, scraping the side of the bowl often.
  3. Add eggs, one at a time, beating 30 seconds with each addition. Scrape the bowl!
  4. Combine buttermilk, coffee, and vanilla.
  5. In a small bowl, sift together the flour, baking soda, baking powder, and salt.
  6. Alternately add flour and liquids, beginning with ⅓ of the flour, stirring well, then add ⅓ of the liquid. Repeat until all has been added. Mix until well combined.
  7. Remove 1 cup of the batter and place in a small bowl. Fold in 1 tablespoon dark cocoa.
  8. Divide the remaining batter between 3 small bowls. Add 2 teaspoons regular cocoa to one bowl, add green food coloring to one bowl (add a touch of cocoa or orange color if you want to make a khaki color) and leave the last bowl as it is. You will have dark brown, light brown, green, and cream/tan.
  9. The first layer: using a small spoon, drop dollops of green, light brown, and cream batter in a random pattern in the prepared loaf pan. Place dark batter in a piping bag or sturdy food storage bag with the tip cut off and add long, skinny shapes here and there. Fill in some low places, climb the side of the pan - just don't use too much of it in one spot.
  10. The second layer: repeat, taking care to fill in any low places. Tap the bottom of the pan on a hard surface and gently smooth the top. The colors will smear together on top, but that's fine.
  11. Bake for approximately 75 minutes. Ovens vary, so check the cake at 1 hour by inserting a skewer into the center next to the crack (which is perfectly normal for a pound cake, by the way). If the skewer has batter or a lot of sticky crumbs on it, give the cake more time. It takes a long time to cook a pound cake in a loaf pan, and the edges may get a little dark before it's done. I just use a serrated blade to trim them if necessary.
  12. Cool the pan on a baking rack for 10 minutes before lifting the cake out.
  13. FUDGY COATING: In a small pot, combine water, corn syrup, and powdered sugar. Stir over medium heat until hot but not bubbling. Remove from heat and stir in chocolate. Spread over cake and decorate as desired.

Cream that butter and sugar until it’s light and fluffy (at least 3 minutes) then add eggs one at a time. Be patient and beat well!

Alternately add the flour mixture and the liquids.

Separate and color batter.

First layer. The dark brown is added using a pastry bag to get long, skinny shapes. What I didn’t realize was, since you’re cutting from the end, the squiggles should go cross-wise. Next time!

Second layer. Fill in those low spots!

Smooth the top and bake. Bake for a looooong time.

It will crack. Embrace it.

You can let it cool and serve it just like this, or drizzle it with glaze or ganache. You can wrap it snugly and hide it in the pantry where you’ll have sneaky little rendezvous with it for days (it just gets better and better as it ages) while you pretend to be looking for a can of mushrooms. Ahem.

Or you can decorate it however you choose. Here’s my cake. There are no smooth, perfect lines – this is a rustic cake for a man who’s into hunting.

I was really surprised by the lack of chocolate molds available in the shape of deer. Apparently, you can get deer heads or Bambi. I used a cheap little silicone mold I just bought, and it was not a good application for chocolate. If you want to get one, they’re on eBay and Amazon, but I’ve got to warn you, just count on getting a deer torso and head. The antlers and legs will break off. The mold is made for fondant, not chocolate. Honestly? I don’t even know how you’d get the fondant to come out of this delicate shape. 

So, you could bake and decorate deer-shaped cookies. (I’ll bet you have a reindeer cookie cutter in your holiday stash.) Or you could print a silhouette of a deer, put a piece of waxed paper over it, put melted chocolate in a pastry bag and follow the lines, filling in as you go. You could buy cute hunter/deer cake toppers. Or you could just make trees and pretend the deer is hiding behind them somewhere. (Probably the most realistic scenario.)

I piped trees, froze them briefly, then flipped them over and piped the other side. Add a sucker stick or toothpick before piping side two – then it’ll stick neatly in the cake.

I used light green candy melts for the trees, then painted them with color dust for depth. They didn’t want to stay upright; a simple solution would have been to add a toothpick when I flipped them over and piped the second side. Instead, the toothpicks were put to use propping the trees up.

I wanted the top to look like dirt, so I crushed chocolate sandwich cookies, discarding the white centers, and put the crumbs on waxed paper. I iced the top and long sides of the cake, picked it up by the ends, turned it over and rolled the top in crumbs. Ta Da!

If your guy isn’t into camo and hunting and you’ve still read this far, you are my new best friend! Instead of camo, make the colors those of his favorite team, or turn it red, white, and blue for the 4th of July!

Remember to keep the cake well wrapped at room temperature. It’s good for days . . . if it lasts that long.

Lorinda


Orange Cranberry Cupcakes

Chopped fresh cranberries and orange zest add little bursts of flavor to these sweet vanilla cupcakes. The fluffy orange icing is made with a generous amount of whipping cream, which keeps it from being too sweet.

Make sure to freeze lots of cranberries this season, because these cupcakes aren’t just for the holidays – you’ll want to make them all year long.

You know how many sweets I bake (my sweet tooth is legendary), so you might be surprised to know that I really prefer my cake unadorned, or at least minimally so, and sometimes even (gasp) scrape off some of the icing. Peer pressure often has me piling the icing on cupcakes just like everyone else, and I have to admit it makes for beautiful photos.  But how on earth are you supposed to eat a cupcake with mountain-high icing without having it go right up your nose?

Eeeuw. Not attractive.

So I’ll give you two options. A half-batch of icing is enough for a sweet little rosette on each cupcake, like this:

Or, if you love your icing, make a full batch and pile it higher, like this:

Yes, you could make even more and go for the mountain effect, but I didn’t go there. This time.

For an artsy effect, you might want to gently heat and drizzle orange marmalade or cranberry sauce over the icing, which would be lovely. But for the love of all that’s holy, do NOT use fresh cranberries to decorate the cupcakes unless you want to watch everyone pucker.  Sour, sour, sour. The berries that are baked into the cake itself are delicious, though.


Orange Cranberry Cupcakes
Print
Author:
Sweet orange cupcakes studded with bits of chopped fresh cranberries, topped with whipped orange icing. Makes 24 tall cupcakes, or approximately 28-30 standard cupcakes.
Ingredients
  • CAKE:
  • 1 cup butter, softened
  • 2¼ cups sugar
  • 1 teaspoon vanilla
  • 1 teaspoon orange extract
  • 4 eggs, room temperature
  • 3½ cups cake flour
  • 2 teaspoons baking powder
  • ½ teaspoon baking soda
  • ½ teaspoon salt
  • 1½ cups buttermilk
  • 1 cup fresh cranberries, coarsely chopped
  • grated zest from 1 large orange
  • 1 tablespoon flour
  • ICING:
  • 1 cup (2 sticks) butter, softened
  • ½ cup shortening
  • 2 tablespoons concentrated frozen orange juice
  • 2 teaspoons vanilla
  • grated zest from 1 large orange
  • pinch salt
  • 6 cups powdered sugar
  • ½ cup heavy whipping cream
  • orange food coloring if desired
  • Candy orange slice or sprinkles for decorating
Instructions
  1. Heat oven to 350 F. Place extra large baking cups in two 12-cavity cupcake pans. (If you are using regular baking cups, this recipe will make approximately 28-30.)
  2. In a large bowl, beat the butter and sugar together until light and fluffy - about 5 minutes.
  3. Add vanilla and orange extracts and mix until combined.
  4. Add eggs one at a time, beating and scraping the bowl between each addition.
  5. In a medium bowl, sift the flour, baking powder, baking soda, and salt together.
  6. Alternately add the flour mixture and buttermilk to the butter mixture, beginning with the flour and ending with the buttermilk, approximately ⅓ of each at a time. Stir each addition well before adding the next.
  7. Beat mixture just until well blended.
  8. Add 1 tablespoon flour to the cranberries and toss to coat. Fold cranberries and orange zest into batter.
  9. Scoop into cupcake liners. For extra large (or tulip-type) liners fill a little over half full - about level with the pan. If you're using regular liners, fill approximately ⅔ full.
  10. Bake approximately 20-25 minutes, or until cupcake springs back up when pressed on the top.
  11. Cool on a rack.
  12. ICING:
  13. In a large bowl, beat together the butter, shortening, orange juice, and vanilla together well.
  14. Add powdered sugar and orange zest, beat until combined. If too stiff to mix, add a little of the whipping cream.
  15. Add whipping cream and beat until light and fluffy. This will take several minutes.
  16. Place half of the icing in a bowl and add a small amount of orange food coloring.
  17. Fill a pastry bag fitted with a large open star tip with both colors to get a swirled look. For a rosette, start in the center of your cupcake and work in circles outward. For a mounded "mountain" effect, start on the outside and work your way in, increasing pressure at the center. Top with a candy orange slice or sprinkles.

My next-door neighbor, Pam, gave me some wonderful parchment supplies and I’m in love with these extra-large liners. They come up high so you can use a little more batter. (They fit nicely into two of my standard cupcake pans but were a little too big for the other.) If you can’t find them, you can use tulip-type liners or just make more regular-sized cupcakes.

Beat butter and sugar until fluffy.

Add vanilla, orange extract, and eggs. Beat well.

Add one-third of the flour. Stir.

Add one-third of the buttermilk. Stir.

….and repeat. Again!

Dust the cranberries with flour. Fold into batter along with orange zest

Fill tall cups a little over half full.

Beat butter, shortening, orange juice, and vanilla together. Add powdered sugar and orange zest.

Whip in the cream. So fluffy!

Put both colors together in a pastry bag fitted with a large open star tip and make ’em pretty! Top with an orange candy slice.

These would make a perfect holiday dessert . . . not too rich, not too heavy, and so festive!

Time’s flying and Christmas is just around the corner. I’m so not ready. The next time you hear from me I’ll probably be pushing chocolate hearts, so let me say it right now:

Merry, Merry Christmas!

Lorinda

Chocolate Cupcakes with Grand Marnier Icing

I gussied these chocolate cupcakes up for Halloween, creating pumpkins with little spiders lurking on them, but without the spiders they would be perfect for Thanksgiving – a real crowd-pleaser. Grand Marnier makes these an adult indulgence, of course, but you can always replace the liqueur with orange juice if you are feeding them to littles.

I’ll go with the booze, thank you very much.

I love Grand Marnier and usually splurge on a bottle every year. Mostly for baking, though a little occasionally makes its way into a small brandy snifter. Who can resist that? What amazing flavor it imparts to buttercream icing! It doesn’t take much, so you could just buy one or two of those mini bottles at the liquor store if your budget is tight, or go with a knock-off version.

Chocolate Cupcakes with Grand Marnier Icing
Print
Author:
Makes about 30 cupcakes Decorating them like pumpkins uses a lot of icing! If you choose to simply frost the cupcakes, you can cut the icing recipe in half.
Ingredients
  • CAKE:
  • 2¼ cups all-purpose flour
  • 2 cups sugar
  • 1 teaspoon salt
  • 2 teaspoons baking powder
  • 1 teaspoon baking soda
  • 1 cup cocoa powder (I use a mixture of regular and extra dark)
  • ¾ cup buttermilk
  • 1 cup oil (I use peanut oil, but canola would be good too)
  • 1 teaspoon vanilla
  • 3 eggs
  • ½ cup hot coffee
  • Grand Marnier for drizzling over cupcakes before icing (optional)
  • ICING:
  • 1 cup butter
  • 4 tablespoons shortening
  • 9 cups powdered sugar
  • ¼ cup Grand Marnier liqueur
  • 2 tablespoons frozen orange juice concentrate
  • ¼ cup heavy cream
  • Orange food coloring (optional)
  • Chocolate slivers, green icing for decorating.
Instructions
  1. Heat oven to 350 F. Line cupcake pans with paper liners.
  2. In a large bowl, whisk together the flour, sugar, salt, baking powder, baking soda, and cocoa powder.
  3. Add buttermilk, oil, and vanilla. Beat well, scraping the bowl often.
  4. Add eggs, one at a time, beating well in between each addition.
  5. Stir in the coffee until mixture is smooth.
  6. Fill cupcake liners a little more than half full, but no more than ⅔ full.
  7. Bake 25-30 minutes, or until top springs back when touched and a toothpick inserted in the center of a cupcake comes out clean.
  8. Cool on a rack.
  9. Once cool, you may want to poke inch-deep holes in the cupcake tops and drizzle each cupcake with ½ teaspoon Grand Marnier, letting it soak in through the holes.
  10. ICING: beat together the butter, shortening, and 2 cups of the powdered sugar until creamy.
  11. Add Grand Marnier, frozen orange juice, and cream. Beat until well combined.
  12. Add the remaining powdered sugar, 1 cup at a time, beating well after each addition. Scrape the sides of the bowl often. Beat on high until fluffy, adjusting if necessary by adding more powdered sugar or cream to achieve a thick icing that will hold shape when piped.
  13. Add orange food coloring, if desired.
  14. With a pastry bag fitted with large round tip, pipe a mound in the middle of each cupcake. Starting at the base of the mound and working your way around the icing mound, pipe from bottom to top, releasing pressure on the pastry bag as you reach the top. Put a small sliver of chocolate in the center of the top for a stem and, if desired, use a small amount of green icing to add leaves.

Fill a little over halfway.

Poke holes with a skewer and drizzle with Grand Marnier.

Use large round tip to make a flat circle then center mound (like a witch’s hat). Or . . . just make a mound.

Pull icing up from the base of the circle to create a pumpkin.

Now just stick a little sliver of chocolate (or get creative: a pretzel stick, piece of Tootsie Roll, cacao nib, whatever) on top and, if you want, add a few leaves and curlicues with green icing and a tiny writing tip. I piped small spiders on mine with melted chocolate (because the crow requested them) but if you don’t want to get all crazy, you could just do this: 

Added bonus to taking this shortcut: you would only need half of the icing recipe for the pretty little floret. A drizzle of chocolate or a few sprinkles, and it’s a thing of beauty.

Enjoy!

Lorinda

Maple Whiskey Coffee Cake

Maple whiskey, ground pecans, and a generous topping of crunchy streusel combine to give this fluffy coffee cake unbelievable flavor – a cozy treat for crisp fall mornings.

I adore coffee cake. Well, to be honest, I adore the sugary topping. Usually, the cake part itself is kind of uninspired – basically just a canvas for the delectable topping. But for this recipe, I added a layer of toasted ground pecans combined with streusel and maple whiskey which creates an oasis of flavor in the cake.

Grab a big cup of coffee and savor every bite!


Maple Whiskey Coffee Cake
Print
Author:
This fluffy coffee cake has a layer of maple whiskey and pecan, with a crunchy streusel topping and maple whiskey drizzle. Perfect for chilly fall mornings!
Ingredients
  • STREUSEL:
  • 1 cup plus 1 tablespoon white sugar, divided
  • 4 tablespoons butter, melted
  • 2 teaspoons cinnamon
  • ¼ cup plus 1 tablespoon flour, divided
  • ¾ cup ground pecans (toasted first for best flavor)
  • pinch salt
  • ¼ cup maple flavored whiskey (or regular whiskey and ½ teaspoon maple flavoring)
  • CAKE:
  • 1 cup sugar
  • ½ cup butter, softened
  • 2 eggs
  • 2½ cups all-purpose flour
  • 2 teaspoons baking powder
  • ½ teaspoon baking soda
  • ½ teaspoon salt
  • 1 cup buttermilk
  • GLAZE (optional):
  • 2 tablespoons maple-flavored whiskey
  • ½ teaspoon maple flavoring
  • ¾ cup powdered sugar
Instructions
  1. Make streusel. In a small bowl, combine 1 cup of the sugar (reserve 1 T), the melted butter, cinnamon, ¼ cup of the flour (reserve 1 T), ground pecans, and salt. Stir until combined. Remove 1 cup of this mixture and put it in another small bowl. Add the reserved sugar and flour and the whiskey. (This will be the filling.) Stir until combined. Set both bowls aside.
  2. Heat oven to 350 F. Spray a 9-inch springform pan with an oil/flour baking spray, or lightly grease and flour pan. (Alternatively, you can use a Bundt pan. Make sure to spray or grease/flour it well.)
  3. In a large bowl, beat sugar and butter until light.
  4. Add eggs, one at a time, beating well and scraping the sides of the bowl often.
  5. Combine dry ingredients and add alternately with the buttermilk, using half of each mixture at a time, beginning with the dry ingredients and ending with the buttermilk. Beat just until well combined.
  6. Spread half of this mixture into prepared pan, bringing it all the way to the edge of the pan.
  7. Spread all of the whiskey filling onto the batter and top with the remaining cake batter, spooning it carefully over the filling and spreading gently.
  8. Sprinkle all of the streusel over the batter and bake for approximately 45 minutes, or until a toothpick or wooden skewer comes out clean when inserted in the middle of the cake. (If using a Bundt pan, test after 40 minutes.)
  9. Cool on a rack for 15-20 minutes before unlatching outer ring of pan.
  10. Whisk together the glaze ingredients. Adjust liquid or powdered sugar to achieve a glaze that's easy to drizzle or pipe onto warm cake.

Hints:

  • Grind the toasted pecans in a coffee/spice grinder or food processor. Short bursts are best so it doesn’t turn into pecan butter. Small chunks are fine. If you don’t have a grinder/processor, simply chop the nuts finely.
  • Can’t find maple flavored whiskey? (I’m SO sorry.) Use regular whiskey and 1/2 teaspoon of maple flavoring, like Mapleine. If you love maple, add a little more flavoring.
  • Don’t want to use booze at all? (Eyebrows raised incredulously.) Substitute maple syrup and leave out the additional tablespoons of sugar and flour.
  • Do you have maple sugar? I love baking with that stuff! Use it in place of white sugar in the streusel for additional flavor.
  • You can also use a Bundt pan for this. You’ll just have to flip the cake over once it’s cooled to get the streusel on top.

Grind the pecans. (Toast them first for more flavor!)

Stir together the streusel ingredients

Add maple whiskey to half of the streusel mixture.

Spread half of the batter in the pan, then add all of the whiskey streusel filling.

Spread remaining batter over the filling and sprinkle streusel over the top.

Ready to bake!

Drizzle with maple whiskey icing if desired.

It really doesn’t take long to get this cake ready for the oven, and you can just imagine how good it smells, can’t you? Give it a try, and I’ll bet it will be a regular occurrence at your house. I mean, everyone likes whiskey for breakfast, right?

Lorinda

All-American Angel Food Cake

This may sound odd coming from a confirmed chocoholic, but if I could only have one type of cake for the rest of my life, it would be angel food. For the Fourth of July I made a red, white and blue angel food cake, giving this classic cake red and blue layers and topping it with strawberry whipped cream. Light, cool, and sweet—just perfect for a hot summer day.

I didn’t get to try it, however, because I’m on a super strict diet. But my wonderful group of taste-testers did, and they all were very enthused. Need a laugh? I take all of the goodies that I am not allowed to eat to my weekly Watching Our Weight group and divvy it up. Talk about sabotage. But the biggest loser each week wins the pot, so can you blame me? Bwa ha ha.

This cake isn’t as high and fluffy as a regular angel food cake because it requires some manhandling of the batter to get the colored layers. Usually the batter is very gently folded and then spooned carefully into a tube pan. For this cake I had to actually spread the batter, which deflates some of those precious air bubbles. But it was still light and tender.

See? Still plenty high. And in case you’re wondering, the colors really were that vibrant. I used a concentrated food color from Wilton, and whoooooeeeee!

For best results:

  • Line the bottom of the tube pan with parchment.
  • Stir the colored batters as little as possible. It’s okay if the colored batter is a little streaky.
  • Use concentrated or paste food coloring. It will take too much regular liquid color to get a nice red, and the liquid will destroy the air bubbles.
  • Bake for an hour without opening the door to peek (unless you have a wonky stove and can’t trust it).
  • I rarely use whipped topping in a tub, but it is more stable for this application. You can definitely use whipped cream, but the topping will be softer and won’t hold up as well in hot conditions.
  • Room temperature egg whites are used. I suggest you separate the eggs while they’re still cold and then leave the bowl of whites out for an hour to warm up (covered, of course). If you try to separate the eggs when they are room temperature, the yolks tend to break. Ask me how I know!

If you haven’t made an angel food cake from scratch before, don’t panic. It isn’t hard at all. Room temperature egg whites, well-sifted flour, and squeaky clean utensils are all you need to remember. Well, and to follow the recipe:

All-American Angel Food Cake
Print
Author:
Ingredients
  • CAKE:
  • 1 cup sifted cake flour
  • 1½ cups superfine sugar (important to use superfine)
  • 1⅓ cups egg whites (about 11 eggs), room temperature
  • 1¼ teaspoons cream of tartar
  • ¼ teaspoon salt
  • 1 teaspoon vanilla (or ½ teaspoon almond or lemon) extract
  • Concentrated red and blue food coloring, to achieve desired shade
  • Powdered sugar, sprinkles if desired
  • STRAWBERRY CREAM:
  • 1 tub whipped topping OR 3 cups of sweetened whipped cream
  • ½ cup chopped fresh strawberries (more to taste)
  • 2 tablespoons strawberry spreadable fruit - or jam.
  • small fresh strawberries for garnish
Instructions
  1. Heat the oven to 325 F.
  2. Prepare a tube pan by cutting a circle of parchment the size of the bottom of the pan and cutting a round hole in the middle so that it will fit over the tube. Do not grease or flour the parchment or the pan.
  3. In a small bowl, sift flour 3 times with ½ cup of the sugar.
  4. In a large bowl, beat the egg whites until foamy. Sprinkle the salt and cream of tartar over eggs and beat until they hold soft peaks.
  5. Add the rest of the sugar, ¼ cup at a time, beating after each addition. Stir in flavored extract.
  6. Add the flour and sugar mixture ½ cup at a time, folding gently after each addition.
  7. Remove 2 cups of batter, placing 1 cup of each into a separate small bowl. Add red food color to one bowl and blue to the other, and fold in gently. Only stir as much as necessary; it's okay if it's streaky.
  8. Drop ⅓ of the white batter into the bottom of the lined pan and use the back of a spoon or a small spatula to spread evenly. Again, don't overwork the batter!
  9. Add all of the red batter and spread gently to cover the white batter. Using a thin spatula or knife, run all the way around the circle halfway between the tube and the side of the pan. Only do this once.
  10. Add ⅓ of the white batter, level it out, and top with the blue, spreading carefully. This time when you run the knife through the batter, keep it shallow so you don't disturb the red layer.
  11. Cover with the remaining white batter, smooth gently, and bake 1 hour at 325. Top should be deep golden brown.
  12. Turn pan upside down on cooling rack and allow to cool completely. Slide a knife around the side of pan to release the cake. Dust with powdered sugar. Add a few sprinkles if you wish.
  13. STRAWBERRY TOPPING:
  14. In a small bowl, stir the chopped berries and spreadable fruit together. If you are using whipped topping, stir together with the berry mixture until well combined. If you are using fresh whipped cream, fold the berry mixture into the topping as gently as possible.
  15. Keep topping refrigerated until needed. Place a dollop on each slice of cake and top with a berry.


Gradually add flour mixture to eggs.

Fold food coloring into divided batter.

Gently spread one third of white batter on bottom of pan. Cover with all of red batter.

Run a spatula or knife through the batter, one time. Go all the way around the circle, halfway between the tube and the side of the pan.

Repeat with layer of white, then blue. Go shallow when you run the spatula around the center so you don’t disturb the red. Top with remaining white batter.

That’s it! Bake it, cool it, and top it if you wish, though I love my angel food cake plain, too. Dust the cake with powdered sugar (and maybe a few sprinkles) to make it purty, and cut it with a serrated blade.

Hooray for the red, white and blue!

Lorinda


Honey Bee Spice Cake

This pretty spring confection is a five layer honey spice cake filled with whipped buttercream icing and topped with a layer of marshmallow honey fondant. A cute little beehive is made from leftover cake pieces (removed because I just had to make the cake a hexagon to go with the honeycomb theme) and placed on the top amid icing flowers and leaves and a jellybean honey bee or two.

You’re looking at a lot of time, labor, and ingredients. The butter! Omygosh, the powdered sugar! If this has you shaking your head, don’t stop reading. I’ll give you time-saving options.

The picture doesn’t do it justice; this is a huge cake. I used 10-inch square pans, which hold roughly twice what a standard 9-inch round pan holds. Even after cutting my cake into a hexagon shape, it weighed a ton. Trust me, it’s a thing of beauty, but be prepared to make a lot of icing! (And by this I mean . . . buy extra butter and powdered sugar. Depending on how generous you are, or how many flowers you want to make, you may need another batch.)

Right off the bat I’m going to go into my usual disclaimer: I’m a little bit nutty when it comes to playing with my food. I’m also retired and have a whole lot of free time. If you don’t want to go all the way with this project, here are some ideas for cutting corners:

  • In the first place, don’t cut corners! I made a hexagon to resemble honeycomb. You can stick to a round or square cake.
  • Cut the recipe in half and use three 9-inch round pans. (If you only have two pans, use approximately 2 1/2 cups of batter in each of your available pans and bake the cakes. (They won’t take as long to bake, so start checking at 30 minutes.) When they’re done, re-use one of the cake pans with the remaining batter. It will be fine waiting there on the counter for its turn. Don’t try to divide them – just level the tops and go with three thicker layers.
  • If you choose not to go with a hexagon shape, you won’t have leftover cake for the beehive. Use a big round pastry tip and pipe a buttercream beehive in the middle. Or just decorate with flowers and bees.
  • Easier yet? Make cupcakes. The fondant can still be rolled out and pressed with bubble wrap for the design, then cut into squares and draped over the cupcakes. An icing beehive on each would look really cute.
  • Speaking of fondant, you could save time by buying it (in the cake decorating aisle of large stores), but it sure won’t taste as good. Lots of people just peel it off anyhow, so it’s up to you.
  • Flowers are a lot of fun to create, but they can also be very time consuming. You can buy pre-made decorator flowers, use edible fresh flowers, or even buy wafer paper edible flowers online. (Just type “edible wafer flowers” into your search engine.) See what wafer paper pansies look like here on my Brownies for a Crowd post.
  • Don’t forget that you can spread this out a bit, too. Make the cakes ahead. Wrap them well and freeze them, or let them chill in the fridge for a day or two. If you’re making flowers, do that ahead of time, piping them onto pieces of waxed paper and freezing them. The bees can be made way ahead. They don’t need any special treatment – just put them up high where they aren’t a temptation to little ones, so they don’t “fly away”.


TO MAKE BEES,  use jelly beans – a yellow one for the body and thin slices of either yellow or white for the wings. I used a Wilton edible ink marker for the eyes and stripes, but found that some jellybeans really resisted the color. A little dark chocolate and a very small piping tip might be easier for you. I stuck a pin in the poor bee’s bum for easy handling, and then when he was finished, pulled out the pin and put a tiny strip of black licorice in the hole for a stinger. I melted a little white chocolate in a small dish to use as glue and attached two thin slices to the sides for wings. You will need to hold them in place for a few seconds to let the white chocolate dry.

My little bee factory

The following recipe is for the LARGE spice cake. It’s easy to cut in half if you prefer to go that route. Yes, yes, I know – the recipe goes on and on and on. That’s because it is for the fondant, the cake, and the icing!

Honey Bee Spice Cake
Print
Author:
This will make a huge cake, using three 10-inch square cake pans. You can also divide the recipe in half and use three 9-inch round pans instead. Make the fondant the day before and leave (covered) on the counter until ready to use.
Ingredients
  • FONDANT (for best results, make the day before):
  • 14 ounces marshmallow creme (also called "fluff")
  • 2 tablespoons honey
  • 1 teaspoon vanilla extract
  • yellow and orange food coloring, and a small amount of cocoa powder to achieve honey color
  • 2 pounds powdered sugar
  • CAKE:
  • 1 cup cooking oil (peanut, canola, anything light colored)
  • 1 cup butter, room temperature
  • 2 cups sugar
  • 1 cup honey
  • 1 tablespoon vanilla
  • Juice and zest of one large lemon (about 3 tablespoons juice)
  • 12 eggs, separated
  • 3 cups cake flour
  • 2 cups all purpose flour
  • 2 teaspoons baking soda
  • 2 teaspoons baking powder
  • 1 teaspoon salt
  • 2 tablespoons cinnamon
  • 1 teaspoon nutmeg
  • ½ teaspoon allspice
  • ½ teaspoon ginger
  • ½ teaspoon ground cloves
  • ½ teaspoon cardamom (optional)
  • 1½ cup buttermilk
  • 1 cup milk
  • WHIPPED BUTTERCREAM ICING:
  • 1 pound (4 sticks) butter, room temperature
  • 1 cup shortening
  • 3 pounds powdered sugar
  • 1 teaspoon vanilla (clear vanilla for a lighter color)
  • 1 teaspoon banana flavoring (optional - substitute lemon or extra vanilla if preferred)
  • ⅔ cup heavy cream
  • assorted food coloring
  • Small bubble wrap
  • Decorations: flowers, bees (you can find these pre-made in some cake decorating departments, or make them from jelly beans), leaves, sprinkles
Instructions
  1. FONDANT: In a large bowl, combine the marshmallow cream, honey, and vanilla extract. Add food coloring one drop at a time, and a little cocoa powder, until it is the color of honey. Stir in as much of the powdered sugar as you can.
  2. Lightly coat your work surface with shortening and sprinkle generously with powdered sugar. Using greased hands, knead the remaining powdered sugar into the fondant. This may take 10-15 minutes. When finished, the fondant should be fairly stiff and should not stick to your hands. (If it's still sticky, use a little more powdered sugar.) Cover with a bowl on the counter or place in a plastic storage bag. Leave out on the counter until ready to use.
  3. CAKE: Heat oven to 350 F. Grease and flour (or use an oil/flour spray like Baker's Joy) 3 10-inch square cake pans. (If you don't have 3 pans, bake the cakes in shifts.) Place parchment in the bottom of each pan.
  4. In a large bowl combine oil, butter, sugar, and honey. Beat for 2 minutes.
  5. Add vanilla, lemon juice, and lemon zest and beat until combined.
  6. Add egg yolks, one at a time, beating well between each addition. Scrape the sides of the bowl frequently.
  7. In a large bowl or pan, sift together the flours, baking soda, baking powder, salt, and spices.
  8. In a small bowl or measuring cup, combine the buttermilk and milk.
  9. Beginning with the dry ingredients and ending with the liquid, add ⅓ of each at a time, mixing each time just until incorporated. So . . . ⅓ of the flour mixture, mix. ⅓ of the liquid, mix, repeat until all is combined.
  10. In a large bowl, beat egg whites until stiff peaks begin to form. Fold gently into the cake batter.
  11. I filled two of the pans a little over half full - about 7 cups of batter in each - (these will each be divided into two layers once cooled) and filled the third pan less than half full - about 4 cups of batter. The third cake will be thinner, and won't be divided - just use it as the top layer.
  12. Bake for approximately 40 minutes (a little less for the thinner cake), or until a toothpick comes out clean when inserted in the middle of the cake. Ovens vary - if you see that the cake is browning and pulling slightly away from the sides of the pan, give it the toothpick check!
  13. Allow the cakes to cool in the pan on a rack for 10 minutes, then carefully turn them out.
  14. For easiest handling, I really recommend you chill the cakes thoroughly before cutting layers or trimming.
  15. I made a cardboard template of a hexagon and used it to cut the cake before layering it. Save the trimmings in a covered bowl for later if you plan on making a beehive for the top.
  16. Divide each of the two larger cakes into two equal layers. Leave the thin cake as is. A little dome won't hurt with this cake, because the fondant will be draping over it, but you can level it if you'd like.
  17. ICING: In a large bowl, beat the butter well. Add the shortening and beat until thoroughly combined. Beat in the vanilla and banana flavoring. Add powdered sugar slowly. If mixture gets too thick to beat, drizzle in a little of the cream. Scrape sides often, and beat until completely combined.
  18. Slowly add cream, beating at high speed until icing is thick but spreadable. If it is too thick, add a little more cream. If it is too thin, add a little more powdered sugar.
  19. Spread icing between each layer, being careful to bring the icing all the way out to the edge. (Piping a "dam" around the edge is very helpful.)
  20. Cover the entire cake with a very thin coating of icing. This is a crumb coat, which will trap the crumbs and keep the cake looking nicer when you ice it.
  21. Chill for at least one hour, or pop the cake in the freezer for 20-30 minutes.
  22. Spread icing over entire cake. Don't worry too much about making it perfect. If you're using the fondant top, you'll only see the bottom part of the cake. Save about ¼ cup of icing if you are making a beehive for the top.
  23. DECORATE:
  24. Roll the fondant out on a greased surface generously sprinkled with powdered sugar. Roll just a little less than ¼ inch thick. Cut a rough circle at least 1 inch bigger all around than the top of the cake. Press entire circle with lightly floured bubble wrap to achieve a honeycomb effect. You can do this with a rolling pin, but I find that I have better control when pressing with my hand.
  25. Using both hands, lift the fondant up and quickly drape over cake. Fondant will stretch! Don't press onto sides of cake - let it hang. Use a pair of scissors to trim around the bottom of the fondant in a slightly uneven design or scallop, leaving the bottom inch or two of the cake showing.
  26. To make the beehive, combine cake scraps with just enough icing to make it hold together when you squeeze it. Form a beehive and drape with a thin piece of fondant. Use fingers to press smoothly. Press a little cocoa in the beehive entrance to give it some depth. Set on cake.
  27. Decorate with icing flowers, leaves, honey bees.

Mmmm. Marshmallow creme!

Grease those hands and knead it! Use as much powdered sugar as it will hold.

Fondant. Yes, it’s messy to make, but pretty tasty! Cover and let it rest.

Cool for 10 minutes, then turn out onto rack to cool completely.

Divide the two larger cakes as evenly as possible. Level the third (thinner) cake and use whole.

Layer with icing.

It’s crumb coated. Now chill!

Roll it out, almost 1/4-inch thick so it will show the bubble marks.

Press the bubble wrap firmly on fondant.

Ice the cake. Make it pretty around the bottom, but don’t worry too much about the top. It’ll be covered with fondant.

Lay the fondant over the cake. Use a scissors to trim it up so the bottom of the cake shows. I piped decorations around the bottom first. Don’t do this! It made it harder to shape the fondant.

Roughly shape the beehive out of cake scraps mixed with a little icing.

Lay fondant over hive and press gently to shape. Use thumb and a little cocoa powder in the bee entrance to give it some depth.

Decorate with icing leaves and flowers, or anything else that suits your fancy.

That’s it. Piece of cake, right? Hahaha, I know. I’m ducking right now.

Lorinda

Boozy Chocolate Cherry Sundae Cake

This rich, slightly boozy chocolate cake is paired with a light, slightly boozy whipped tart cherry buttercream filling. (Are you seeing a theme here?) And if that isn’t enough to make you put on your apron, it’s covered with chocolate ganache and sprinkled with chopped walnuts. Add a dollop of whipped cream, and you’d think you were eating a sundae…only better.

Boozy sundaes are the best!

Of course you don’t have to add alcohol. A little cherry flavoring in the cake would be fine. Ditto with the buttercream – just add more flavoring. Obviously you’d want to do this if you were planning to serve the cake to children, because contrary to what we have all been told, alcohol doesn’t always magically disappear when heated.

I used a 6-inch Wiltons heart pan. I sure wish I had two of them, because I had to bake one at a time, and this recipe makes four. It just took a little more time, but the batter held up very well at room temperature. Each cake was leveled and then sliced into two thin layers. I only used five layers for the finished cake, but wisely compensated for the “wonky” layers I knew I’d get. (I seem to be missing that gene. You know, the one where you can see if something is level. You should see the way pictures hang on my wall!)

Hubby happily ate the scraps.

This isn’t an inexpensive cake to make. The dried cherries are pricey, good ganache uses good chocolate, and of course you’ll need the chocolate cherry liqueur and the cherry brandy, but those two liqueurs are wonderful to have around. They are great in so many dishes…or just for sipping!

Seriously, if there’s any time to indulge in something completely decadent, it’s in February! You can use the excuse of Valentine’s Day, George Washington’s birthday (hellloooo…cherries) or a morale booster as winter begins to turn into a slushy, gray mess. Any or all of those reasons work for me.

Tips:

  • If you can’t find the dried cherries, by all means used canned sweet cherries – or frozen cherries – or even maraschino cherries. Just blot them well and skip the whole “soaking them in booze” step. I’m sure you’ll find something to do with that extra liqueur.
  • I just can’t be brutal and cut much off the top of the small cakes to level them. I take off what I must, but there is still a flat half and a slightly rounded half. I use the flat halves for layering, so they’ll stay somewhat level, and then one with a slightly rounded edge for the top. It looks pretty that way, and lets the ganache cascade off nicely.
  • Speaking of cascading, stop before you think you should. That stuff will keep working its way down and you don’t want huge puddles at the bottom. Hold off on the nuts until you’re sure the lava flow has stopped, otherwise they will be going along for the ride.
  • I used five of the eight baked layers, which was plenty tall. One tore, and two were a little out of level. If you trust your slicing skills better than I trust mine, just bake three of the cakes and make a few cupcakes with the remaining batter.

Do you know why this recipe looks so HUGE? There are three components, and I’m very wordy about how to do each – the cake, the filling, and the ganache. It’s not as scary as it looks! It all begins with a rich, tender, killer chocolate cake:

Boozy Chocolate Cherry Sundae Cake
Print
Author:
Ingredients
  • CAKE:
  • 2¼ cups all-purpose flour
  • 1 teaspoon salt
  • 1 teaspoon baking powder
  • 2 teaspoons baking soda
  • ¾ cup unsweetened cocoa
  • 2 cups sugar
  • 1 cup oil (I use peanut or walnut oil - any light flavored oil will work)
  • 1 cup VERY strong coffee (see note at bottom of cake ingredient list)
  • ⅔ cup milk
  • ⅓ cup Baileys Chocolate Cherry Liqueur (or substitute with milk plus 1 teaspoon cherry flavoring)
  • 3 large eggs
  • 1 teaspoon vanilla
  • NOTE: For best flavor, strong coffee can be made by bringing ½ cup ground coffee and 1½ cups water to a boil. Remove from heat and allow to cool. Strain into measuring cup to equal 1 cup.
  • FILLING:
  • ½ cup tart dried cherries, chopped into small pieces
  • 3 tablespoons cherry brandy, divided (or 2 tablespoons water, 1 tablepoon milk)
  • 1 cup butter, softened
  • ½ cup shortening
  • ½ teaspoon cherry flavoring (a little more if you aren't using the brandy)
  • 10 drops red food coloring
  • 6 cups powdered sugar
  • ⅓ cup heavy whipping cream
  • GANACHE:
  • 8 ounces good quality dark chocolate, chopped
  • 1 cup heavy whipping cream
  • walnuts or sprinkles, if desired
Instructions
  1. Heat oven to 350 F. Grease and flour (or use an oil and flour spray like Baker's Joy) pans. A piece of parchment, cut to fit pan, can be put in the bottom for ease of release. For layered heart cake, use 6-inch heart pans. Cakes may be baked one at a time if only one pan is available. (Make sure pan is cooled and greased between cakes.) Two 9-inch round pans may be used instead.
  2. In a large bowl, sift the flour, salt, baking powder, baking soda, cocoa, and sugar.
  3. Add oil, coffee, milk, and Baileys (or milk and flavoring, if preferred). Beat for 1 minute on medium speed, scraping sides of bowl.
  4. Add eggs and vanilla. Beat 1 additional minute.
  5. Pour batter into pans: Fill the 6-inch heart pans half way, approximately 1½ cups of batter in each. Or divide evenly between 9-inch pans.
  6. Bake 25 minutes. Test with a toothpick. It should come out cleanly when inserted in the center of the cake.
  7. Allow cakes to cool in pans for 5 minutes, then carefully turn out onto rack to cool completely. Chill for easiest handling! Cut a thin slice off of the top of each cake to level it, and then cut each cake into two equal layers.
  8. FILLING:
  9. In a small pan on medium heat, combine the dried cherries and 2 tablespoons cherry brandy (or water, if preferred). Bring to a simmer, remove from heat, and let sit for 20-30 minutes.
  10. In large bowl, beat the butter and shortening until smooth and creamy. Add remaining tablespoon of brandy (or milk, if preferred) cherry flavoring, and food coloring, and beat well.
  11. Gradually add powdered sugar and beat until completely incorporated. Mixture will be thick.
  12. With beater on medium high speed, slowly add cream and continue to beat until stiff peaks form - approximately 3 minutes.
  13. Drain the cherries (keep the brandy they were soaking in for later) and stir into the filling.
  14. Spread between 5 cake layers, crumb coat the sides (this is a very thin coating to hold in the crumbs) and chill for about an hour to let the coating set.
  15. While the coating is setting, make the ganache.
  16. GANACHE:
  17. Place chopped chocolate into small bowl.
  18. In small pan on medium heat, bring the cream to a heavy simmer. It should be bubbly, but not at a boil. Remove from heat.
  19. Pour half of the hot cream over the chocolate and let it sit for 2 minutes. Stir gently with a rubber spatula.
  20. Return the cream to the stove and bring back to a simmer. Pour over chocolate mixture.
  21. Fold slowly until cream and chocolate are combined. Set aside, but stir occasionally.
  22. If you are using liqueur in this recipe, use a wooden skewer to poke holes in the top of the chilled cake, almost through the bottom layer. Carefully pour remaining brandy (from the cherries) into the holes. OR you can use a tablespoon or two of Baileys. Not too much or the cake will get mushy!
  23. Ice the cake, sides and top, with the remaining filling.
  24. If your ganache is thick but still pourable, it's ready to be spooned over the top of the cake. If it's still very thin, wait a little longer; it will thicken as it sets.
  25. Decorate with nuts or colored sprinkles.


Filled. I used the bottom half of each cake for the layers (they’re flatter) and then a more rounded top half for the top of the cake. This will allow the ganache to flow better.

Crumb coating.

Hot cream added to chopped chocolate…

…equals magic. Ganache!

Pouring ganache over iced cake.

Enjoy!

Lorinda

No-Bake S’mores Cheesecake

No bake s'mores cheesecake - The Rowdy BakerWith grandchildren here for their summer visit, all thoughts have turned to s’mores. Cheesecake was our plan for their mom’s birthday, so you can guess what flavor we chose!

We made a large cheesecake with a graham cracker crust, a layer of chocolate cheesecake, a layer of chocolate ganache, and a layer of marshmallow cheesecake…and then decorated around the top with whipped cream and ganache rosettes.

I totally stole this photo collage from my daughter. Thank you, Brenna!

I totally stole this photo collage from my daughter. Thank you, Brenna!


When I say “we”, I really mean it. The girls are getting old enough to not only help, but practically take over. It’s gotten past the grit my teeth and try not to meddle stage; now I feel more like a conductor with a very talented and capable orchestra. Oh, and the beautiful blue nails in the picture? Those are 12-year old Sophie’s, not mine! (They’d be a little impractical for me in the garden.)

My daughter loved the dessert, and so did we. I especially liked the fluffy marshmallow layer, and would probably double that part of the recipe next time. There was enough room to fit it into the pan, and it deserved equal billing with the chocolate layer in my opinion.

Hints:

  • I used a 10-inch springform pan. Use a 9-inch pan, if you prefer. There’s room for all of the layers, but your decorations will just be on top instead of nestled into the crumb sides.
  • If you love marshmallows, you could add another handful to the melted marshmallow mixture before combining with the cream cheese.
No-Bake S'mores Cheesecake
Print
Author:
3 layers of goodness - chocolate cheesecake, ganache, and marshmallow cheesecake - make this a luscious (yet not too rich or heavy) dessert that will easily serve 10-12.
Ingredients
  • CRUST:
  • 2 cups finely-ground graham cracker crumbs
  • ½ cup melted butter
  • ¼ cup brown sugar
  • CHOCOLATE CHEESECAKE:
  • 1½ cups chocolate chips
  • 12 ounces cream cheese, softened
  • ½ cup sugar
  • ¼ cup butter, softened
  • ¼ cup unsweetened cocoa powder
  • 1 teaspoon vanilla
  • 2 cups non-dairy whipped topping
  • GANACHE:
  • 1 cup heavy cream
  • 10 ounces good quality dark chocolate
  • MARSHMALLOW CHEESECAKE:
  • 6 ounces mini-marshmallows
  • ⅓ cup plus 1 tablespoon heavy cream, divided
  • 8 ounces cream cheese, softened
  • ¼ cup powdered sugar
  • 1 tablespoon heavy cream
  • 1 cup non-dairy whipped topping
Instructions
  1. CRUST - baked or no-baked options given.
  2. Baked (my favorite method): Heat oven to 325 F. Lightly spray 10-inch springform pan with an oil/flour spray like Baker's Joy. Place pan on baking sheet.
  3. Combine 2 cups graham cracker crumbs, ½ cup melted butter, and ¼ cup brown sugar. Press very firmly into pan, using fingers or straight sided measuring cup. Bake for 10 minutes. Move to rack to cool.
  4. No-bake crust: Prepare crust as described, but instead of baking, place in refrigerator for at least 1 hour before adding filling.
  5. CHOCOLATE CHEESECAKE LAYER:
  6. Melt chocolate chips in microwave-safe bowl, stirring every 15 seconds until completely melted, or in small pan over lowest heat possible, stirring often. Set aside to cool slightly.
  7. In a large bowl, combine 12 ounces cream cheese, ½ cup sugar, and ¼ cup softened butter. Beat well.
  8. Add ¼ cup cocoa powder and 1 teaspoon vanilla, and beat until combined.
  9. Gradually add melted chocolate, beating until incorporated.
  10. Gently fold in 2 cups whipped topping. Spread evenly over prepared crust. Refrigerate for at least 30 minutes.
  11. While the cheesecake is chilling, prepare the ganache.
  12. GANACHE:
  13. Chop the 10 ounces of dark chocolate finely and place in a small bowl.
  14. In a small pan, heat 1 cup cream until it bubbles around the edges...almost to a boil. Remove from heat.
  15. Pour half of the hot cream over the chocolate and allow it to sit without stirring for a few minutes - this will begin melting the chocolate..Stir gently.
  16. Re-heat the remaining cream and pour over chocolate mixture. Allow to sit a few minutes more, then stir gently until smooth.
  17. Pour half of the ganache over the chocolate layer in the pan and return the cheesecake to the refrigerator for at least 1 hour. Put a piece of plastic wrap over the remaining ganache and set aside, stirring occasionally.
  18. MARSHMALLOW CHEESECAKE LAYER:
  19. In a small pan on low heat, stir together 6 ounces of marshmallows and ⅓ cup cream, Remove from heat before the marshmallows are completely melted, to leave little bites of marshmallows in the cheesecake. (If you prefer a smooth layer, stir until completely melted.) Allow to cool slightly.
  20. In medium bowl, beat together 8 ounces cream cheese, ¼ cup powdered sugar, and 1 tablespoon cream. Add the marshmallow mixture and stir until combined.
  21. Fold in 1 cup of whipped topping and spread the mixture over the ganache layer in the pan.
  22. Chill for several hours - overnight is even better! At any point during this chilling time, you can decorate your cheesecake:
  23. Fill a pastry bag fitted with a large open star tip and pipe simple rosettes on a parchment lined baking sheet. Freeze for at least 1 hour.
  24. Decorate cheesecake with whipped cream, ganache rosettes, graham crackers, or cracker crumbs.
  25. Remove the springform pan ring and serve!
Press the crust into the pan very firmly.

Press the crust into the pan very firmly.

Spread the chocolate cheesecake layer evenly.

Spread the chocolate cheesecake layer evenly.

Between the chocolate layer and this lovely marshmallow layer was a layer of ganache...but we forgot to take a photo.

Between the chocolate layer and this lovely marshmallow layer was a layer of ganache…but we forgot to take a photo.

Sophie, piping out pretty ganache decorations.

Sophie, piping out pretty ganache decorations.

Sigh. My family has left, slowly working their way back to California. Things are quiet here – and I think I’m through with all things s’mores. At least until next summer!

Lorinda


Lavender Lime Tea Cakes – and a Bonus Cocktail!

Lavender Lime Tea Cakes, The Rowdy BakerUndecided whether to give readers a recipe that made a whopping 6 dozen tea cakes, or cut the recipe in half and end up with leftover coconut-lime mixture, I came up with the following options:

  • Make a ton of tea cakes. (Hey, they’re small. And light. And irresistible.)
  • Make a half batch and use the leftover coconut and lime mixture on a salad or vegetables.
  • Make a half batch and use the leftover mixture to make a kick-ass cocktail!

I’m pretty sure you know which route I took.


Tempting Tropical Fizz - Tthe Rowdy Baker


Waste not, want not, right?

So…the recipe will give you approximately 3 dozen dainty, soft, refreshing tea cakes. (Definitely more cake than cookie.) You can double it easily if you’d like, but then you won’t be able to make yourself a Tempting Tropical Fizz. Your call!

Making these cookies will require a couple of special ingredients and a little advance preparation. You will need to thoroughly chill a can of coconut milk so that you can pour out the separated liquid and keep the solids. Try to find coconut milk that is high in fat. If it doesn’t say so on the front, compare the nutritional information on all of your options to pick the one that has a higher fat content. Here’s what you’re looking for:coconut milk

I used lavender sugar in this recipe. I keep a jar of sugar mixed with culinary lavender in my pantry at all times, so my sugar was very flavorful and I just sifted out the lavender buds. (I mix sugar and lavender buds in a mason jar – 1 heaping tablespoon of buds per cup of sugar – and let it sit at least one week.) If you don’t happen to have lavender sugar sitting around, you can blend together one cup of sugar (if you’re doubling the recipe) and two teaspoons of culinary lavender in a blender until the lavender pieces are very fine.

You’ll find that the subtle flavor of lavender and lime isn’t overwhelming at all; it’s a wonderful combination.

Lavender Lime Tea Cakes - and a Bonus Cocktail!
Print
Author:
Makes 3 dozen tea cakes. This recipe will actually only use half of the coconut milk and lime mixture. (See instructions.) Double the rest of the recipe to avoid leftover mixture, or refrigerate it for another use.
Ingredients
  • 1 can (13.5 oz) CHILLED coconut milk...preferably a brand with a higher fat content.
  • zest and juice from 2 small limes (approximately 2 tablespoons juice).
  • ½ cup butter, room temperature
  • ½ cup lavender sugar *see instructions
  • 1 egg plus 1 egg white
  • 1 teaspoon vanilla ( I used clear vanilla for this, but that's optional)
  • 2½ cups cake flour
  • 1 teaspoon baking powder
  • ½ teaspoon baking soda
  • ¼ teaspoon salt
Instructions
  1. * To make lavender sugar, either start a week ahead of time and combine ½ cup sugar with 2 teaspoons culinary lavender in an airtight container (sift out the lavender buds before using) OR for immediate use, combine ½ cup sugar and 1 teaspoon culinary lavender in a blender and blend until the lavender is ground into small particles.
  2. Heat oven to 350 F. Line baking sheets with parchment.
  3. Drain liquid from thoroughly chilled, canned coconut milk, and reserve for another use if desired. Place coconut solids in a small bowl.
  4. Add lime zest and juice to coconut solids and stir well. Place in refrigerator.
  5. In a large bowl, cream butter and lavender sugar together well.
  6. Add egg, egg white, and vanilla. Mix well.
  7. Remove coconut mixture from the refrigerator and give it a stir. Measure out ½ cup of the mixture and put the rest away for another use.
  8. Add ½ cup of coconut mixture to the bowl, stirring until combined.
  9. Add the dry ingredients and mix on low just until incorporated. Batter will be thick and sticky.
  10. Dough can be scooped using a small cookie scoop or level tablespoon, or you can pipe it with a pastry bag and rosette tip. (The cakes won't hold the shape well, but you will still see design on the top of the baked cakes if you pipe them.)
  11. Bake for 10 minutes or until the bottom of the cookies is turning a golden brown. The top will not brown.
  12. Remove to a cooling rack, and when the cakes are just barely warm, shake them gently in powdered sugar.

Drain the liquid and keep the solids!

Drain the liquid and keep the solids!

Somewhere between batter and dough. It's soft and sticky!

Somewhere between batter and dough. It’s soft and sticky!

You can scoop...

You can scoop…

Or pipe. Don't expect them to hold the rosette shape, but there will be some design on the top of the baked cakes.

Or pipe. Don’t expect them to hold the rosette shape, but there will be design on the top of the baked cakes.

Only the bottoms should turn golden brown.

Only the bottoms should turn golden brown.

Dust with powdered sugar. (See the shape? These were piped.)

Dust with powdered sugar. (See the shape? These were piped.)

Sooooo, ready for that cocktail yet?

TEMPTING TROPICAL FIZZ

Drop a heaping spoonful of the coconut milk and lime mixture into a glass. Add 1 pineapple slice and about 1/4 cup of pineapple juice (or more to taste). Add clear rum to taste, and top with sparkling mineral water. Give it a quick stir – it should be quite frothy!
I used approximately equal amounts of all 4 ingredients, which made a tart, refreshing drink. If you’d like it to be sweeter, add more pineapple juice or a little simple syrup.

Cheers!

Lorinda