Bouquet Burger

This post is part of a fantastic burger grill giveaway hosted by Girl Carnivore, where we all try to outdo each other to produce the best burger imaginable . . .but the burger you’re about to see is all my own. 

Play along and maybe you’ll win a big grilling package! (I strategically put the contest info below my post so you’ll have to at least LOOK at my burger to get to the good stuff.)


Produce a grilled masterpiece this summer with this lavender-and-garlic-infused burger. Savory garlic blends with the delicate taste and fragrance of French lavender, creating an experience that will entertain your taste buds without crashing the party. As pungent as the infusion may seem while it’s cooking, the resulting flavor—once blended with the beef—is mellow. Complex. Slightly obscure. Oh, you’re gonna love this!

I added cheese and garlic to the burger buns, too, because there is no such thing as too much garlic! The buns are easy to make, and a feast for the eyes as well as the stomach, with bits of crispy cheese poking out of the rich golden crust.

Cabot Cheese sent participants a generous assortment of cheeses, and I made good use of each amazing variety. Choose your favorite flavor, of course, but I liked using a Colby Jack on the burger itself, sharp cheddar in the buns, and a sprinkling of spicy “Fiery Jack” on top of the bun as it baked.

Bouquet Burger
Print
Author:
Cheesy garlic buns top these lavender and garlic burgers. The recipe makes 6 burgers and 8 buns. That will give you two extra buns to "test". Enjoy!
Ingredients
  • CHEESY GARLIC BUNS:
  • 1 cup very warm water
  • 1 package active-dry yeast
  • 1 teaspoon sugar
  • 1 egg
  • ¼ cup milk powder (whole milk powder if possible)
  • ¼ cup oil (light olive, canola, peanut)
  • 3 cups bread flour
  • 1 teaspoon salt
  • 3 cloves garlic, finely chopped and sauteed briefly in a small amount of olive oil
  • 1 cup grated cheese - more if you'd like. (I used sharp cheddar and Parmesan)
  • BUN BATH:
  • ¼ cup baking soda
  • 1 cup warm water
  • 1 egg
  • ½ cup grated cheese (I used Cabot's Fiery Jack) to sprinkle on buns before baking
  • BURGERS:
  • 1 tablespoon olive oil
  • 5 large cloves garlic, chopped
  • 2-3 tablespoons culinary lavender
  • ½ cup undiluted canned consommé
  • 1 teaspoon brown sugar
  • Salt and pepper to taste
  • 2½ pounds burger (I used Angus, 80% lean)
Instructions
  1. In a large bowl (a sturdy stand mixer with dough hook is recommended) combine warm water, yeast, and sugar. Allow mixture to sit until foamy - about 5 minutes.
  2. Add egg, milk powder, and oil. Mix well.
  3. Add flour and salt. Mix until combined. Knead by machine for 5-6 minutes (if kneading by hand, turn out onto floured surface and knead for 7-8 minutes.)
  4. Knead in 1 cup grated cheese and the sauteed garlic. Place in a greased bowl, turning to coat the dough. Cover and let rise until doubled - about 1 hour.
  5. Cover two large baking sheets with parchment (or lightly grease them).
  6. Punch down dough and divide into 8 equal pieces, forming each piece into a smooth ball.
  7. Place 4 balls onto each baking sheet and press to flatten each into a 4-inch circle, using your hand or the back of a salad plate. Cover lightly with a dish towel and allow the buns to rise until puffy - about 40 minutes.
  8. Heat oven to 375 F.
  9. For a rich brown crust, place the baking soda, water, and egg into a small bowl and whisk or beat until foamy. Lift each bun gently and drop, top down, in the bowl. Press on one side as you lift on the opposite side to remove the bun. Place carefully back on the baking sheet and sprinkle with cheese.
  10. Bake until brown - approximately 14 minutes. Cool on rack.
  11. BURGERS:
  12. In a small pan on medium low heat, combine 1 tablespoon olive oil and the chopped garlic. Cook gently on medium-low for 5 minutes. Don't let the garlic get brown - reduce heat if necessary. Add lavender and consommé and simmer for an additional 5 minutes. Turn off heat and cover the pan. Let it sit for 1 hour. Strain into a medium bowl, pressing mixture with the back of a spoon. Discard the garlic and lavender. (Or if you want to go for the gusto, add some of it to your burger mixture.)
  13. Stir 1 teaspoon brown sugar into the broth. Add meat and mix well. Mix in salt and pepper if desired.
  14. Cover and place bowl in the refrigerator for 2-3 hours.
  15. Press burger into 6 patties and grill to desired doneness, adding cheese at the end.
  16. Add your favorite veggies and condiments and serve with the cheesy garlic buns.

When dough meets garlic and cheese.

Cut into equal pieces (yes, yes, I use a kitchen scale. I can’t help it) and form balls.

Once the buns have risen and are puffy, whisk together the baking soda, water, and egg.

Dip. Be careful – don’t squeeeeze!

Sprinkle dipped buns with cheese and pop them in the oven, one baking sheet at a time.

Cook garlic gently in oil. Add lavender and broth.

So much flavor going into that burger!

Strain the broth into a bowl and add brown sugar.

Stir in the meat, make 6 patties, and refrigerate for 2-3 hours.

Grill the burgers and top with cheese if desired. Grill those buns, too, but watch them; they go fast! Add your favorite veggies and condiments.

Look at all of these participants! I hope you’ll give them a visit. The calendar is full of upcoming burger posts, so between now and the end of the month you’ll see something from each and every one of these creative people:

🍔 Girl Carnivore 🍔 A Kitchen Hoor’s Adventures 🍔 A Simple Pantry 🍔 Abra’s Kitchen 🍔 AcadiaTwo’s Kitchen Antics 🍔 An Affair from the Heart 🍔 Bakersbeans 🍔 Betsi’s World 🍔Caroline’s Cooking 🍔 Cindy’s Recipes and Writings 🍔 City Living Boston 🍔 Cluttercafe 🍔 Cooking With Carlee 🍔 Convos with Karen 🍔Daily Dish Recipes 🍔 Dance Around The Kitchen 🍔 Dixie Chik Cooks 🍔 Dizzy Busy and Hungry 🍔 Doodlecraft 🍔 Everyday Eileen 🍔 Family Around the Table 🍔 Family Food on the Table 🍔 Family Spice 🍔Farmwife Feeds 🍔Food Above Gold 🍔 For the Love of Food 🍔 Grillax.com 🍔 Grilling Montana 🍔 Grumpy’s Honeybunch 🍔 Hezzi-D’s Books and Cooks 🍔 Honeybunch Hunts 🍔 HORNS BBQ 🍔 Intelligent Domestications 🍔 It Is a Keeper 🍔 Jolene’s Recipe Journal 🍔 Jonesin For Taste 🍔 Juggling Act Mama 🍔 Karen’s Kitchen Stories 🍔 Kate’s Recipe Box 🍔 Krazy Kitchen Mom 🍔 Life Anchored 🍔 Life of a Ginger 🍔 Mildly Meandering 🍔 Miss in the KItchen 🍔 Palatable Pastime 🍔 Pastry Chef Online 🍔 Perspective Portions 🍔 Plowing Through Life 🍔 PNW Eats 🍔 Pook’s Pantry 🍔 Real Life With Dad 🍔 Sarah’s Cucina Bella 🍔 Seduction In The Kitchen 🍔 Simple and Savory 🍔 Souffle Bombay 🍔 Spiced 🍔 Spoonabilities 🍔 Strawberry Blondie Kitchen 🍔 SueBee Homemaker 🍔 Sumptuous Spoonfuls 🍔 Sweet ReciPeas 🍔 Swirls of Flavor 🍔 Take Two Tapas 🍔 Tampa Cake Girl 🍔 Taste And See 🍔 The Baking Fairy 🍔 The Beard and The Baker 🍔 The Complete Savorist 🍔 The Crumby Kitchen 🍔 The Heritage Cookbook Project 🍔 The Keto Guy 🍔 The Redhead Baker 🍔 The Rowdy Baker 🍔 The Schmidty Wife 🍔 The Shirley Journey 🍔 The Spiffy Cookie 🍔 This Farm Girl Cooks 🍔 Thyme for Cocktails 🍔 We are not Martha 🍔 Well Fed Baker 🍔 West Via Midwest 🍔 What’s Cooking Italian Style Cuisine 🍔 Who Needs A Cape? 🍔 Wildflour’s Cottage Kitchen 🍔 Wok & Skillet 🍔 Zest & Simmer 🍔

Check out Burgermonth.com to see the daily orgy of burger creations (just scroll way down), then enter a Rafflecopter giveaway for a chance to win the Ultimate Burger Grilling Giveaway! Here’s a peek at the goodies:

I’d like to offer a great big thank you (mwah!) to the #BurgerMonth sponsors for the Ultimate Burger Grilling Giveaway:  Cabot Cheese, Char-Griller Grills, Crow Canyon Home, Porter Road, Melissas Produce, Red Duck, Spiceology, &  Western BBQ. You made this so exciting!


Sweet Violets Cake

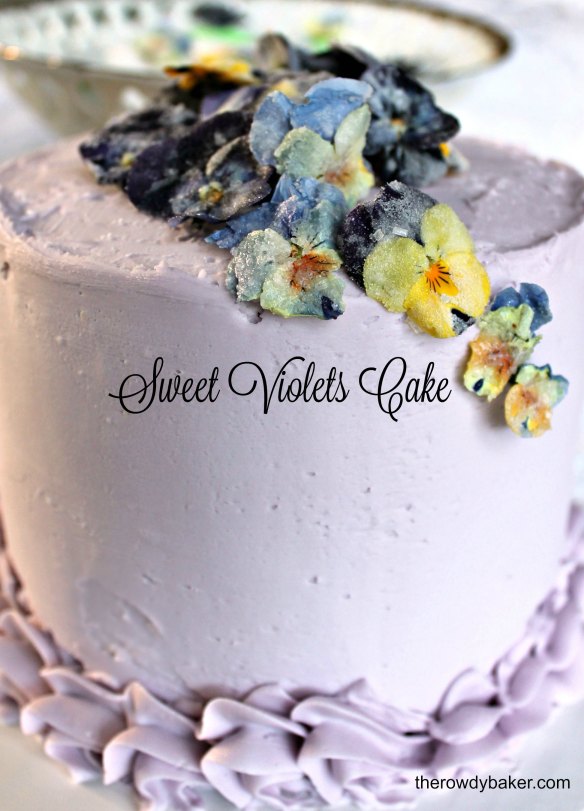
Luscious lemon cake is layered with violet flavored icing for a unique dessert that is perfect for Mother’s Day or a spring tea. Violet flavoring can be purchased online, or a substitution can be made by soaking violet candy in heavy cream overnight. Top the cake with sugared violets for a simple, stunning presentation. For fun I made petits fours, too. The recipe is just a bit different, since a denser cake is called for; if you’re interested in making them I’ll give you instructions at the bottom of the post.

Sweet Violets Cake
Print
Author:
The recipe will make two 9-inch cakes (split to make 4 layers) or three 6-inch cakes (split to make 5 or 6 layers).
Ingredients
  • 2¼ cups cake flour
  • 2 teaspoons baking powder
  • 1 teaspoon baking soda
  • 1 teaspoon salt
  • ½ cup shortening (or coconut oil), room temperature
  • 1½ cups sugar
  • grated lemon peel from 2 lemons
  • 1 cup buttermilk
  • ¼ cup fresh lemon juice
  • ¼ cup milk
  • yellow food coloring if desired
  • 5 egg whites
  • ICING:
  • 1 cup butter, room temperature
  • ½ cup shortening
  • 4 cups powdered sugar
  • 3 tablespoons heavy whipping cream
  • 4-5 drops violet flavoring
  • violet food coloring
  • SUGARED VIOLETS
  • Fresh violets (violas, Johnny Jump-ups). Make sure they haven't been treated with any chemicals! Grow them, find them wild, or order online.
  • 1 teaspoon meringue powder (found in cake decorating section of large stores)
  • 4 teaspoons warm water
  • Superfine sugar
Instructions
  1. Heat oven to 350 F.
  2. Grease and flour two 9-inch round cake pans or three 6-inch cake pans. I like to put a circle of parchment in the bottom of each pan. (If you only have two 6-inch pans, bake two cakes and then clean one pan and bake the other cake. The batter will be fine on the counter while the first cakes bake.)
  3. Sift together the flour, baking powder, baking soda, and salt. Set aside.
  4. In a large bowl, cream together the shortening and sugar. Add the grated lemon peel and mix well.
  5. In a small bowl combine the buttermilk, lemon juice, and milk.
  6. To the large bowl with the shortening and sugar mixture, alternately add the dry ingredients and milk mixture, beginning with the flour and ending with the milk mixture, adding about a third of each at a time.
  7. Beat for one minute at medium speed.
  8. In a medium bowl, whip the egg whites until stiff peaks form. Fold gently but thoroughly into cake mixture.
  9. Divide between the cake pans. Bake for approximately 25-30 minutes, or until a toothpick comes out clean when inserted in the middle. Allow to cool for 10 minutes on a rack and then turn out of the pan to finish cooling completely.
  10. For easiest slicing, wrap and freeze cakes for several hours.
  11. ICING: Beat butter and shortening well. Add powdered sugar 1 cup at a time. If mixture gets too stiff for your mixer, add a little of the whipping cream. Once all powdered sugar is incorporated, add the whipping cream and beat well until smooth and fluffy. Add the flavoring and a tiny amount of coloring. Beat until combined.
  12. Slice cake into layers. If making the 6-inch cake, you may want to just use 5 layers. Stack the layers with icing in between, making sure to get the icing all the way to the edge of each layer. For easiest handling, spread a thin layer around the outside of the cake and freeze for at least 1 hour. Ice the outside and top of cake and top with sugared violets.
  13. VIOLETS: Place a piece of waxed paper or parchment on a cooling rack. With a toothpick, poke holes every few inches. This will allow airflow as the flowers dry.
  14. Combine meringue powder and warm water in small dish. Whisk well. Place flower face-down on your hand, and with a soft paintbrush, brush a layer of meringue mixture on the back. Flip the flower over and brush the front. Sprinkle back and front with superfine sugar. Pinch off stem and place flower, stem down, on prepared cooling rack. Let the flowers dry for at least 24 hours. In the oven with the light on is great - the slight warmth from the light helps the flowers dry quickly.

Paint flowers with meringue mixture, then sprinkle with superfine sugar.

Sugared and drying.

Violet everything. If you can’t get the flavoring, drop 12 violet pastille candies into 1/4 cup heavy cream. Cover and refrigerate overnight. Strain and use in the icing.

I graduated the colored icing – but really not necessary.

To make a denser cake for petits fours, increase flour to 2 1/2 cups, decrease baking powder to 1 teaspoon, add 1/2 cup softened butter (in addition to the shortening), and instead of 5 egg whites, add two whole eggs (one at a time, scraping the bowl between each egg) to the creamed butter and sugar mixture, beating well. The remaining three egg whites will be beaten and folded in at the end. Put batter in a greased and floured 9x13x2-inch pan. Bake until a toothpick comes out cleanly when inserted in the middle. Once cool, cut into 1 inch squares. Remember – the freezer is your best friend! For help with icing and technique, here are instructions for Petits Fours

Note: one of my testers suggested a layer of lemon curd in the petits fours. What a great idea! I’ll do that next time, for sure.

I loved listening to this song on YouTube. It says Dinah Shore sang it, but the pictures in the video are of Doris Day. Meh. Whoever sang it, it was a clever little ditty.

Sweet violets, sweeter than the roses,
Covered all over from head to toe,
Covered all over with sweet violets.

Happy Mother’s Day!

Lorinda

Kulich Easter Bread

Kulich, a traditional Russian Easter bread, is a tall column of buttery, slightly sweet bread filled with fruit. The texture is feathery, not soft like a cinnamon roll. Lightly spiced, with a hint of orange (and if you choose, a touch of cognac, brandy, or rum), this recipe is certain to become a family favorite.

In Russia, the kulich is taken to church to be blessed after the Easter service; it’s that important!  Some believe the iced, domed top is supposed to represent a snow-covered orthodox church. (It snowed a lot on my kulich. I may have gotten carried away with the icing this time.) It’s also traditionally decorated with flowers on top, which is a stunning presentation for Easter.

Have you ever eaten Panettone? Kulich is very similar. Some people like to add chopped almonds, but I prefer to just use fruit.

I bought paper panettone molds—which made the whole process so much easier. There are very nice nonstick molds available too. They’re on my wish list! You can also use coffee cans that are lined with buttered parchment.

This will take a while to make, but requires very little hands-on effort. It’s a rich dough and rises three times, with a total of six to ten hours of rise time. Plan to hang around the the house the day before Easter so you can monitor the dough as it progresses from sponge to dough to masterpiece. While it’s doing its thing you can dye eggs, eat chocolates, run to the store, and go about your business.

Easter Kulich
Print
Author:
Start this project in the morning. The bread is very slow to rise! Makes two tall loaves or three shorter loaves.
Ingredients
  • SPONGE:
  • 1 cup very warm milk
  • 1 tablespoon sugar
  • 2 packages active-dry yeast
  • 1 egg
  • 2 cups bread flour
  • BREAD:
  • 1 cup raisins
  • ½ cup currants or chopped dried fruit
  • ⅓ cup cognac (or brandy, rum, or orange juice)
  • 2 eggs plus 2 egg yolks
  • ¾ cup sugar
  • ¾ cup butter, melted
  • Zest from one orange
  • ¼ teaspoon cardamom
  • 2 teaspoons cinnamon
  • 2 teaspoons salt
  • 1 teaspoon vanilla
  • 3 cups bread flour (a little more if necessary)
  • ½ cup candied citrus peel, chopped
  • FROSTING:
  • 2 cups powdered sugar
  • 2 tablespoon orange or lemon juice
  • Milk to thin the frosting if necessary
Instructions
  1. In a large bowl (a stand mixer is recommended), combine the warm milk and sugar. Add the yeast and let it sit for 2–3 minutes. Add the egg and mix well.
  2. Add 1 cup of the flour and beat for 1 minute. Sprinkle the remaining 1 cup of flour over the yeast mixture. Do not stir! Cover and let the sponge sit for 2–3 hours. The yeast mixture will rise and cover most of the flour.
  3. While the sponge is rising, combine the raisins, dried fruit, and alcohol (or orange juice) in a small bowl. Cover.
  4. When the sponge has risen (expect to see pockets of flour) add the eggs and egg yolks to the sponge and mix well.
  5. Add sugar and mix well.
  6. Add the melted butter gradually, until completely incorporated.Switch to a dough hook if you're using a stand mixer.
  7. Add the orange zest, cardamom, cinnamon, salt, vanilla, and 2 cups flour. Mix well.
  8. Gradually add remaining cup of flour.
  9. Drain alcohol from raisins. (Don't waste it - it's wonderful in coffee!) Add drained raisins and candied citrus to dough.
  10. Knead by machine for 5 minutes (or by hand 7-8 minutes). Dough should come cleanly away from the sides of the bowl, but should still be soft and slightly sticky. If it is too sticky, add additional flour 1 tablespoon at a time.
  11. Place dough in greased bowl and allow to rise in a warm place until doubled. This will take several hours.
  12. If you are not using disposable panettone molds, prepare pans. Line the bottoms and sides of two or three (depending on the height you want) 1-pound coffee cans with buttered parchment paper. You can also use large ramekins, with heavy foil wrapped around the outside to add height.
  13. Place molds on a baking sheet. Divide dough in half for two taller loaves, or into thirds for three shorter ones. Form into smooth balls and place into prepared molds. Press gently with fingers to flatten the tops slightly; this will keep them nice and even when they bake. Cover and allow to rise until the dough gets close to the top of the molds. This can take 3-5 hours!
  14. Heat oven to 350 F.
  15. Cover molds lightly with foil and bake until a wooden skewer inserted into the middle of the dough comes out clean. Remove foil if a darker top is desired. Depending on the size of your pans, baking time can be 45–60 minutes. Remove from oven and cool on a rack. Lay them on their side on the rack for 10–15 minutes, rolling gently every few minutes. Slide kulich out of the cans or molds and cool on the rack, rolling once or twice to avoid flat sides.
  16. When cool, combine the powdered sugar, lemon or orange juice, and enough milk to make a frosting that will ooze slowly over the sides of the kulich when the top is frosted. Frost the tops and decorate with flowers, nuts, raisins, or sprinkles.

Once the sponge has absorbed most of the flour (this will take 2-3 hours), add eggs and beat well.

Beat in the sugar.

Gradually add the butter.

Add orange zest, spices, vanilla, and 2 cups of flour. Beat well. Gradually add remaining 1 cup of flour until dough comes cleanly away from sides of bowl.

Add drained raisins and candied fruit. Knead by machine 5 minutes or by hand 7-8 minutes.

Place in greased bowl. Cover and let rise until doubled, 2-3 hours.

Place dough in three molds for shorter kulich, or two molds for taller ones. You guessed it . . . let them rise a loooooong time. 3-5 hours. Then bake!

Wishing you a joyous Easter!

Lorinda


Chocolate Shortbread Bird Nests

These crisp chocolate shortbread nests are filled with ganache and pretty blue eggs, a perfect treat to place by each plate on your Easter table.

You’ll be surprised by how easy and fun these are to make—a great project for the whole family. They’re a little fragile after they’ve been baked, so if your littles are . . . well . . . little, you may want to supervise the filling and egg placement. To make the process even easier, you can always use canned frosting instead of making ganache.

Chocolate Shortbread Bird Nests
Print
Author:
Makes about 4 dozen
Ingredients
  • ½ cup butter, softened
  • ½ cup shortening
  • 1 cup powdered sugar
  • 1 egg yolk
  • 3 tablespoons coffee or milk
  • 2 cups all-purpose flour
  • ⅓ cup unsweetened cocoa powder
  • ¼ teaspoon salt
  • ½ cup cornstarch
  • GANACHE:
  • ½ cup heavy cream
  • 6 ounces dark chocolate, chopped (I used mini-chips)
  • Small candy eggs
Instructions
  1. In a large bowl (a stand mixture is recommended) beat the butter, shortening, and powdered sugar together until creamy.
  2. Add egg yolk and coffee (or milk) and mix well.
  3. Add flour, cocoa powder, salt, and cornstarch. Beat well. Be patient - it may take a few minutes before the mixture comes together.
  4. Divide into two parts and chill for 1 hour.
  5. Heat oven to 350 F.
  6. Lightly spray mini cupcake pan with baking spray (an oil/flour mixture).
  7. On floured surface roll half of the dough out approximately ⅛-inch thick. To keep the cookies similar in size, cut out 3-inch rounds (or squares). Using a thin spatula or bench scraper, chop one piece into thin strips. Lift the strips into a cavity of prepared pan, loosely surrounding the sides. Leave a few stray pieces sticking out of the top. Place a scrap of dough into the bottom of the cup if needed and press gently. Repeat with all of the remaining dough.
  8. Bake approximately 8-9 minutes. Allow cookies to cool for several minutes, then gently lift each out of the pan and place on a cooling rack. Once cooled the cookies should be fairly crisp. If not, add another minute to the remaining cookies.
  9. GANACHE: Heat heavy cream until it's steamy. Remove from heat, add chocolate and let it sit for 3-4 minutes. Stir well.
  10. Add a dollop of ganache to the bottom of each nest and decorate with small candy eggs.

Chop fine strips to create nesting material.

Loosely arrange shortbread strips in prepared cups. Bake!

Hint: Once they’ve cooled a bit, try putting something lightweight but stiff (cardboard, a flexible cutting board, etc.) over the top and then flipping the whole works over. It’s easier than lifting each one out of the pan.

So simple. Even the ganache is easy to make. Hope you’ll try this!

Lorinda

King Cake Cookies

I’m still in King Cake mode, but this time I applied the concept to cookies, adding a little more spice to my favorite soft sugar cookies and gussying them up in Mardi Gras colors. How could anyone resist these?

I chose this cookie dough because it puffs up a bit, and I wanted the cookies to resemble little King Cakes. They’re not crunchy like Christmas cutouts, but they aren’t cake-like either. They’re somewhere in between.

Bake them, decorate them, and you’re done. Excuse me? Are you lifting an eyebrow at me? You must have hung around the blog for a while, because . . . yeah . . . I couldn’t resist ADDING A PRALINE FILLING!

The most exciting thing about this filling is its versatility. I woke up in the middle of the night thinking up all kinds of recipes I could use it in. The downside is I can’t keep pieces of it from falling in my mouth.

I’ll admit that making the praline filling, shaping it, and pressing the cookies together adds a lot more fussy time in the kitchen, so if you want to skip it I totally understand. The cookies are great without it, but the filling really does add a nice surprise, and it makes them bigger—about the size of a cake doughnut.

King Cake Cookies
Print
Author:
Makes about 30 filled cookies and 36-38 unfilled. Dough must be chilled; make sure to plan ahead!
Ingredients
  • COOKIES:
  • 1 cup butter, softened
  • 1½ cup sugar
  • 2 eggs
  • 2 teaspoons vanilla
  • 4¾ cups flour
  • 1 teaspoon salt
  • 1 teaspoon baking soda,
  • 1 teaspoon baking powder
  • 1 teaspoon cinnamon
  • ¼ teaspoon cardamom
  • ¼ teaspoon nutmeg
  • 1 cup sour cream
  • FILLING: (Optional)
  • ¾ cup brown sugar
  • 3 tablespoons butter
  • 3 tablespoons whole milk
  • 3 tablespoons corn syrup
  • pinch of salt
  • 1 teaspoon vanilla
  • 1¼ cups finely chopped pecans (I like to use toasted pecans for more flavor)
  • GLAZE:
  • 1 pound powdered sugar
  • 1 teaspoon vanilla
  • ⅓ cup milk (Approximate. Adjust to preference.)
  • Colored sugar - gold, green, purple
Instructions
  1. In a large bowl, beat butter and sugar until fluffy. Add eggs and vanilla and beat well.
  2. Sift flour, salt, baking soda, baking powder, cinnamon, cardamom, and nutmeg together into a medium bowl.
  3. Beginning with the dry ingredients and ending with the sour cream, add alternately - ⅓ of each at a time. Mix just until combined.
  4. Cover and chill for at least 2 hours (longer is fine).While dough chills (or at least 1 hour before you are ready to roll it out) make the praline mixture if you are making the filled version.
  5. FILLING: Lightly butter a piece of parchment (or use a silpat).
  6. In a medium pan over medium heat, bring brown sugar, butter, milk, corn syrup, and salt to a boil, stirring often, and cook for 2 minutes. Add pecans and cook for an additional 3 minutes, stirring constantly. Remove from heat and add vanilla.
  7. Pour onto buttered parchment or silpat and use a buttered spatula to spread filling into a 6½-inch by 12-inch rectangle. Use the spatula to make neat edges. The mixture is very easy to shape. Allow it to cool.
  8. Cut into thin strips 6½-inches long and form into circles a little smaller than the cookie cutter you plan to use. (It may be easier for you to cut the strips and wait to make the circles directly on the cookies.)
  9. Heat oven to 375 F. Place parchment on baking sheets.
  10. Working with ⅓ of the cookie dough at a time and keeping the rest refrigerated, roll out on floured surface. If you are making filled cookies, keep the dough no thicker than ¼-inch. If you are making unfilled cookies, roll the dough thicker - a generous ⅓-inch.
  11. Using a 3-inch round cookie cutter, cut circles as close to each other as possible. Cut the center out to create a ring, using the end of a large piping tip, a shot glass, or a bottle cap. Place all of the scraps together and set aside.
  12. Repeat with the remaining dough, then roll all of the scraps together at once and cut out cookies. These cookies won't be quite as light, but they will still be good!
  13. If you are filling the cookies, place a ring of praline on one cookie ring and cover with another. Press down gently to ease the top dough over the filling. Use your fingers to go around the cookie, pressing the two pieces of dough together on the outside and inside of the ring. The dough is very soft and will cooperate. Place at least 1-inch apart on prepared baking sheets.
  14. Bake one sheet of cookies at a time on the middle rack. Bake 10-11 minutes for unfilled cookies, 11-12 minutes for filled. Watch closely and don't overbake. The cookies shouldn't be brown on top, though the bottoms will be golden brown. Cool on racks.
  15. GLAZE: Place powdered sugar in a medium bowl. Add vanilla and drizzle in the milk until you get an icing that is fairly thin and easy to spread.
  16. Work with just one cookie at a time, icing and sprinkling with colored sugar. Allow cookies to dry thoroughly before storing. Keep in an airtight container.

Cut out cookie rings.

Spread praline mixture on buttered parchment to cool.

Shape thin strips of praline into circles and place on ring. Top with a second ring.

Press firmly all the way around, smoothing out the seam as you go.

I tried making designs with limited success. It worked better with the rolled out scraps since those cookies don’t puff up as much.

To make sure the colored sugar sticks, ice and sugar one cookie at a time.

Add green, purple, and gold sugar.

Messy, yes, so if you have some kidlings who like to “help”, this is their chance.These don’t have to be perfect, just colorful and tasty.

If you make the filled version you may be able to stuff a little plastic baby in through the bottom. Good luck with that!

Lorinda


Bourbon Praline King Cake

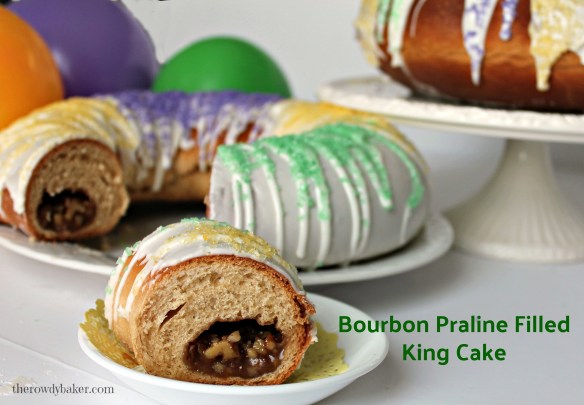
How fun is this? I’d never made or eaten a King Cake before I tackled this project, but was very glad I finally succumbed to Mardi Gras madness. It took a few tries before I was satisfied that the resulting King Cake matched the picture in my head, but you can learn from my trials and nail it on your first try.

I did learn two things that I’d like to pass along:

My first piece of wisdom: buy a little plastic baby to hide in the cake. (I can’t get on board with baking anything plastic in my cake, so I’d go with the “tuck it in from the bottom after the cake is baked and cooled” method.) I tried to make my babies out of pink gum paste, and I think I can say with great confidence that shaping little babies is not my calling. They didn’t look like babies at all. One looked like a little old man (eeeuw, a NAKED old man) and the other looked like a monkey. Buy them! Or go the old-fashioned route and hide an uncooked bean in the cake instead.

See how the filling is rolled in this version? To do that, leave the nuts out of the cooked praline mixture. Spread it on the dough and sprinkle with the nuts. I just really wanted a core of molten praline goo, so I went with the praline log method.

My second piece of wisdom: don’t expect cake. After a whole lot of Googling I have come to the conclusion that King Cakes are different things to different people, but the majority agree that it is a sugared-up yeast bread baked in a ring shape. Think of a cinnamon roll that wasn’t cut into slices.

I, of course, had to add booze. You don’t have to. I tried Southern Comfort and Bourbon. Each was wonderful. I didn’t use much, just enough to give a hint of flavor. Use a little vanilla instead if you prefer.

Bourbon Praline King Cake
Print
Author:
Makes 2 King Cakes. Can be baked on baking sheets or in bundt pans.
Ingredients
  • CAKE:
  • ¼ cup butter
  • 1 cup milk
  • ¼ cup oil (anything lightly flavored, like canola or peanut oil)
  • ⅓ cup sugar
  • 2 teaspoons cinnamon
  • ¼ teaspoon cardamom
  • ⅛ teaspoon nutmeg
  • 1 teaspoon salt
  • ⅓ cup very warm water
  • 1 package active-dry yeast
  • pinch of sugar
  • 2 eggs and 2 egg yolks
  • 4½ cups flour (either bread flour or all-purpose)
  • FILLING:
  • ½ cup white sugar
  • ½ cup brown sugar
  • ¼ cup cream
  • ¼ cup butter
  • ¼ cup corn syrup
  • 1½ cups finely chopped pecans (I use toasted for extra flavor)
  • 2 tablespoons bourbon or Southern Comfort
  • ICING:
  • 1 pound powdered sugar
  • 2 tablespoons bourbon or Southern Comfort
  • milk
  • Colored sprinkles. You'll need green, dark yellow, and purple
  • 2 plastic babies to hide in cakes!
Instructions
  1. CAKE: In a small pan on medium heat, combine butter, milk, oil, ⅓ cup sugar, cinnamon, cardamom, nutmeg, and salt. Heat until butter is melted and the mixture is just beginning to bubble around the edge of the pan. Pour into large bowl and allow to cool slightly.
  2. In a small bowl, combine very warm water, yeast, and a pinch of sugar. Allow it to sit until bubbly, about 5 minutes.
  3. Add yeast mixture to bowl. Add eggs and 4 cups of flour. If using a stand mixer, use a dough hook and beat well. Slowly add remaining flour until dough pulls away from the side of the bowl. Knead by machine for 5 minutes, or drop dough onto generously floured surface and knead by hand for 8 minutes. Dough will be slightly sticky, but if it is very sticky, add a little more flour.
  4. Place dough in greased bowl and allow it to rise until double. This is a rich dough and may take 1½ hours to rise. While dough is rising, make filling so it will have time to cool and set.
  5. FILLING: In a large pan on medium heat, combined white sugar, brown sugar, cream, butter, and corn syrup. Bring mixture to a boil and cook for 2 minutes, stirring frequently.
  6. Add chopped nuts. Cook for an additional 4 minutes, stirring constantly. Remove from heat and add the bourbon. Stir well and set aside to cool. By the time the dough has risen, the filling should be firm.
  7. Divide filling in half and roll each into a 21-inch log on floured parchment.
  8. Prepare pans for the cakes. You can bake rings on parchment covered baking sheets or in lightly greased bundt pans. (I spray my bundt pan with an oil/flour baking spray.)
  9. Punch down dough and divide into two equal parts. Working with one piece at a time, use hands to press into a long rectangle on floured surface. Roll into a 22" by 7" rectangle.
  10. Place one praline log on the long edge and roll. Fold over the ends and pinch firmly. Pinch firmly all along the long seam.
  11. If you are using baking sheets, lift the roll onto the sheet and form a circle. Overlap the ends and pinch well. If you are using bundt pans, drop the dough into the prepared pan. It will be a little long, but overlap the ends, pinch well, and ease the dough around the bottom. It will settle in nicely.
  12. Cover with towels or plastic wrap and let rise for about an hour. The rings won't double in size, but they should be light and puffy.
  13. Heat oven to 350 F. Bake until golden brown, 30-40 minutes. The bottom should be a rich brown. Remove from pans to a cooling rack. Tuck a plastic baby in the bottom of each cake. Brush the top with butter, if desired. Once cakes are cool, make icing.
  14. ICING: Place powdered sugar in a large bowl. Add bourbon (or a teaspoon of vanilla) and while beating, trickle in milk until the icing is just thin enough to pour.
  15. Pour over the tops of the cakes, letting the icing drip down the sides. Sprinkle with colored sugar.

Once hot m.ilk/spice mixture has cooled a bit, add bubbly yeast

Mix in eggs and flour. Knead well and place dough in greased bowl to rise.

Add pecans to the boiled praline mixture. Cook it some more, then add booze.

Okay. It looks gross. I know, I know. But this praline log will be the center of your King Cake.

Working with half of the dough, press into a long rectangle shape.

Position praline log on long edge.

Roll

Pinch it like you mean it! You don’t want to let any of that praline goodness ooze out.

Make a ring with seam at the bottom. (It can be tricky and twist. You’re the boss!) Overlap ends and PINCH.

Or use a bundt pan. I put the seam down, and of course it showed because the bottom becomes the top. You can try it with the seam up or . . . use lots of icing.

The cake on top was done in a bundt pan. The one on bottom on a baking sheet. The bundt was puffier, but it was probably because I only baked one at a time and it had a little longer rise time.


Raspberry Marshmallow Fudge

If there’s anything I can’t resist, it’s fudge. Though I usually like mine with lots of nuts, this time I left them out and added swirls of seedless raspberry jam and mini-marshmallows, and loved the results. Since this batch is going to a bake sale, I also left out the Chambord, but if you have a bottle of this delicious raspberry liqueur, add a splash at the end when you stir in the chocolate and marshmallow fluff for extra flavor.

For Valentine’s Day, you can cut the fudge with a heart-shaped cutter. Or, if you have small silicone heart molds, use them – they work really well. Traditional square pieces are lovely too, of course.

“Special” Instructions:

What I say: Once fudge is firm, cut edges neatly with a very sharp knife. This will create attractive squares of fudge.

What I mean: Cut the edges off and eat them.

This uses a pound of dark chocolate, but it makes a big batch of fudge. (4+ pounds.) I doubt you’ll find yourself with extra fudge, but if you do it can be wrapped tightly and frozen.

Raspberry Marshmallow Fudge
Print
Author:
Makes over 4 pounds of fudge. You will need a candy thermometer for this recipe.
Ingredients
  • 3½ cups sugar
  • 1 cup evaporated milk
  • 1 cup butter (if using unsalted butter, add a pinch of salt)
  • ⅔ cup seedless raspberry spread (or jam), divided
  • 1 pound dark chocolate, coarsely chopped
  • 13 ounces marshmallow creme (fluff)
  • 2 cups mini-marshmallows
  • Special equipment: candy thermometer
Instructions
  1. Prepare a 9x12-inch baking pan by placing a piece of parchment in the bottom, extended over the sides. Butter lightly, including any exposed areas on the ends.
  2. In a large saucepan on medium heat, bring sugar, milk, butter, and ⅓ cup raspberry spread to a boil. stirring frequently. Once it is boiling, stir continuously until it reaches 234 F. (Adjust for high altitudes by subtracting 1 degree for each 500 feet above sea level.) Remove from heat.
  3. Stir in chopped chocolate and marshmallow fluff until completely melted and smooth.
  4. Drop spoonfuls of remaining ⅓ cup of raspberry on the mixture and add marshmallows. Fold gently, no more than 8-10 times. The goal is to have streaks of raspberry and semi-whole marshmallows.
  5. Pour into prepared pan and smooth with a spatula. Once fudge is cooled, chill until firm. Lift out of pan and cut as desired.

Some special things you’ll need to make this fudge. I prefer to use good dark chocolate, but you can use chocolate chips (or a combination of both) if you prefer.

Bring sugar, milk, butter, and some of the raspberry spread to a boil.

Bring mixture to 234 F (adjust for high altitudes). This is almost there.

Stir in chocolate and marshmallow fluff until smooth. (Here’s where a splash of Chambord would be added if desired.)

Gently fold in the remaining raspberry spread and the marshmallows.

Pour into prepared pan.

Ready to cut!

Wishing you hearts and flowers . . . and lots of sweet indulgences.

Lorinda

Chocolate and Tart Cherry Cookies

Easy. So easy! And with the combination of chocolate and tart dried cherries, these soft cookies are incredibly tasty, too. I used milk, dark, and white chocolate, but you can use whatever combination pleases you. The tart cherries add extra flavor and texture, making these cookies addictive little treats.

Leave them plain and you’re done, but if you want to gussy them up a bit, shake them in powdered sugar while they’re still slightly warm. Or brush the tops with a thin glaze. You can also roll (or pat) the dough out on a generously floured surface and cut out simple shapes. Of course, I used a heart cutter because what could possibly be more perfect for Valentine’s Day than chocolate and cherry cookies?

POWDERED:GLAZED:HEARTS:

Chocolate and Tart Cherry Cookies
Print
Author:
Makes about 3½ dozen cookies
Ingredients
  • ½ cup butter, softened
  • ¾ cup sugar
  • 2 eggs
  • ½ cup sour cream
  • 2 teaspoons vanilla
  • 2½ cups all-purpose flour
  • 1 teaspoon baking powder
  • ½ teaspoon baking soda
  • ¼ teaspoon salt
  • ½ cup (more if desired) dried tart cherries
  • 1 heaping cup chocolate chips - a combination of milk, dark, and white is good
Instructions
  1. Heat oven to 375. Cover baking sheets with parchment.
  2. In a large bowl, beat butter and sugar together for 2 minutes.
  3. Add eggs. Beat for 1 minute.
  4. Add sour cream and vanilla. Beat until combined.
  5. Add flour, baking powder, baking soda, and salt. Mix just until combined.
  6. Stir in cherries and chocolate.
  7. Drop rounded tablespoons of dough at least 1 inch apart on prepared baking sheet. (For rounder, smoother cookies you can roll dough into balls using floured hands)
  8. Bake 11-12 minutes. Remove from oven when bottoms are brown but the cookies are still light colored. Remove from baking sheet and cool on rack.
  9. Fun Options:These can be served plain or you can shake barely warm cookies in a bag of powdered sugar. You can also brush with a simple glaze made of powdered sugar and milk. For heart-shaped cookies, pat or roll dough a generous ½-inch thick on floured surface and lift to baking sheet with a thin spatula.

You won’t need step-by-step photos here, but I took a couple of random pictures for you.

Dried cherries. (I’m sure there are many more brands.) I love the mild Montmorency cherries.

Add cherries and chocolate chips to dough.

You can even cut this dough into shapes. Pat or roll it a little over 1/2-inch thick on a floured surface and cut with cookie or biscuit cutter.

That’s all there is! No tips needed, because these are so simple.

Make some for your Valentine!

Lorinda

Pear Date Walnut Bread

Cutting carbs in the new year? This hearty, rich bread will provide a satisfying excuse for setting your resolutions aside for a few days. (Yes, that makes me an enabler.)
But really, this is a good option if you’re craving bread. Pears, dates, and walnuts are all healthy foods. It’s sweetened with honey, and part of the flour is whole wheat. The trick is just going to be exercising moderation – something I’ve failed miserably at in this case.

I’d like to tell you that I just nibbled on my test pieces, but I’d be lying. Toast this stuff and put a light scraping of butter on it, and I will keep testing and testing and testing.

My favorite version (which is the recipe given below) has a cup of chopped dates and a cup of ground walnuts. If you want to lighten the calorie load, you can reduce both of those ingredients by half.

Give yourself a little extra time when making this bread; the rich dough takes a little longer to rise. It will be worth the wait!

Preparing your ingredients before beginning the bread is a good idea. Chop those dates! Grind those walnuts! But hold up on cutting the pear until your dough is mixing so the pieces won’t go brown on you. 

I added ground walnuts to the recipe to add flavor and structure. A few seconds in a food processor or blender should do it – it doesn’t need to be ground into a paste. The goal is to make the pieces tiny enough to ensure easy slicing of the finished loaves.

NOTE: Unless you have a big family or are making this for a large gathering, I’d recommend freezing one loaf and storing the other in the refrigerator. Since the bread includes fresh fruit, it won’t last as long on the counter as regular bread. 

Pear Date Walnut Bread
Print
Author:
Makes two loaves.
Ingredients
  • 1½ cup very warm water
  • 1 package active-dry yeast
  • pinch of sugar
  • ¼ cup honey
  • ¼ cup butter, melted
  • 2 large eggs
  • 1 cup chopped dates
  • 1 cup coarsely ground walnuts (use a food processor for best results, or chop very fine)
  • 1 cup whole wheat flour
  • 4 cups bread flour divided
  • 2 teaspoons salt
  • ¼ teaspoon cinnamon (optional)
  • 1 pear, peeled, cored, and chopped into small pieces
Instructions
  1. In a small bowl or glass measuring cup, combine the warm water, yeast, and pinch of sugar. Let it sit until foamy (about 5 minutes).
  2. In a large bowl (a stand mixer is recommended) combine honey, butter, eggs, and yeast mixture.
  3. Stir in dates and ground walnuts.
  4. Using a dough hook, add wheat flour, 3½ cups of the bread flour. salt, and cinnamon (if using). Beat well for 4 minutes. (If kneading by hand, add the remaining flour now and knead for 6 minutes before kneading in the pears.)
  5. Add chopped pears and stir until combined. Slowly add remaining flour until mixture comes away from the side of the bowl. Add a little extra flour if necessary. Dough will be soft and sticky.
  6. Place dough into greased bowl. Cover and allow it to rise until double, 1 to 1½ hours.
  7. Punch down dough and divide in half. On floured surface either roll dough into two balls and place on baking sheet, or form into two loaves and place in greased loaf pans.
  8. Allow dough to rise in pans until almost doubled.
  9. Heat oven to 375 F.
  10. Bake approximately 35 minutes, or until the bottom of the loaves are browned and sound hollow when tapped. Brush the tops with butter if desired. Cool on racks before cutting.

Ingredients.

Grind the walnuts if possible. If not, chop them as finely as you can. They’ll add lots of flavor.

Combine honey, egg, butter, and yeast mixture.

Mix in the dates and walnuts

Add most of the dry ingredients and mix (knead) for 4 minutes by machine. Add pears. Slowly add remaining flour until it comes away from the sides of the bowl.

After the dough rises, form into two balls on a baking sheet, or . . .

. . . form loaves and place in greased pans. Bake.

Enjoy!

Oh, my word, this is good toasted. Tomorrow I’m going to use it for French Toast; I’ll bet it’ll be amazing. We’re expecting snow, and I can’t think of a better treat to go with  sausage patties and a cup of steaming coffee. 

Lorinda

Easy Kitty Treats

Here’s a fun gift idea for Christmas. Kids will have a blast making these little kitty treats, especially if you let them cut the dough out with a large plastic straw, because the only way to get the dough back out of the straw is to blow it out. They’ll enjoy that for a while, and then you can pick all the little blobs of dough off the wall and let them go to town rolling and flattening them with their fingers instead.

Even if you don’t have a cat, I’ll bet you know someone who does. If they dote on their kitty they will appreciate a bag of homemade goodies. And in case you’re wondering, my dogs will do backward flips for these, even though they’re made with catnip.

Mixing up the (stinky) dough is easy. If you don’t mind the rough edges (my cats certainly don’t) cutting the little shapes out is as simple as running a knife or pizza cutter across in small strips horizontally and vertically.

If you want them to look nicer (for gifts – or perhaps your feline is persnickety and concerned with aesthetics), roll those little pieces up into small balls and flatten with your finger. Or go all out and use silicone molds, like this:

The dough pops right out of a silicone mold.

Feel free to throw in an extra can of meat if your cat is finicky. You just may need to add a bit more flour to compensate for the extra juice.


Easy Kitty Treats
Print
Author:
Ingredients
  • 1 5-oz can tuna (do not drain) or try salmon or chicken
  • 1 cup solid pack pumpkin
  • 1 egg
  • 2 tablespoons unsalted butter
  • 1 cup cornmeal
  • 3 cups oat flour (purchase, or make your own by blending oats in a coffee grinder or a blender)
  • 1 tablespoon catnip - optional
Instructions
  1. Heat oven to 325 F.
  2. In a food processor or sturdy blender, mix all ingredients together to make a stiff dough.
  3. On lightly floured parchment, roll dough out to ¼-inch thickness.
  4. Cut treats. They can be made into small squares by cutting thin strips horizontally and vertically, using a pastry wheel or pizza cutter. This is the fastest way. If the pieces don’t separate on their own, bake it in one piece for the first 20 minutes, then break it apart and continue baking. For more attractive treats, roll into small balls and flatten with your finger. Or flour the end of a jumbo straw and cut circles. You’ll have to blow each one out – kids love to do this. If you have a silicone mold with small designs, the dough can be pressed into each cavity. It will pop out easily.
  5. Bake for 20 minutes. Stir to assure even baking, and return to the oven. Reduce heat to 250 and bake for an additional 20 minutes. Turn off the oven and let the treats remain inside until cool.
  6. Store in an airtight container for up to a week at room temperature, or for several weeks in the refrigerator.

Ingredients. (The pumpkin looks a little soupy because it was frozen.)

Grind up the oatmeal (or buy oat flour).

Mix it all together. The amount of juice in your tuna/salmon/chicken might vary, so adjust with a little more or less flour if needed.

A few options, from left to right: cut with a large smoothie straw (fun, but tiring); squeeze between thumb and first finger of both hands to make pyramid shapes; use a pastry cutter.

You can either cut the rolled dough out directly on a baking sheet and break the treats up during the baking cycle . . .

Or separate them before baking. A fluted pastry cutter makes the treats separate easily.

That’s it! Put them in a decorative bag and make a cat happy this season!

Cats will love these treats!